There are two ways to access a donation without a report or export:
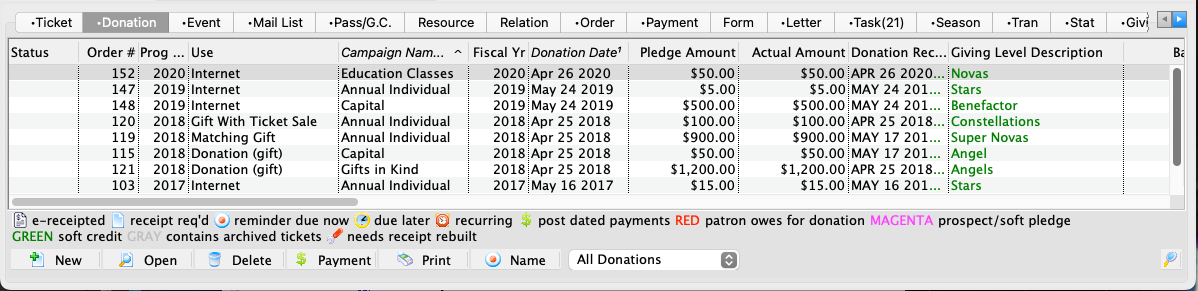

Patron Donation Tab
For each patron via the Patron Donation Tab
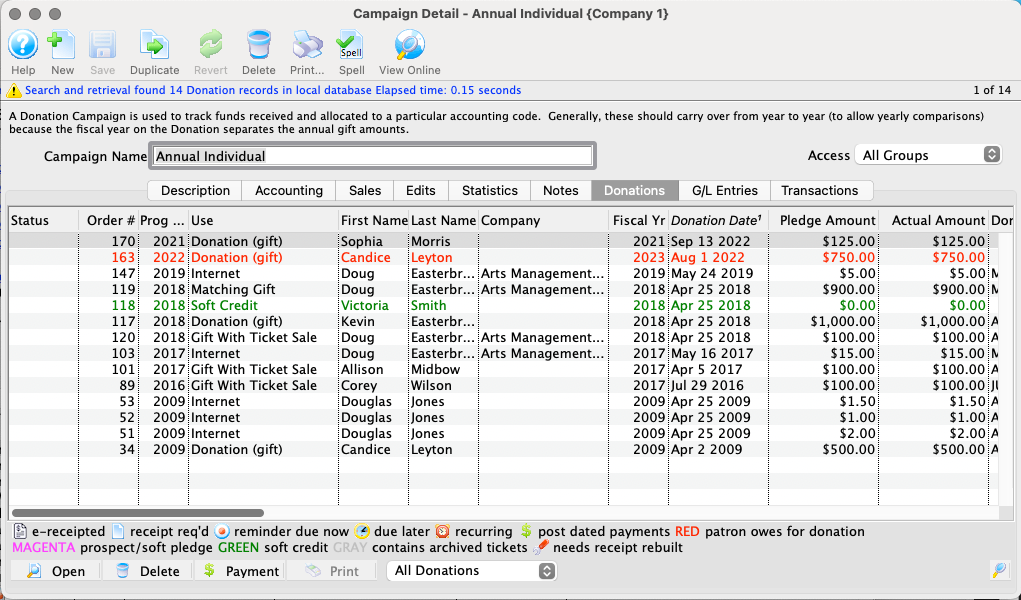

Campaign Donation Tab
For each campaign via the Campaign Detail Window >> Donations Tab
From either location, you can open the Donation Detail Window by selecting a single record in the list and double-clicking or clicking the Open button.


Donation List Context Menu
The context menu from either location provides a variety of direct options, including:
Detail Window Top
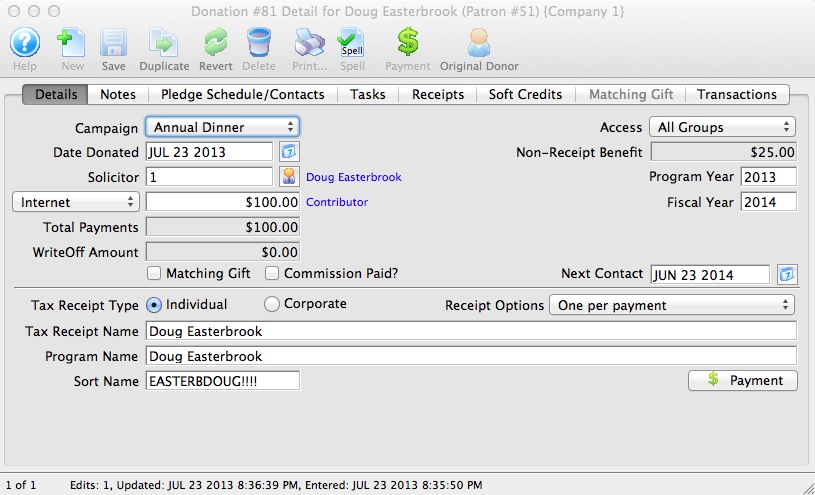
The Donation Detail window can be viewed via the Open button or double-clicking an individual donation record. This window can be accessed from several places, including:
- The Patron Donation Tab
- The Campaign Detail Window >> Donations Tab
- The Order Window >> Donation Screen
Toolbar Top

New Button
Inserts a new donation.

Save Button
Saves changes made to the current donation.

Revert Button
Reverts changes made to the donation back to the last saved point.

Delete Button
Removes the donation so long as all receipts and payments have already been removed.

Print Button
Generates a report displaying the donation details.

Spellcheck Button
Checks the spelling within the data entry fields.
Payment Button
Opens the Payment Screen to add a payment to the donation order.
Create Recurring Template Button
Opens a blank Recurring Template Detail Window to insert a new recurring donation template.
Details Tab Top
The Details Tab contains the critical information for every donation record and is the first place that an employee enters donation information.
Campaign
A dropdown list of all available donation campaigns. Every donation requires one donation campaign to be selected.
Date Donated
The date a donation was made. By default, this will be the computer date that the record was created. If the donation differs from this default computer date, it can be manually back-dated. You can back-date by up to three months into a prior calendar year.
Note that Revenue Canada states that if the donation date and date entered into the system are different, both must be displayed on a tax receipt.
Solicitor
A dropdown to select the person responsible for receiving the donation. Available solicitors must exist as an employee.
Donation Type
The Donation Type choice affects whether the Gift Amount hits the G/L to create a receivable.
-
Prospect
- Indicates a possible future donation.
- For tracking a list of prospective donors throughout the moves management process.
- Pledge amount NOT sent to the G/L.
- When selected, presents the following message in blue text:
Long term prospect who may give if nurtured appropriately. Receivables/accounting entries ARE NOT created until this is converted to a gift.
Soft Pledge
- Used for prospects that have indicated an intent to give, but have not signed any paperwork.
- Soft pledges NOT sent to the G/L.
Hard Pledge
- Classifies donations where the donor has signed a pledge card and needs to be sent reminders to donate.
- Pledge amount sent to the G/L as a receivable (as per IRS/CRA reporting requirements for in-hand pledge cards).
Donation (gift)
- Used for regular donations, in-kind gifts, grants, and most donations.
- Intended for gifts where you are reasonably assured you will receive the donation payment in full.
- Gift amount sent to the G/L as a receivable.
Gift Amount
- Total amount of the gift, which could be paid in one payment, multiple partial payments, or in post-dated installment payments.
Total Payment
Total amount of money received in payment for the donation. A donation may be made in the form of a stock and the payment amount may be more of less than the donation amount.
Write Off Amount
The unpaid difference between the Gift Amount and the total payments.
Matching Gift
Checking this Matching Gift flag lets you link this donation to another patron who will also donate as a result of this patron giving a new donation. When checked, this enables the Match Tab.
Commission
Check this Commission Paid box to indicate if a commission was paid to a third party to procure this gift. Theatre Manager will enter the date that the commission was paid.
Access
Specifies the groups of people who can access this donation (in case you wish to restrict who can see/edit this donation)
Non-Receipt Benefit
The amount deducted from the tax receipt to cover taxable benefits received by making the donation. You will not be able to enter a receiptable benefit unless you have set it up in the Campaign Detail Window >> Accounting Tab and, in some cases, the Giving Level Matrix >> Benefits Tab.
Next Contact
By default, the Next Contact Date is eleven months from the date of the donation. This date can be changed should you require a different date from the default. Use it in reports to print a list of donors that need to be contacted to ensure that they give on a regular basis.
Fiscal Year
The Fiscal Year defaults from the campaign setup or, if that is not set, then from the current fiscal year in Company Preferences >> Accounting Tab. This is the year field that meets IRS/CRS reporting/accounting requirements.
Program Year
The Program Year is generally the same as Fiscal Year. However, you can make it an arbitrary year in the future or past so that you can track totals differently than fiscal year. Changing program year has no effect on financial data. It can be used as selection criteria for creating the program listing while not affecting the IRS/CRA reporting via Fiscal Year.
It defaults to the Fiscal Year unless the Default Program Year has been set in the campaign setup.
Tax Receipt Name
Records the name of the individual who will receive the tax-deductible receipt. Theatre Manager prints built-in receipts with this name field. It could differ from the individual giving the donation if needed. Please refer to tax receipt name considerations when entering this field as there are some legal implications.
Program Name
Records how the patron would like to be recognized on the program. Theatre Manager generates a donor recognition report that ensures your donation list is complete and up-to-date.
The default name Theatre Manager uses for this field is auto-populated in the following order:
- The Default Donor Publication Name in the Patron donor Tab, if provided.
- The Company Name in the patron record, if not empty and if there is no Default Donor Publication Name. In this case, then the donation will also be auto-set to Corporate.
- The patron's name, in the format specified in Company Preferences >> Donations Tab, if the above two options do not apply.
You can manually change the recognition name at any time. If the donor wishes to remain anonymous, this field should read Anonymous. Another common manual override is for gifts in memoriam, in memory of, or in honor of.
Sort Name
The Sort Name is automatically suggested by Theatre Manager and used to position the donor's name in the program. It is initially based on the last name or company, depending on how the default donor name is selected.
In order to maintain a reasonable alphabetic sort order, the sort name starts out with Company (without spaces) for donations marked Corporate and with the following for donations marked Individual:
- The first 7 characters of the Last Name (padded with
!if need be) - The first 7 characters of the First Name (padded with
!if need be) - The first character of the Middle Name (or a single
!if no middle name)
The Sort Name can be manually changed if needed, for example:
- If Program Name is
Anonymous, Sort Name could still beSmithto listAnonymousunderSin the program. - Setting Sort Name to
ZZZZforces it to fall at the end of the program listing. - A gift marked
In Memory of Spot the Family Dog, can be made to fall underSpotif you make this valueSpotor underFamilyif you make this valueFamily.
Receipt Type
Choose how and when receipts should be printed. Read more about the available receipt options and when to use them. Canadian users should review Revenue Canada's policies on issuing tax receipts very carefully as errors can result in heavy fines.
Notes Tab Top
If any of the customized fields listed on this page are made mandatory, you will need to edit the TMdonation.html webpage in order to successfully accept donations online.
The Notes Tab holds donation-specific notes and customized donor fields.
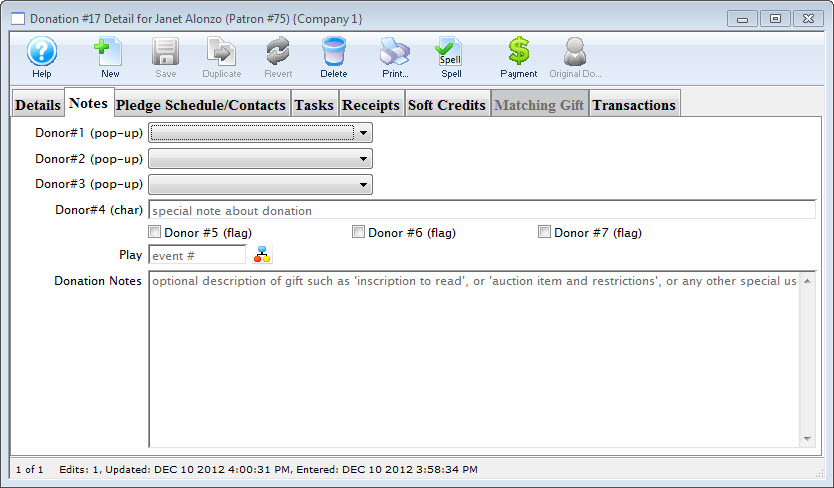
Donor 1 (pop-up)
A customizable pop-up field edited through the Code Tables. This pop-up can be made a mandatory field in Company Preferences.
Donor 2 (pop-up)
A customizable pop-up field edited through the Code Tables. This pop-up can be made a mandatory field in Company Preferences.
Donor 3 (pop-up)
A customizable pop-up field edited through the Code Tables. This pop-up can be made a mandatory field in Company Preferences.
Donor 4 (pop-up)
A customizable character field. This field can be made a mandatory field in Company Preferences.
Donor 5 Field
A customizable checkbox
Donor 6 Field
A customizable checkbox
Donor 7 Field
A customizable checkbox
Play
Allows you to attach an event to this donation (e.g. a fundraiser event or sponsored event)
Donation Notes
General notes about the donation. If the donation is marked as a matching gift, notes to this effect will be automatically placed here.
Pledge Schedule Contacts Tab Top
The Pledge Schedule/Contacts Tab can be used to add pledge schedules and track all donation contacts.
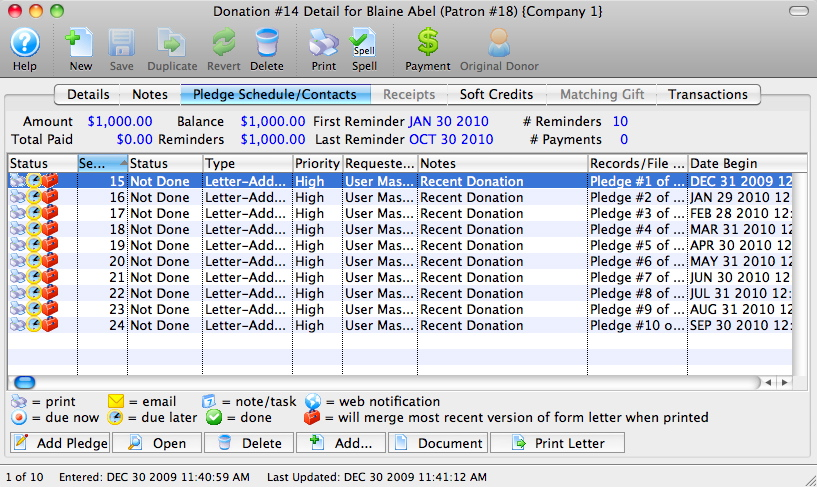

Status Icon Column
Pictorial progress of the letter, pledge, or email
Sequence Number Column
Sequence number of the letter, pledge, or email
Status Column
Progress of the letter, pledge, or email
Type Column
Type of contact detail
Priority Column
Priority rating of the letter, pledge, or email
Requested By Column
Employee who added the correspondence column
Notes Column
Name of the letter or email
Records/File Connected to Correspondence Column
Details of the attached letter, pledge, or email
Date Begin Column
Date that the correspondence is set to send

Add Pledge Button
Adds a scheduled pledge reminder to the donation.

Open Button
Opens the selected letter, pledge, or email.

Delete Button
Deletes the selected letter, pledge, or email.

Add Button
Adds a new letter or email to the donation.

Document Button
Opens the document that corresponds to the selected pledge, letter, or email

Print Letter Button
Prints the selected letter
Pledge Reminder Setup Window Top
The Pledge Setup Window is accessed from the Donation Pledge Schedule/Contacts Tab via the Add or Open buttons.

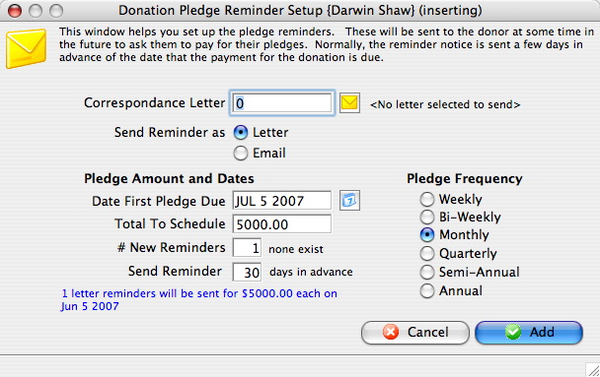
Correspondence Letter
The sequence number of the letter to be sent as the reminder. The envelope icon opens the letter List Window to search and select the correct letter.
Send Reminder As
A radio button option to send the letter either as a physical printer letter or as an email.
Date First Pledge Due
The date that the first reminder will be sent.
Total To Schedule
The pledge amount to be added to the reminder schedule.
Number New Reminders
The number of pledge reminders to add to the donation.
Send Reminder
The number of days ahead of the pledge due date that the letter/email should be sent out.
Pledge Frequency
The amount of time that reminders are to be spread out over. The options are Weekly, Bi-Weekly, Monthly, Quarterly, Semi-Annually, or Annually.
Tasks Tab Top
The Tasks Tab holds tasks related to the donation. Tasks added here also show up on the Patron Tasks Tab, but not all patron tasks will appear on this donation record.
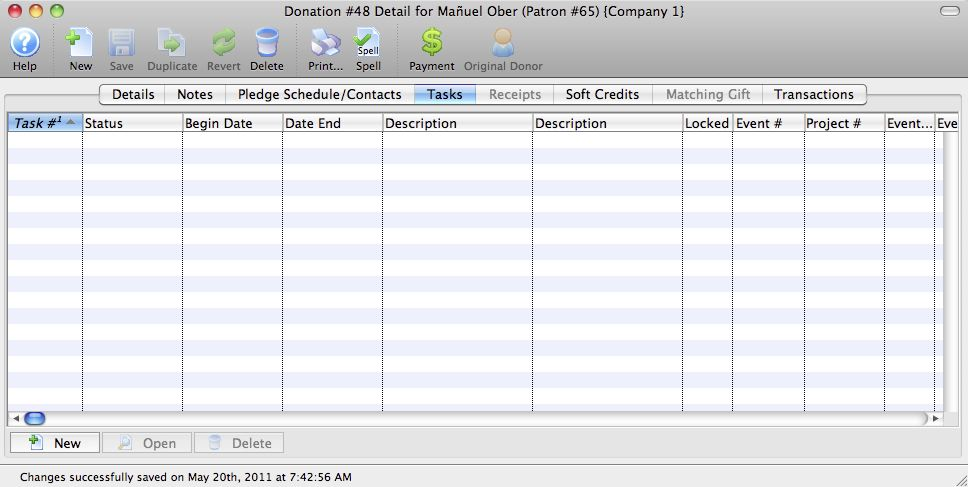
Task Number Column
The sequence number assigned by the database to the task
Status Column
The current status of the task. The options are Done, Not Done, In Progress, or Cancelled.
Begin Date Column
Date the task is set to begin
Date End Column
Projected completion date of the task
Description Column
The description of the task
Event Number Column
The event number associated with the task (if any)
Project Number Column
The project number associated with the task (if any)

New Button
Opens the Task Detail Window to insert a new task attached to the donation.
Open Button
Opens the Task Detail Window to view or edit the selected task.
Delete Button
Deletes the selected task.
Receipts Tab Top
In this Receipts Tab, you can add, edit, and delete donation receipt information.
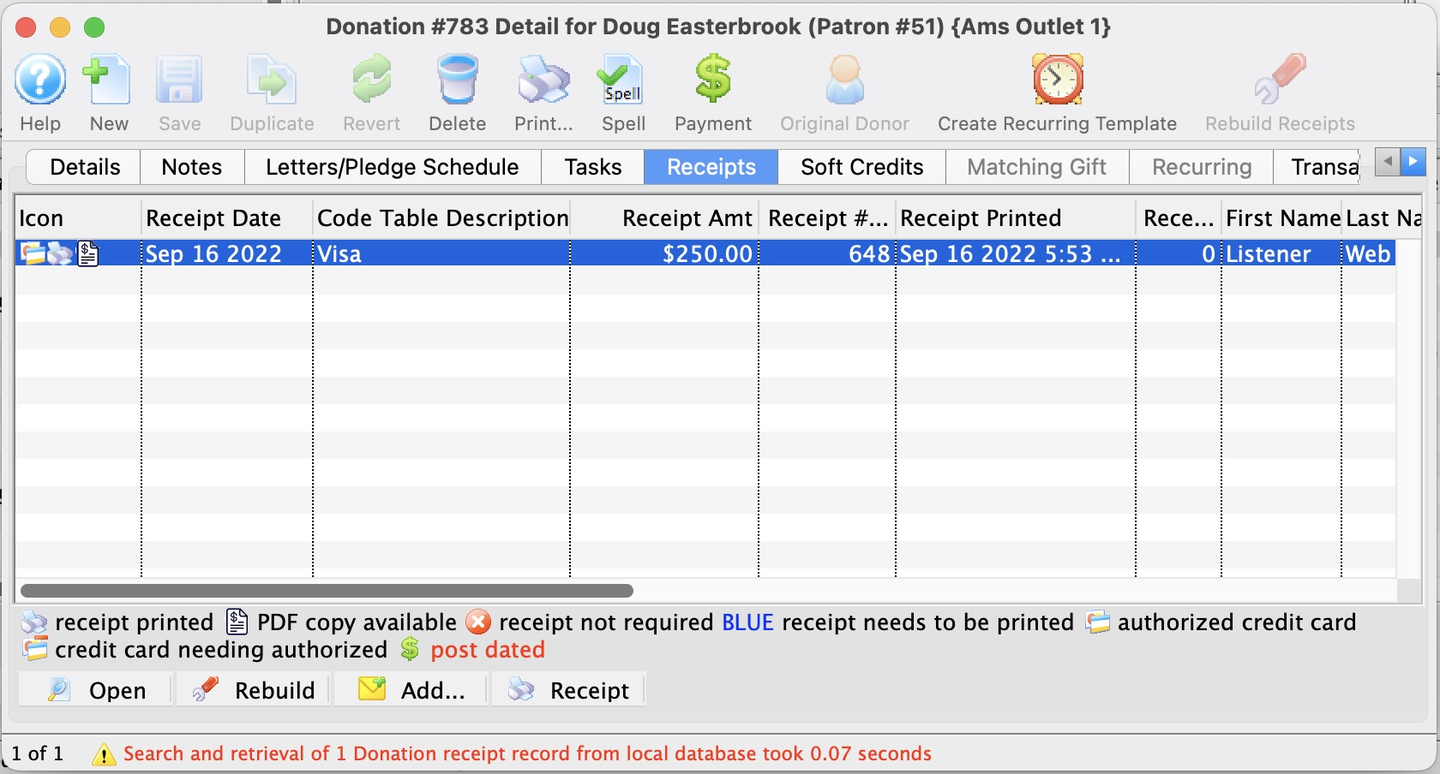
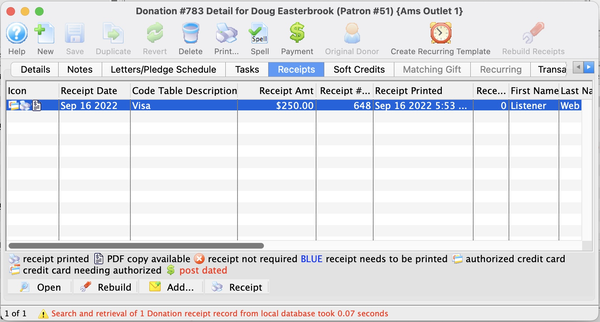
Receipt Date Column
The date the receipt was created (i.e. the day the payment was received)
Description Column
The method of payment received
Receipt Amount Column
The amount the receipt was issued for
Receipt Number Column
The number of the receipt. This number is set up in Company Preferences >> Donations Tab.
Receipt Printed Date Column
Date that the receipt was printed
Receipt Print Count Column
Number of times the receipt has been printed
Open Button
Opens the Edit Manual Receipt Window for manually adjusting or printing the receipt
Delete Button
Deletes the selected receipt. If after the receipt is deleted the total donation is greater than the receipted amount, Theatre Manager will rebuild the order and recreate the receipts.
Add Button
Adds a letter to the selected payment

Receipt Button
Prints a ticket receipt for the selected payment
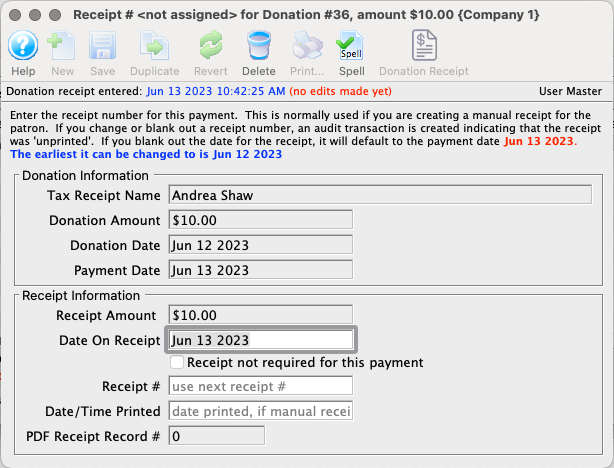
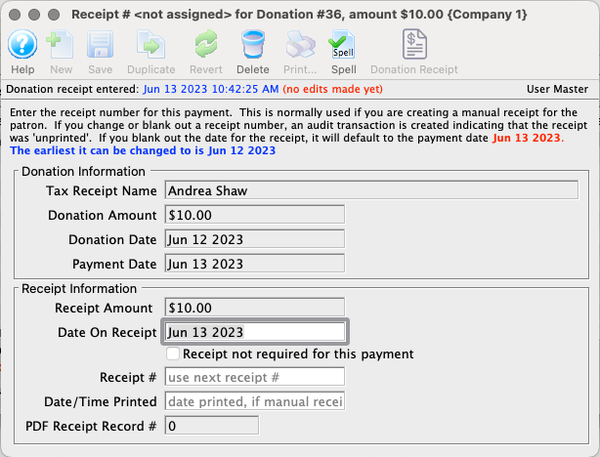
Receipt Detail Window Top
Read the introduction to charitable receipts before proceeding.
The Receipt Detail Window is accessed from the Open button on the Donation Receipt Tab.
New Button
Not available in this window
Save Button
Saves any active edits to the current detail window.

Duplicate Button
Not available in this window
Revert Button
Returns the window to its last-saved values.
Delete Button
Deletes the current receipt. If clicked, a popup prompt will appear asking if you want to create a new receipt record to replace the one you are deleting. Similar to un-printing a receipt.
Print Button
Not available in this window

Donation Receipt Button
Not available in this window
Donation Information Top
Tax Receipt Name
The patron name as it should appear on the receipt (as entered on the Donation Details Tab.
Donation Amount
The total amount of the donation that this receipt is for.
Donation Date
The date of the donation that this receipt is for.
Payment Date
Date of the payment that this receipt represents.
Receipt Information Top
Receipt Amount
The payment amount that this receipt is for.
Date on Receipt
The date that should appear on the receipt. Usually this matches the payment date, but there are occasional situations when this should be manually set.
Receipt Not Required for This Payment
When checked, this marks the payment as non-receiptable and stops Theatre Manager from creating a receipt record.
Receipt Number
Theatre Manager automatically sets the receipt number to the next number as set up in Company Preferences >> Donation Receipts Tab. This value can be changed to match the manual receipt if it has not been set up.
Date and Time Printed
Theatre Manager automatically completes with the current date and time. This can be manually changed if needed.


Set Reprint Button
This button only appears on the window if the receipt has already been printed. It effectively un-prints the receipt to enable manual or batch reprinting. Clicking the Set Reprint button is equivalent to clearing the Date/Time Printed field so that is blank.
PDF Receipt Record Number
A Theatre Manager generated reference number for the printed PDF version of the receipt.
Soft Credits Tab Top
The Soft Credits Tab shows the details of soft credits associated with a specific donation.
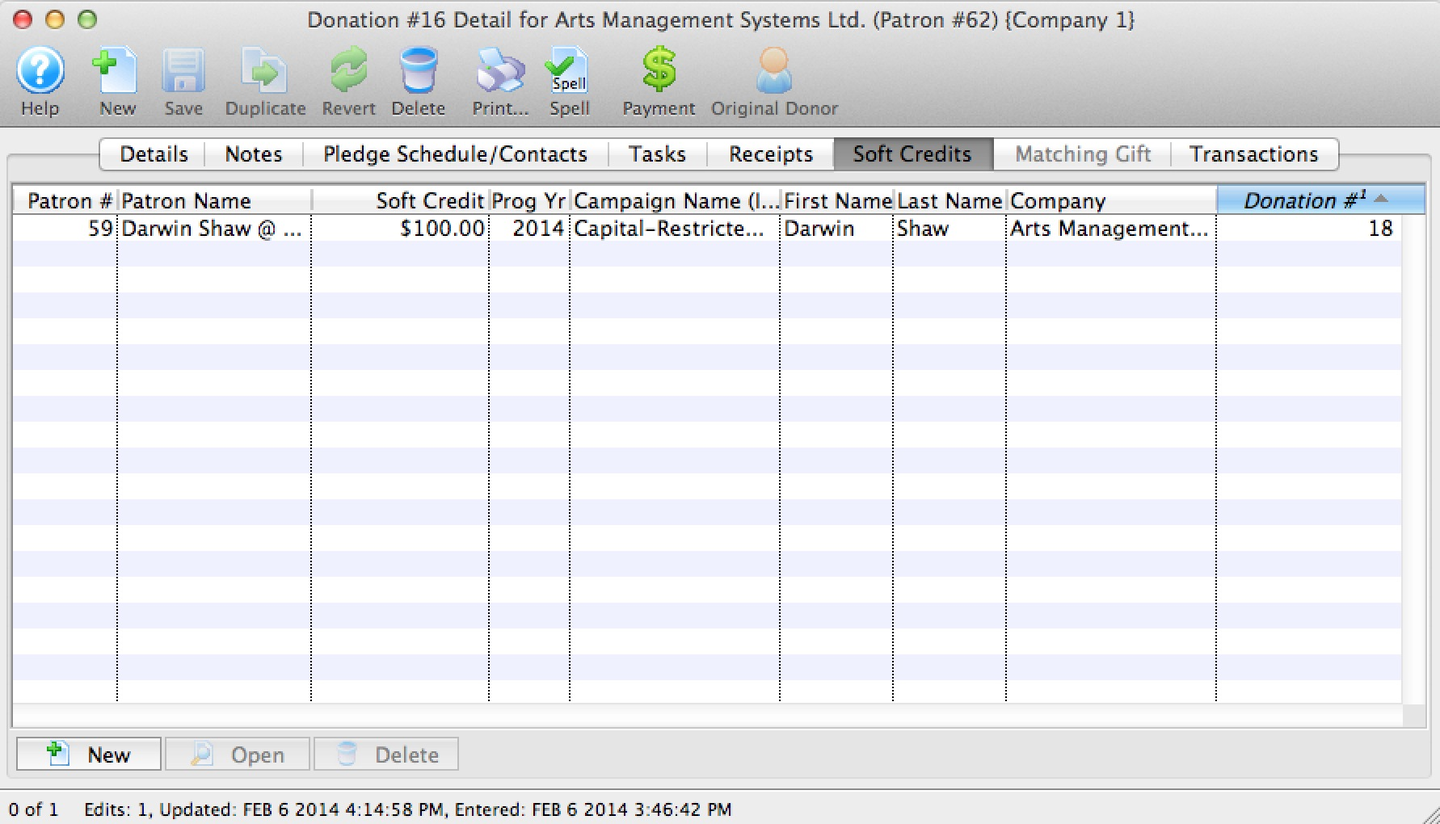

Patron Number Column
The patron reference number for the patron associated with the soft credit
Patron Name Column
First and last name of the associated patron
Soft Credit Column
Amount of the donation that the associated patron should be recognized for
Program Year Column
Year in which the patron should be recognized in publications
Campaign Name Column
Campaign that the donation was contributed towards
First Name Column
First name of the associated patron
Last Name Column
Last name of the associated patron
Company Column
The company name of the associated patron
New Button
Inserts a new soft credit via the Soft Credit Setup Window
Open Button
Opens the Soft Credit Setup Window to view or edit the selected soft credit record
Delete Button
Deletes the selected soft credit
Soft Credit Setup Window Top
The Soft Credit Setup Window is accessed from the Donation Soft Credits Tab via the Add or Open buttons.
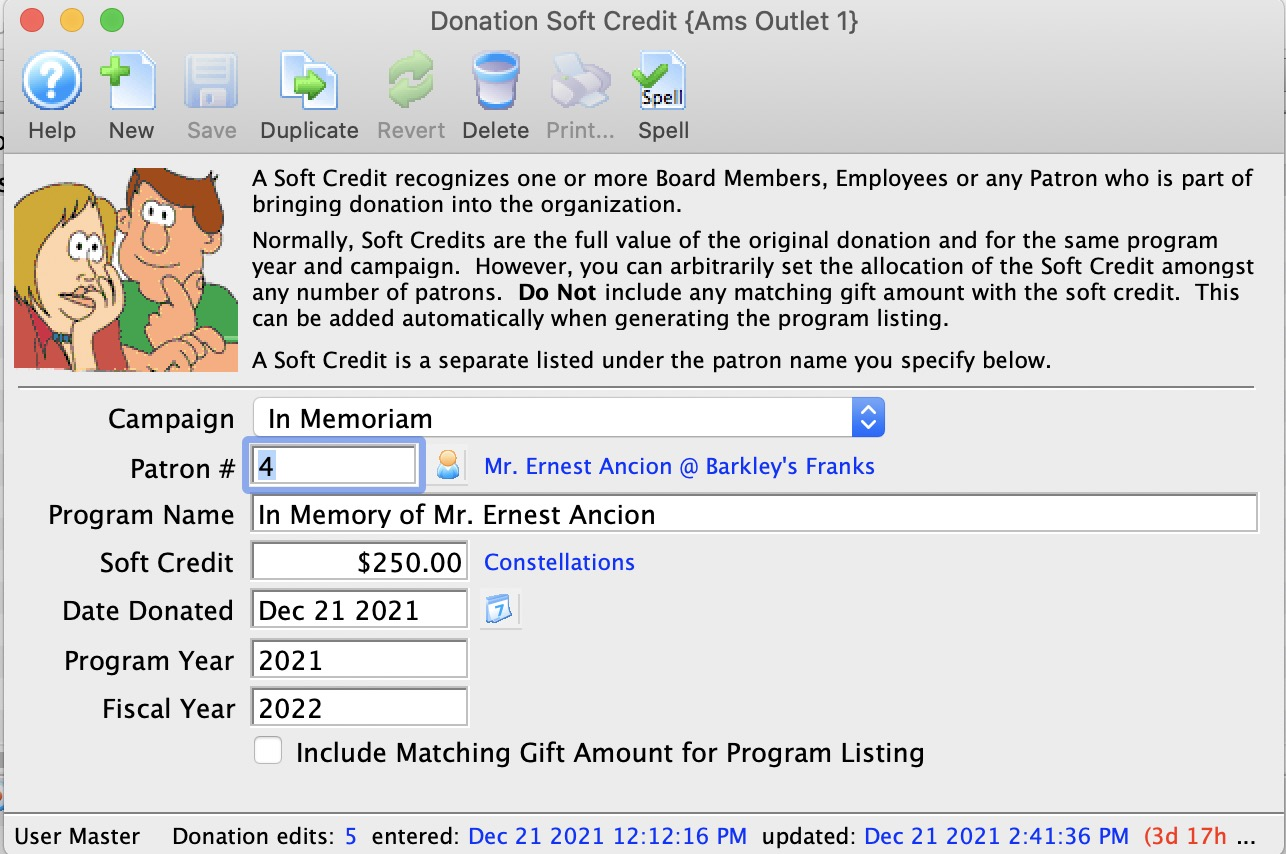

Patron Number
Patron account for the patron who should receive the soft credit. The patron search icon opens the Contact List to search and select a patron record.
Soft Credit
Amount of the soft credit that you wish to add. This assigns a giving level to the credit.
Campaign
This allows you to set the soft credit for a different campaign than the original donation. For example, the person who solicited a corporate donation could receive soft credits on an individual campaign.
Program Year
Determines which program year this soft credit will apply to for the program listing.
Fiscal Year
Determines which fiscal year this soft credit will apply to.
Include Matching Gift Amount
When checked, includes the matching gift amount when determining program list recognition.
Matching Gift Tab Top
The Matching Gift Tab shows the details of the matching gift associated with the donation. The tab becomes available when the matching gift checkbox is checked on the Details Tab. Read more about how to add a matching gift.
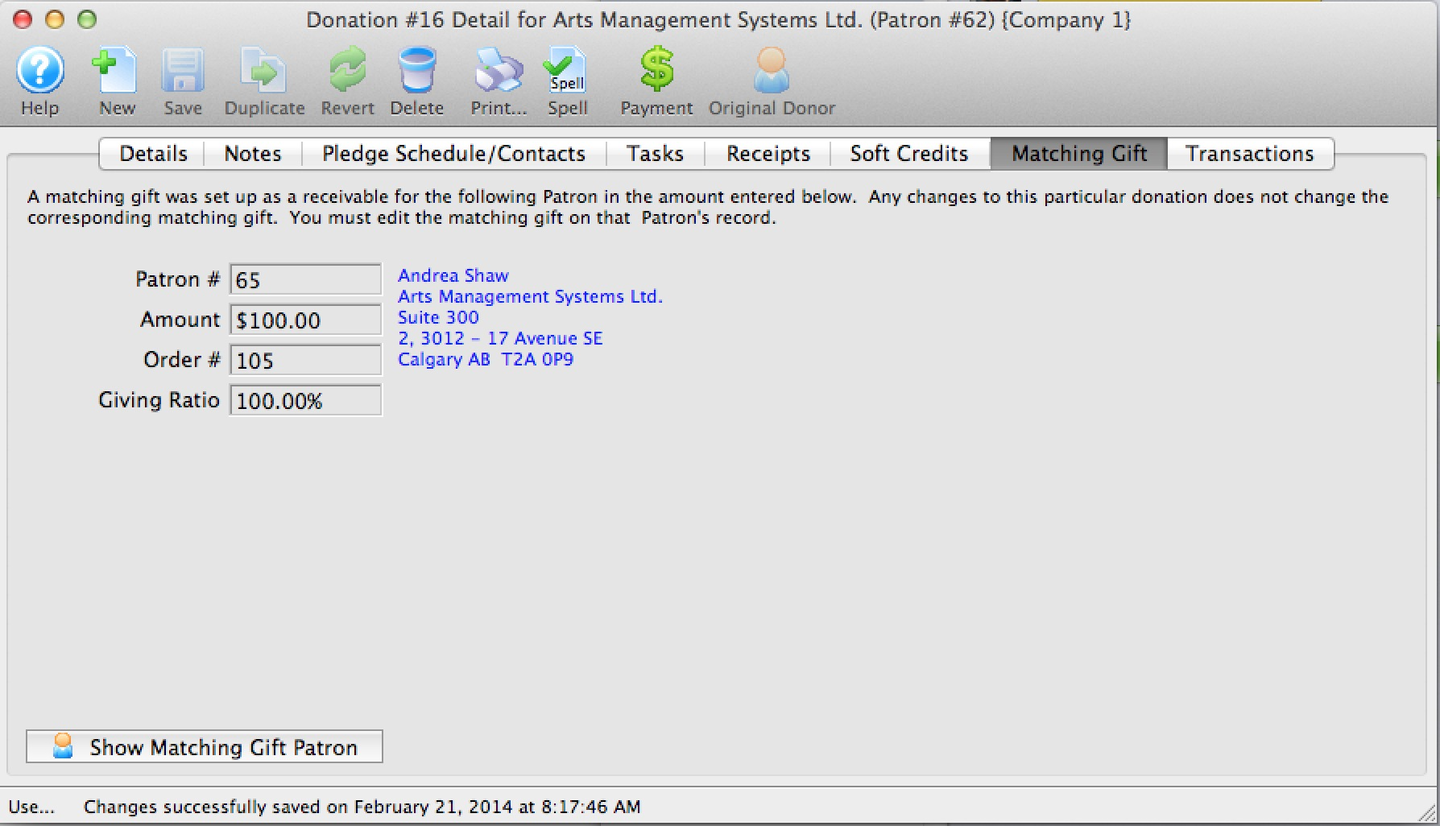

Patron
Patron reference number for the patron who is matching this donation. The patron account selected must be setup as a Matching Gift Company before it can be selected on this tab.
Amount
Value of the donation that the matching gift patron will make
Order Number
Order reference number in the matching gift patron record
Giving Ratio
Percentage of the matching gift amount to the original donation amount

Show Matching Gift Patron Button
Opens the Patron Window for the matching gift patron
Recurring Tab Top
Read more about recurring donations before proceeding.
If the donation associated with this detail record was generated from a recurring template, then the Recurring Tab displays relevant associated template information.
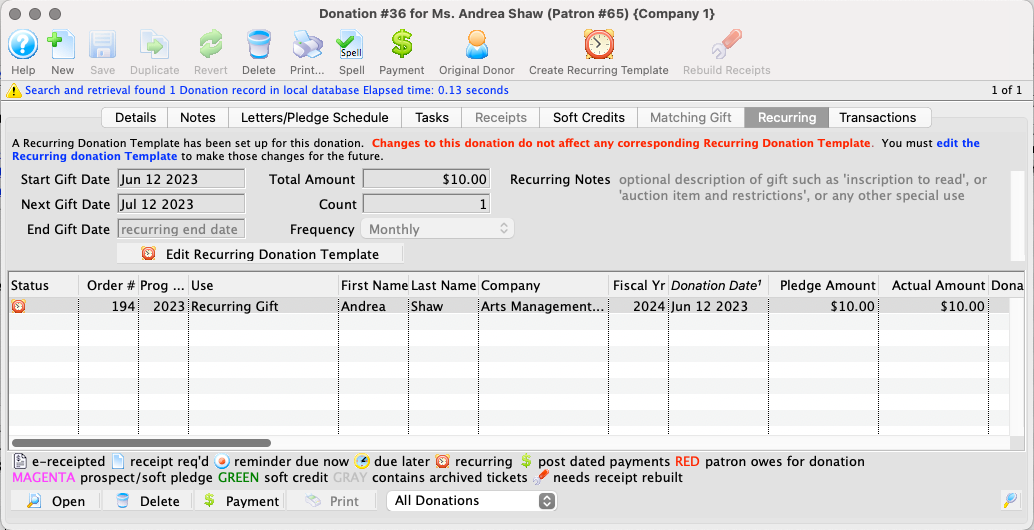

Start Gift Date
The first donation date associated with the template.
Next Gift Date
The next (future) date that a donation will be created from the associated template.
End Gift Date
If provided, the last date that the template should generate donations.
Total Amount
The donation amount for each occurrence of the recurring donation, as setup in the template.
Count
The number of donations created to date based on the associated template.
Frequency
The frequency that recurring donations should be created from the associated template.

Edit Recurring Template Button
Opens the Recurring Template Detail Window for viewing or editing.
Open Button
Opens the Donation Detail Window for the selected donation from the table. The table lists all donations created in association with the recurring template.
Delete Button
Deletes the selected donation from the table. As with deletion of any donation record, all letters, payments, and receipts must be removed before the donation record can be deleted.

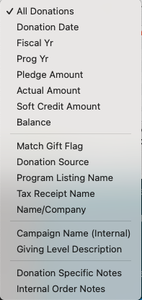
Search/Filter Dropdown
In the case of a longstanding recurring donation, the table can contain a lot of donation records. Use this dropdown to select a filter field, enter appropriate parameters, and click the magnifying glass icon to filter which donations are visible in the list.
Transactions Tab Top
The Transactions Tab lists all transactions associated with the donation.
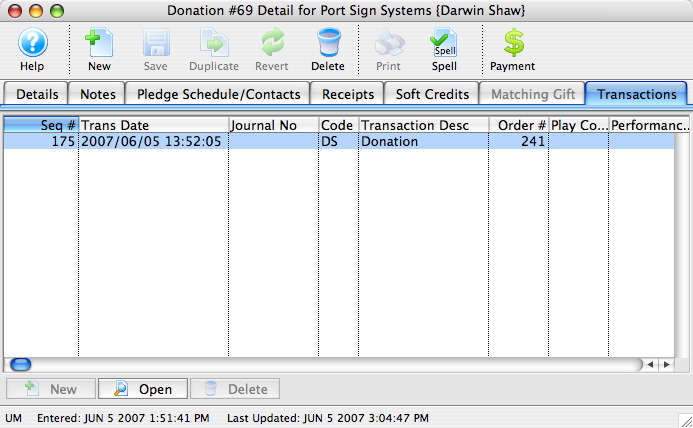
Seq Number Column
Reference number for the transaction
Trans Date Column
Date that the transaction took place
Journal Number Column
Journal entry reference number
Code Column
Reference code used to determine the type of transaction
Transaction Desc Column
Brief description of what happened in the transaction
Order Number Column
Reference number for the order containing the transaction
Play Code Column
Event code for the event associated with the donation (if any)
Performance Code Column
Performance code for the performance associated with the donation (if any)
Open Button
Opens the Transaction Detail Window for viewing
Sample Scenarios Top
Before proceeding, please read the introduction to donation management.
Below is a list of common donation scenarios. Each has a brief description of how to use Theatre Manager to handle the donation type.
Paid at Time of Entry Top
A single donation is one that is entered, paid for and receipted at one time. This is a very common donation type and the easiest one to start with if you are new to Theatre Manager. The basic steps are:
- Insert a new donation (providing amount, campaign, tax receipt name, tax receipt option, etc.).
- Apply a payment.
- Add a letter/email acknowledging the gift (optional).
- Print the tax receipt at time of sale (or later).
Paid in Installments Top
A single donation with a payment plan (post-dated) is very similar to a donation with a single payment at time of sale. The basic steps are:
- Insert a new donation (providing amount, campaign, tax receipt name, selecting annual statement tax receipt option etc.).
- Setup post-dated payments (credit card, EFT, or checks if they give you all the checks in hand).
- Add a letter/email acknowledging the gift (optional).
- Print the tax receipt (now, later when each payment arrives, or once in an annual receipt at end of year).
Pledge to Send Payments Later Top
A single donation without payment in full (either as a single payment or post-dated payments) means that the customer promises to send check(s)/payment(s) in the future in response to a reminder to pay. The basic steps are:
- Insert a new donation (providing amount, campaign, tax receipt name, selecting annual statement tax receipt option etc.).
- On the Correspondence Tab of the donation, set up a pledge reminder letter/email for the appropriate frequency.
- Add a letter/email acknowledging the gift (optional).
- When each payment comes in, look up the donation and apply the payment.
- Print the tax receipt (later when each payment arrives or once in an annual receipt at end of year).
- Use the report Patrons Behind in Pledge Payments to manage who has received a reminder but hasn't yet paid.
Recurring Donation that Repeats Forever Top
A donation that repeats forever (usually monthly, but not necessarily) needs to be entered once and then setup to recur. The next donation is automatically inserted/generated on the appropriate date. (Any existing donation can be turned into recurring this way.) The suggested steps are:
- Insert a donation like the single donation with one payment (select Annual Statement Receipt for the tax receipt type).
- Create a recurring template from the individual donation.
- Set a frequency of occurrence (e.g. weekly, monthly ,quarterly, etc.).
- Pick a payment method (credit card, EFT, or On Account if you will call them each time).
- Run end-of-day each day so that on the appropriate date, Theatre Manager will insert a new donation and payment as specified in the recurring template.
Non-Receiptable Benefit Amount Top
A donation with a benefit amount is entered and paid for like any other donation. The only difference is that the campaign allocated to the donation has a benefit amount assigned to each giving level. (You can allow the benefit amount to be optional, meaning that the patron does not have to take the benefit.) The basic steps are:
- Insert the donation.
- Modify the benefit amount (optional).
- Follow any of the previous examples for post-dated, pledge or single payment.
- Tax-receipts will deduct the benefit amount for IRS or CRA purposes (e.g.
thanks for your donation of X, of which Y is a non-receiptable benefit), while allowing you to recognize the full donation value.
Prospect, Grant, and Foundation Gifts Top
A government grant or foundation gift is the same as a single donation. Simply enter it. However, you may want to do the following:
- Enter the donation and set the Source to
prospectwhen you start applying (optional). - Create a task for the donation and on the Documents Tab, upload any related documents pertinent to the application process).
- When the grant/gift is approved, update the donation amount as needed and change the Source from
prospecttodonation. - Apply payments as they come in.
- If there are interim reports, save those to the tracking task.
Restricted Donations, Capital Campaigns, and Gaming Revenue Top
Generally, restricted donations are those that can only be used for a specific purpose or are required to be put into a separate bank account (or tracked appropriately in the G/L). In some locations, funds MUST be placed into a separate account (e.g. gaming revenue). These can be handled as follows:
- Set up a campaign that uses a restricted account.
- Enter the donation as normal.
- Take payment (one-time, post dated, EFT, pledges, etc).
- When end-of-day is done, Theatre Manager will create clearing entries telling you to move funds from your operating account to the appropriate restricted bank account.
- Use your online banking portal to move the appropriate amount.
Multiple Campaigns Top
Some donations need to be split across two or more campaigns. The basic steps are:
- Enter a donation to the first campaign along with the appropriate amount.
- Use the duplicate button to create a new
prospectdonation in the same order.- Update the duplicate record for the next campaign and amount (if the allocation is not equal).
- Change the Source from
prospecttodonation.
- Proceed and pay for the order as you would any other donation.
Alternatively, if you don't want the donations in the same order, just enter a second one and pay each order separately.
Spread Across Multiple Years Top
Some donations are pledged and split across multiple years for ongoing large donations. For example, a patron might pledge 3K a year to the virtuoso fund for a 5-year period. You likely don't want to record the total 15K upfront into the G/L, creating a large accounts payable entry. However, you would also like to keep track of the total amount and the ongoing balance over time. The basic steps in this scenario are:
- Insert a donation for the first year's amount and take payment as normal.
- Create future dated donations for the correct future years, but change the source to
prospectto keep them from creating a receivable record. - On the Correspondence Tab of each future donation, set up a pledge reminder letter/email for the appropriate frequency.
- As payments are received in the future, change those donations from
prospecttodonation.
Seat Naming Campaign Top
Seat naming campaigns are popular, but require a special setup to track the specific seat locations each donation is associated with. Here's the best way to handle this scenario:
- Create a specific performance for the buy-a-seat campaign.
- Create two prices, one at $0 for the box office and one at $X for online.
- At the box office:
- Sell the required number of free seats to this performance.
- Add a donation to each order for the correct amount and assign to the buy-a-seat campaign.
- Enter any custom inscription notes in Donation Notes.
- Take payment (check, card, EFT, or post dated payments).
- Print tax receipts as required.
- Online:
- Patrons buy the seat they want to sponsor and pay the appropriate price at checkout.
- Periodically (at the end of the campaign) go into the Attendance Tab of the event, select the non-free tickets.
- Right-click to change the price to zero.
- Manually add a donation to each order equivalent to the former ticket price.
- Print tax receipts as required.
At the end of the buy-a-seat sale, you now have a seat map showing the seats that each patron has sponsored as well as a dedicated campaign with the total value of the seats sold and exportable notes for seat plaque engravings.