System Preferences Window Top
System Preferences manage how Theatre Manager behaves for all outlets in the database. The items that can be customized here generally involve system maintenance, overall appearance, and general software behavior that all users will experience. The System Preferences Window is accessed through the main menu via Setup >> System Preferences.

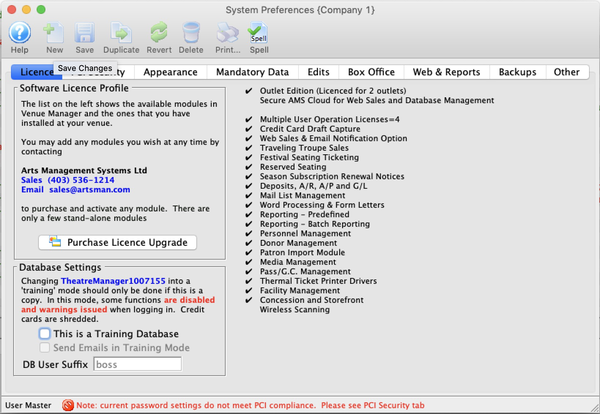
License Tab Top
The License Tab contains information about the components of Theatre Manager currently in use and gives you the ability to purchase upgrades.
Software License Profile Top

Purchase License Upgrade
Allows for the entry of a license upgrade.
Software Features
- This is a list of all the possible features that Theatre Manager offers.
- The features that have checkmarks beside them are the features that the company currently has access to.
- In order to receive additional features that the Theatre Manager has to offer, the organization must purchase a license upgrade.
Database Settings Top
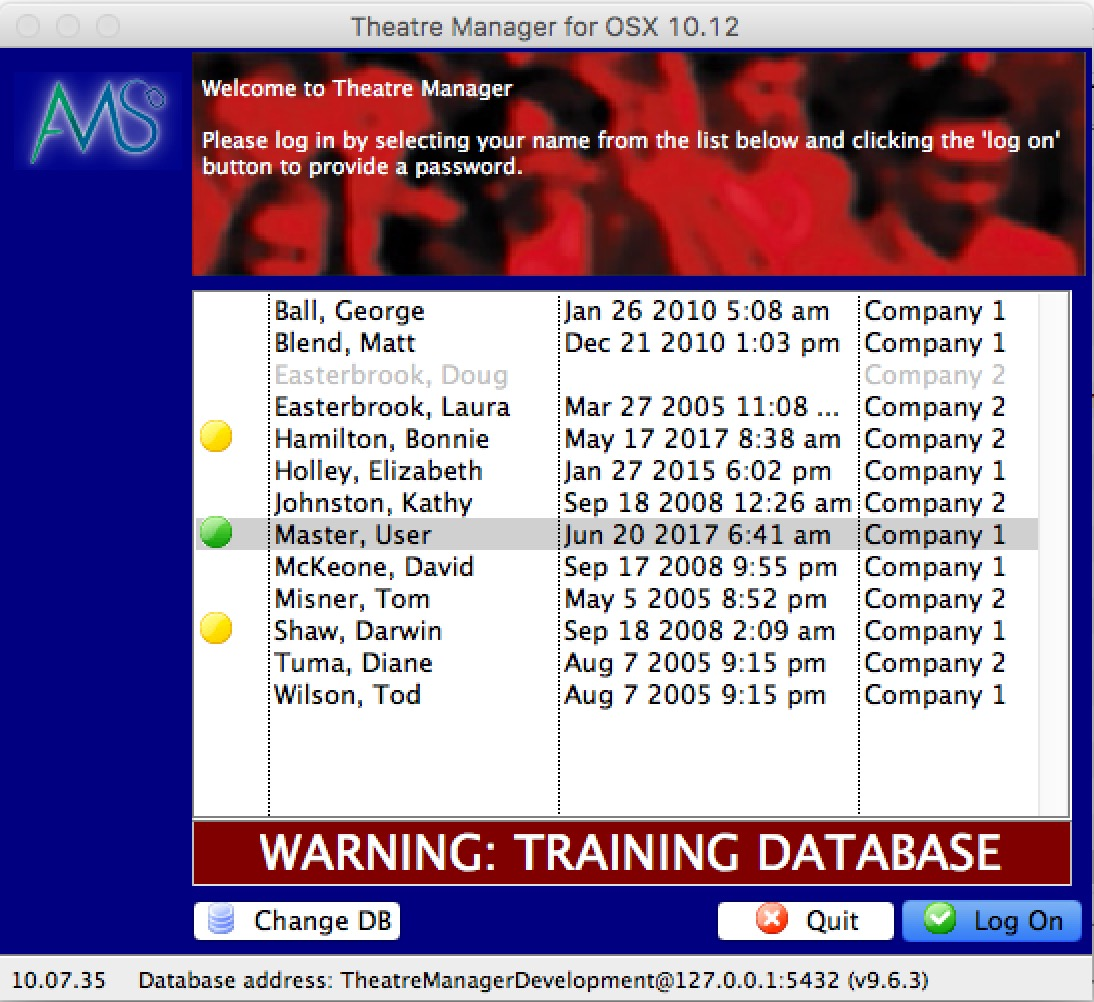
This is a Training Database**
**A venue can set up a database in training mode for use in staff development. This feature should only be used on a copy of a database to flag to Theatre Manager that it will be used in training mode. Training mode means:
- The Login Window is clearly marked that the database is for training purposes.
- All credit cards are automatically shredded immediately so that there are none in the training database.
- The database is set to PCI Schedule 'C' Mode so future credit card payments cannot be saved.
- All merchant accounts are set to emergency mode and this cannot be changed.
- The title of all windows is changed to reflect the training mode.
- If there were remote offsite backups being made, those are disabled just in case.
- Some operational messages (e.g. emails cannot be sent, backups have not occurred, etc.) are no longer displayed.
It is possible to change a training database back into a real one. However, since encrypted credit cards are shredded immediately, they cannot be recovered and are gone forever.
Send Emails in Training Mode
If Web Services (a TM server with a housekeeper) is set up for the training database, you can indicate if the web listeners should send out emails as part of the test process.
DB User Suffix
If you have multiple databases on your server, you should enter a unique database marker for each one. This is appended to the employee ID's in the background so that they are unique per database. We recommend using the last 4 digits of your customer number for your production database, then adding a T (or prod or training) to that number.
PCI Security Tab Top
Before proceeding, read about choosing which PCI schedule (A-EP, C, or D) via the Self-Assessment Questionnaire, which is dependent on your merchant processor, and defining a retention period for credit card information.
Danger! Be Extra Careful!
Users tend to find ways to type credit card information into note fields, which is more of a risk when using Schedule C compliance. Choosing this options requires searching the Contact List for text values that could be credit card information, which is a violation of PCI guidelines.
Caution
Converting from Schedule D to Schedule C will shred all cards currently in the database EXCEPT those set up for future post-dated payments. Since that business already exists, those few cards will remain until the final post-dated payment is taken for the patron. At that time, the card will be shredded immediately. This prevents disruption of existing commitments to patrons. Generally, if you want to take post-dated payments and retain the minimum card data in the database, use Schedule D with 1-day retention.
The PCI Security Tab allows the Master User to set the overall parameters of how employees will log on to the database, the structure of their passwords, and important PCI compliance considerations for managing retention of credit card data.

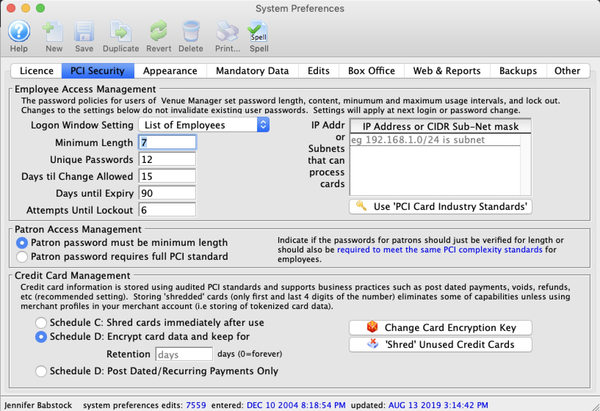
Employee Access Management Top
Logon Window Setting
A dropdown option to have employees login either from a list of employees or using an Access ID and password.
Minimum Length
Sets the minimum length of logon passwords. For PCI compliance, the minimum length is 7 characters.
Unique Passwords
The number of unique passwords required by the system. If set to zero, then passwords are not required to be unique. If set to 2, then the same password may be shared by two employees. If set to 3, then the same password may be shared by three employees.
Days Til Change Allowed
The minimum number of days that a password must be used before it is allowed to be changed.
Days Til Expiry
The maximum number of days that a password may be used. For PCI compliance, this must not exceed 90 days.
Days Til Lockout
This determines how many incorrect attempts an employee may make before Theatre Manager will lock them out of the system and must be manually re-instated.
IP Addresses that Can Accept Cards
PCI documentation indicates that any machines that touch credit card information (e.g. box office stations) are subject to PCI requirements ("in scope"). Here, you can identify which specific machines process credit cards, which means that any other machines on the network (e.g. those used only for reporting or management) will be taken "out of scope" for PCI compliance. To white-list specific machines or subnets of machines that process cards, follow these steps:
- To mark all machines as processing cards, leave the list blank
- To indicate specific machines in scope, enter one or more specific IP address(es) (e.g.
192.168.0.10). - To set a range of machines in scope, enter one or more subnet masks using CIDR format (e.g.
10.10.1.0/24for all machines on the 10.10.1.x subnet, or10.100.0.0/16for all machines on the 10.100.x.x subnet). - To block all machines from processing cards, enter a specific IP address that is not on your network.
You can enter a combination of specific IP addresses and subnet masks. Machines listed in this area will allow credit card information to be entered with card payment methods appearing in the Payment Window as normal. Machines out of scope (as indicated in this area) will automatically exclude card payment methods from the Payment Window so that the workstation user(s) cannot enter any card information.

Use PCI Card Industry Standards Button
Clicking this button changes options to the current PCI Standards for employee passwords and logon attempts.
Patron Access Management Top
Sets the required complexity of patron passwords. There are two level options:
Patron password must be minimum length
- Forces passwords to be at least the same length as employee PCI passwords.
- No other rules are enforced (e.g. required special character and/or number, etc.).
- Normally, this is sufficient and the web pages give a strength meter to people to indicate if the password is good enough, or not.
- This is the default setting because many people have complex enough passwords meeting the length requirement that they use with modification across various sites.
- This option tends to be more patron-friendly as there are fewer stops to the patron to set a highly complex password.
Patron password requires full PCI standards
- Enforces the same password rules that employees have:
- Minimum length as set in employee password settings.
- At least one upper case character * At least one lower case character.
- At least one number.
- At least one special character.
- This is the more secure option, though may cause more patron frustration.
Credit Card Management Top
Schedule C: Shred Cards Immediately After Use
Using an online payment gateway and this setting means that cards will not be stored in the database (e.g. Schedule "C"). The PAN is sent to the processor to get the authorization code and token from the merchant provider. Those are stored in TM (not the card itself) and the merchant token is what is used for voiding cards. It puts the workstation in scope of a PCI device, but not the database.
Schedule D: Encrypted Credit Card Data Schedule "D" compliance with about 120 days of retention is sufficient for most venues, especially if you are using post-dated payments or may have to deal with refunds for cancelled events.
Retention Period The number of days credit card information will be retained before it is shredded in a Schedule D environment. Normally, 90 days will handle most business cases, and the recommended maximum is 365 days. If you set it to one day, then all cards are shredded right away, except those that are saved for post-dated payments.
Schedule D: Post Dated Payments
This option allows storage of encrypted cards for post-dated or recurring payments only. Once the last payment is authorized, the card is shredded. It's effectively the same as the above option with 1-day retention, except that it is far more restrictive about when Theatre Manager can store a card. This setting vastly reduces exposure risk for stored cards under PCI.

Change Card Encryption Key Button
Generates a completely random 60-character key to use as part of the encryption key process that will be unique to the venue and re-encrypt all cards in the database.

Shred Unused Credit Card Button
Immediately shreds credit cards stored longer than the retention period noted above.
Appearance Tab Top
The Appearance Tab contains default text for various areas of Theatre Manager. These fields can be edited to language that best suits the organization.

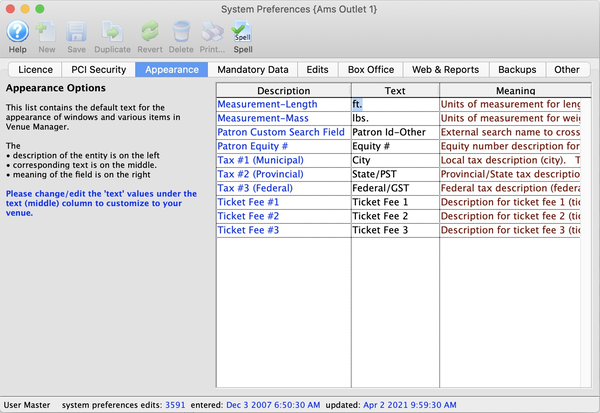
Description Column
The database name of fields available for custom naming. These values cannot be edited.
Text Column
The custom name of the field. Typing a new value in one of these cells and clicking Save rewrites the field name wherever it appears in the system, including for all outlet users.
Meaning
Describes/clarifies how the field is used.
Mandatory Data Tab Top
Before proceeding, read about defining required fields for full versus limited profile patrons.
The Mandatory Data Tab is where you define which fields are required, especially regarding patron accounts. Required fields set here affect all outlets.
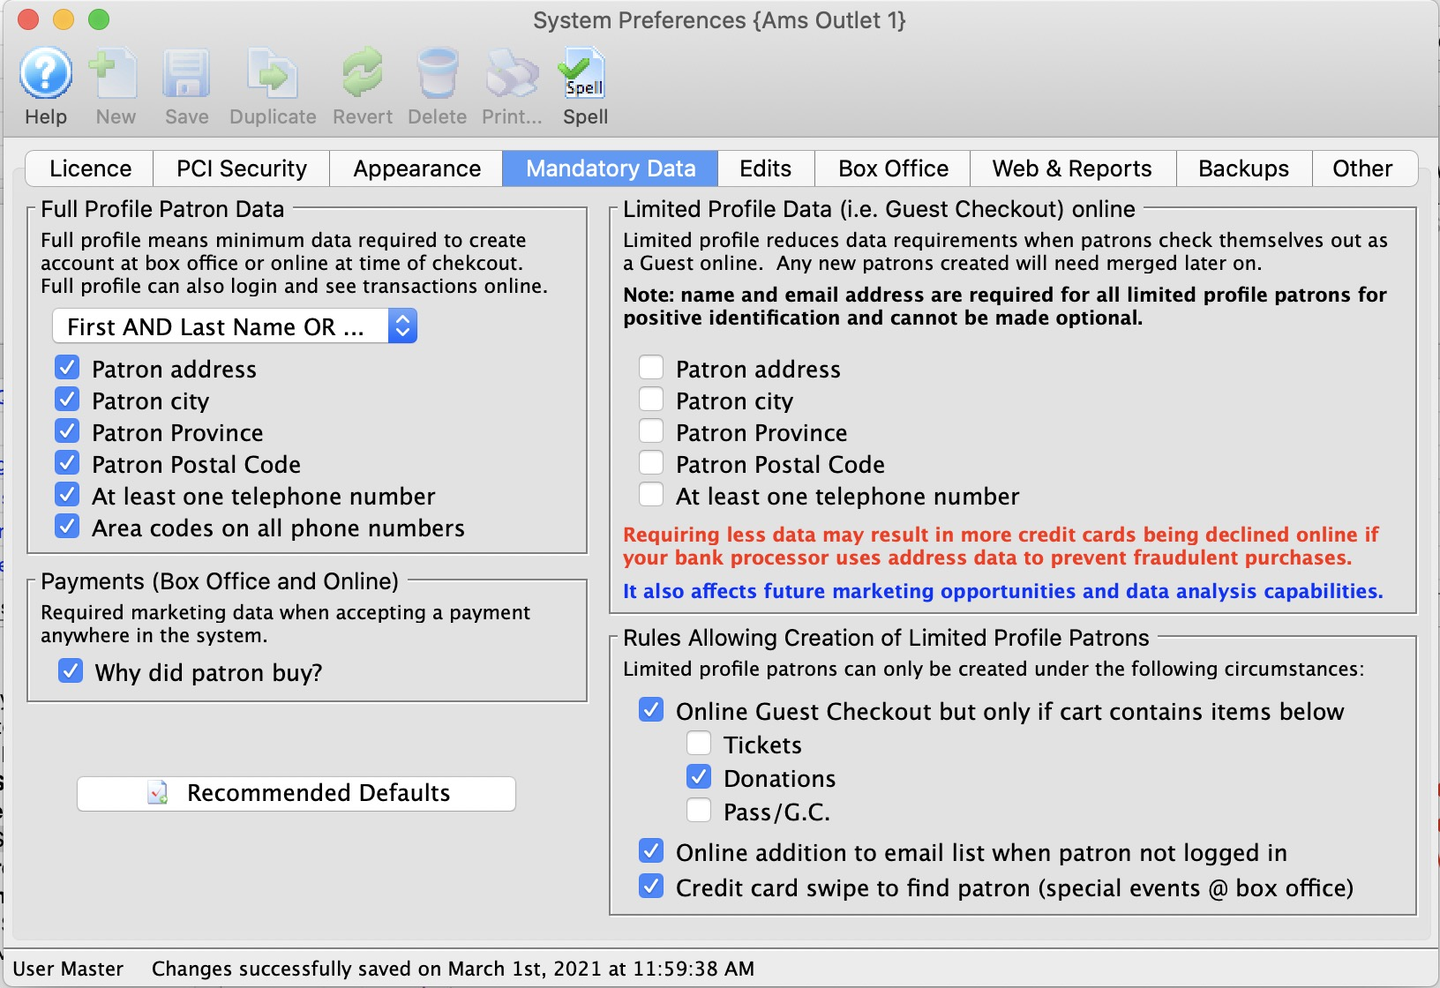
Full Profile Patron Data Top
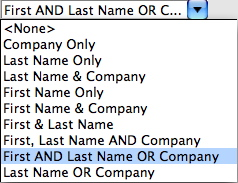
Name Info
Selects which names must be given before a patron record can be saved. Full profile patron information is for BOTH the box office and web patron sale data, unless you are allowing Limited Patron Profiles for online sale.
Patron Address
Checking this box means that the patron's address must be entered before a patron record can be saved. Only one out of the two address lines needs to contain information.
Patron City
Checking this box means that the patron's city must be entered before a patron record can be saved.
Patron Province
Checking this box means that the patron's province must be entered before a patron record can be saved.
Patron Postal Code
Checking this box means that the patron's postal/zip code must be entered before a patron record can be saved.
At Least on Telephone Number
Checking this box will require a minimum of one phone number to be given before a patron record can be saved.
Area Codes on All Phone Numbers
Checking this box will require all phone numbers given to be accompanied by an area code before a patron record can be saved. These days, this option should always be enabled due to the prevalence of 10-digit dialing and cell phones.
Payments (Box Office and Online) Top
Patron Data: Why Did Patron Buy
Checking this box means that the reason the patron made a purchase must be provided before a sale can be completed. Your custom Order Reason to Buy values is entered via:
- A dropdown list that is found on the Payment Window.
- a list window on the web checkout screen if there is a ticket and/or gift certificate in the cart.
- A hidden field in tmTemplates/tmCheckoutDonationReasonToBuy.html containing the default reason to buy for donations. This enables a patron to check out online with only a donation in the shopping cart faster and with fewer questions. If there are no values entered in Code Tables, it will be rejected for online donations.

Recommended Defaults Button
Pressing this button will set the above options to the default settings that Theatre Manager recommends.
Limited Profile Data Top
These are the minimum fields required to proceed with a limited profile account. If you plan to mail tickets AND allow tickets to be sold online with limited profile accounts, then it is prudent to require all mailing address fields.
Rules for Allowing Creation of Limited Profile Patrons Top
This section outlines which conditions/situations allow only a limited profile account.
Full Profile Patron Data Top
Name Info
Selects which names must be given before a patron record can be saved. Full profile patron information is for BOTH the box office and web patron sale data, unless you are allowing Limited Patron Profiles for online sale.
Patron Address
Checking this box means that the patron's address must be entered before a patron record can be saved. Only one out of the two address lines needs to contain information.
Patron City
Checking this box means that the patron's city must be entered before a patron record can be saved.
Patron Province
Checking this box means that the patron's province must be entered before a patron record can be saved.
Patron Postal Code
Checking this box means that the patron's postal/zip code must be entered before a patron record can be saved.
At Least on Telephone Number
Checking this box will require a minimum of one phone number to be given before a patron record can be saved.
Area Codes on All Phone Numbers
Checking this box will require all phone numbers given to be accompanied by an area code before a patron record can be saved. These days, this option should always be enabled due to the prevalence of 10-digit dialing and cell phones.
Payments (Box Office and Online) Top
Patron Data: Why Did Patron Buy
Checking this box means that the reason the patron made a purchase must be provided before a sale can be completed. Your custom Order Reason to Buy values is entered via:
- A dropdown list that is found on the Payment Window.
- A list window on the web checkout screen if there is a ticket and/or gift certificate in the cart.
- A hidden field in tmTemplates/tmCheckoutDonationReasonToBuy.html containing the default reason to buy for donations. This enables a patron to check out online with only a donation in the shopping cart faster and with fewer questions. If there are no values entered in Code Tables, it will be rejected for online donations.
Recommended Defaults Button
Pressing this button will set the above options to the default settings that Theatre Manager recommends.
Limited Profile Data Top
These are the minimum fields required to proceed with a limited profile account. If you plan to mail tickets AND allow tickets to be sold online with limited profile accounts, then it is prudent to require all mailing address fields.
Before proceeding, read about Limited Profile Patrons and guest checkout.
Caution
If guest checkout is enabled, it is HIGHLY RECOMMENDED that all events be set to require print at home so that the customer is emailed their tickets.
This is one of the conditions/situations available as an option to allow limited profile accounts on the System Preferences >> Mandatory Data Tab.
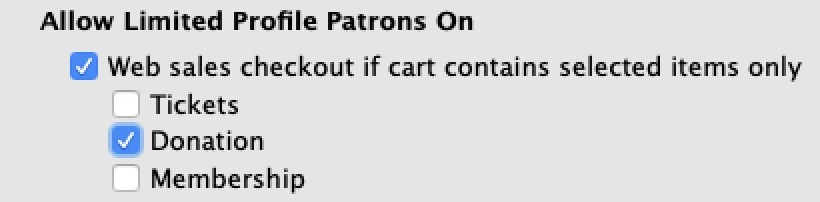

The guest checkout option will appear online based on the current contents of the current shopping cart. The choices are any one of or combination of:
- Tickets
- If there are only tickets in the cart, the patron can check out as a guest.
- Do not set this option if you are selling live-streaming events because the patron who logs into their main account cannot see events in their limited profile patron.
- Donations
- If there are only donations in the cart, the patron can check out as a guest.
- Memberships * If there are only passes/gift certificates in the cart, the patron can check out as a guest.
If multiple items are checked, then the patron can check out using limited profile if only those checked items are in the cart. For example, if donations and tickets are checked, then the patron can use limited profile if a donation and/or ticket are in the cart, but not if a pass is also in the cart.
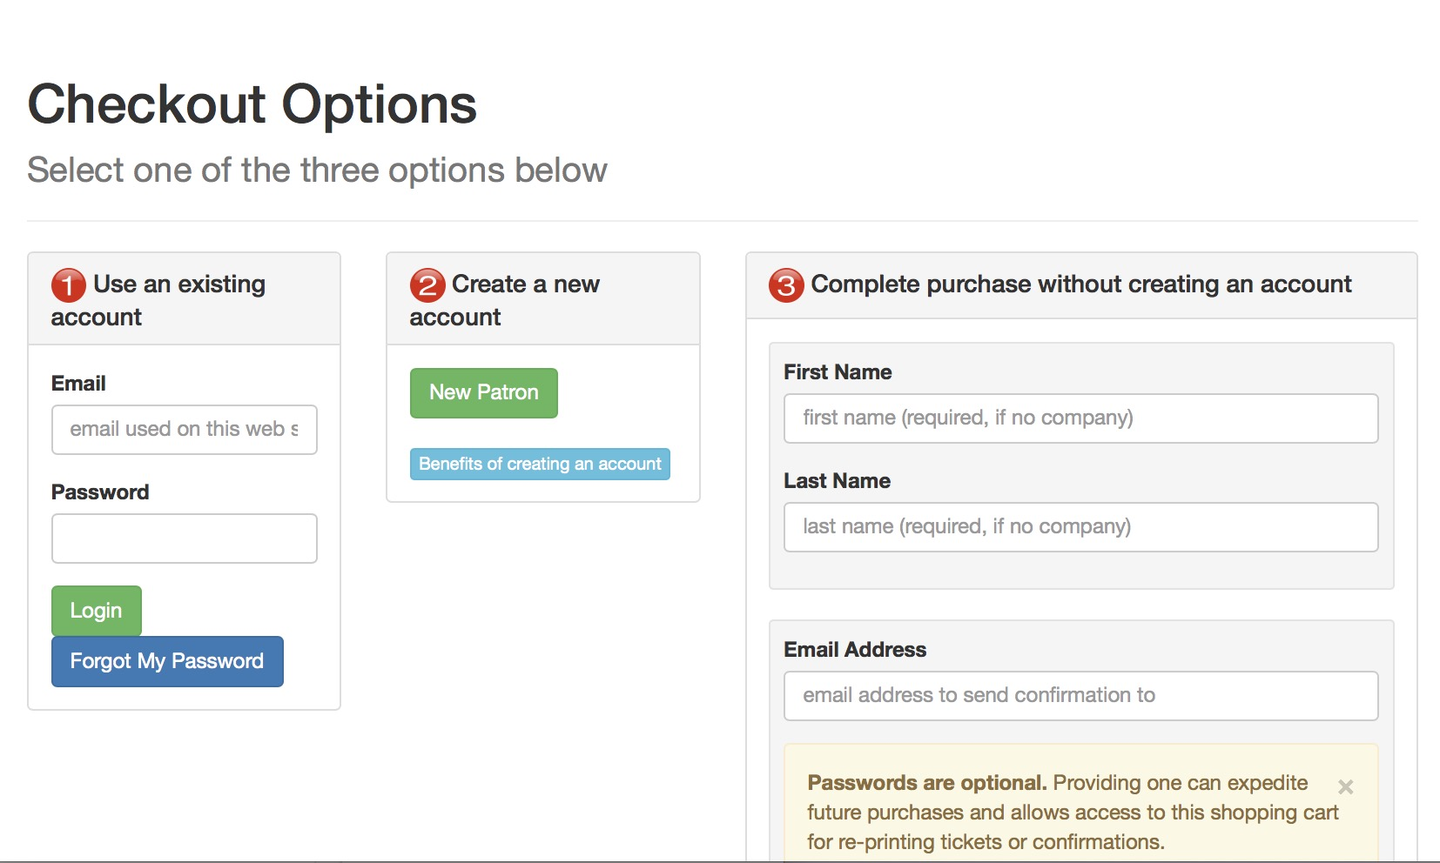
Based on the above cart content selections in System Preferences >> Mandatory Data Tab, the following options will appear to a patron checking out online:
- Use an Existing Account
- The patron will always be provided to option to log into an existing account to complete the purchase.
- This attaches the cart to an existing full profile patron.
- Create a New Account
- The patron will always be provided the option to create a new full profile account with a username and password.
- Complete Purchase Without Creating an Account
- The patron can choose this quick checkout option using only their name and email (at minimum).
- This option creates a new limited profile account in the database.
- If the email address already exists in the database, this new patron will be added to the existing household.
- If the email does not exist, a brand-new household will be created.
- If the patron selects this option but chooses to also provide a password, then a full profile patron will be created.
- A guest checkout cannot log back in online and see their prior purchases.
Before proceeding, read about Limited Profile Patrons and guest checkout and prepare your Box Office staff to be vigilant about finding and merging duplicate patrons.
Before proceeding, read about the Quick Add Mail List Feature.
Caution
This is a built-in Ticketing Site feature of Theatre Manager, but if you wish to place it on your main marketing site, please contact your web designer to implement this advanced web feature in an iframe or equivalent.
This is one of the conditions/situations available as an option to allow limited profile accounts on the System Preferences >> Mandatory Data Tab.
The limited profile patron feature can be used with the Quick Add Mail List feature. The quick form used online for these features requires, at a minimum, first name, last name, and email address.
Implementing this limited profile patron option requires ALL the following:
- The Mail List must be visible on the internet.
- The System Preferences >> Mandatory Data Tab is set to allow limited profile patrons during a Mail List quick add.
- If the patron's email address already exists within the database:
- AND the first and last name match, the existing patron will be added to the Mail List.
- BUT the first and last name do not match, a limited profile patron will be created under the patron owning the email address.
- If the patron's email address does NOT exist, a limited profile patron will be created in the database.
Before proceeding, read about Limited Profile Patrons and guest checkout.
This is one of the conditions/situations available as an option to allow limited profile accounts on the System Preferences >> Mandatory Data Tab.
There is a convenient quick-add feature that creates a patron simply by swiping their credit card. The process works as follows:
- From the Contact List, search for patrons by credit card number.
- Use a swiper device to search for a specific card:
- If the card number is in the database already, Theatre Manager will find the attached patron record(s).
- If the card number does not exist in the database, Theater Manager gives you the option to quick-add a new limited profile patron account using the name on the card.
This feature works well for an admittance process for auctions. If there are bid packets, you can give the patron number created during the swipe and proceed to sell auction items to this patron.
As with any limited profile patron, if you edit the new limited profile account with actual address data, you will be required to provide the minimum information normally required of the box office.
Rules for Allowing Creation of Limited Profile Patrons Top
This section outlines which conditions/situations allow only a limited profile account. Read more about these options above.
Edits Tab Top
The Edits Tab contains patron data management information for Theatre Manager.
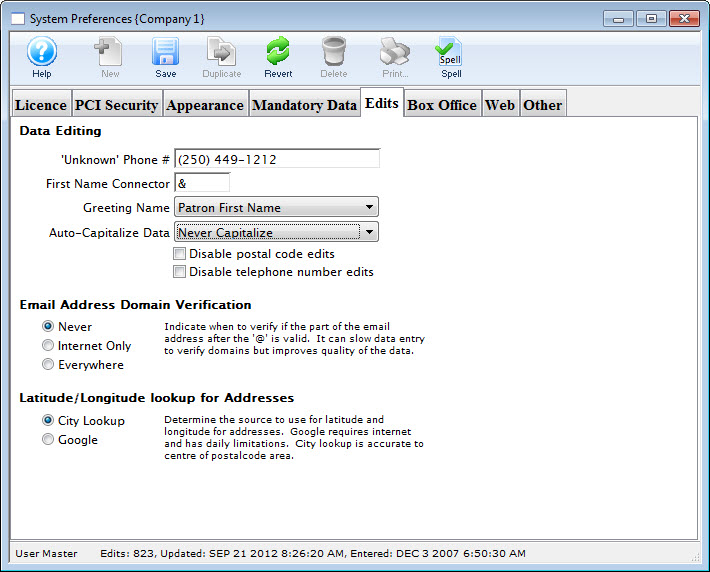
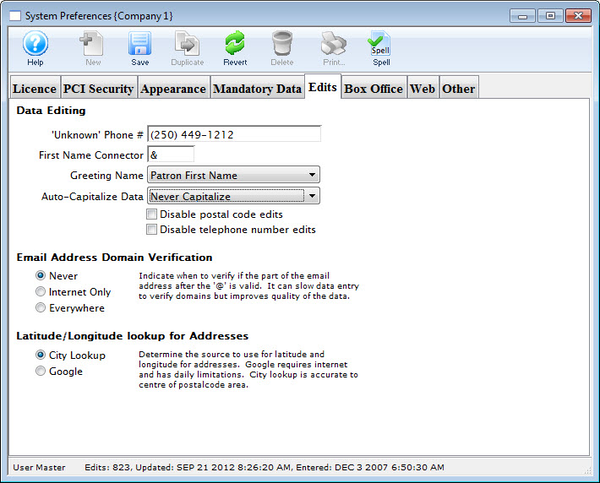
Data Editing Top
Unknown Phone Number
The phone number which can be used if there is no patron phone number. This number will be ignored when checking for multiple patrons, meaning that entering this number on a new patron record will NOT cause a warning popup message to appear.
First Name Connector
The connector which will be used to join first and last names in reports and letters.
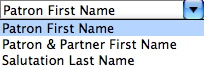
Greeting Name Preference
The greeting preference used when sending material to patrons.
Auto Capitalize
Controls Theatre Manager's ability to set mixed case letters during entry and reduces the necessity to use the shift key. Several methods can be chosen to control this process:
- Never Capitalize
- Removes this option by always accepting exactly what is entered.
- First Time
- Capitalizes the first letter of data entered into a field the first time it is entered.
- When the field is edited, the changes will be saved as entered.
- Mac: Except for
Option-Tab- Capitalizes the first letter of any word entered into a field unless the Option key is held down when Tab is used to move into the next field.
- When the Option key is depressed and Tab is used to move to the next field, the data is recorded as entered.
- Windows: Except for
CTRLClick- Capitalizes the first letter of any word entered into the field unless the CTRL key is held down and clicking is used to move into the next field.
- When the CTRL key is depressed and the click is used to move to the next field, the data is recorded as entered.
- Always Capitalize
- Capitalizes the first letter of any word entered into a field.
Disable Postal Code Edits
If selected, the program will not validate a country's postal/zip code requirements (e.g. Canadian Format as xxx xxx, American Format as xxxxx or xxxxx-xxxx, or New Zealand Format as xxxx).
Disable Telephone Number Edit
If selected, the program will not validate a country's telephone number requirements (e.g. Canadian/American Format as (xxx) xxx - xxxx or New Zealand Format as 0800 xx xx xx or 021 xxx xxxx or 025 xxx xxx or 0Y xxx xxxx where Y is a number between 3 and 9).
Email Address Domain Verification Top
Never
E-mail addresses will not be verified when entered into Theatre Manager.
Internet Only
E-mail addresses will be verified when entered through web sales.
Everywhere
E-mail addresses will always be verified when entered into Theatre Manager. This can slow down data entry, and it is the most accurate.
Latitude/Longitude Lookup for Addresses Top
Determines how patron addresses are geocoded.
Box Office Tab Top
The Box Office Tab lets you set reserved seating hold letter meanings and event/order colors that impact how your Box Office users interact visually with Theatre Manager.

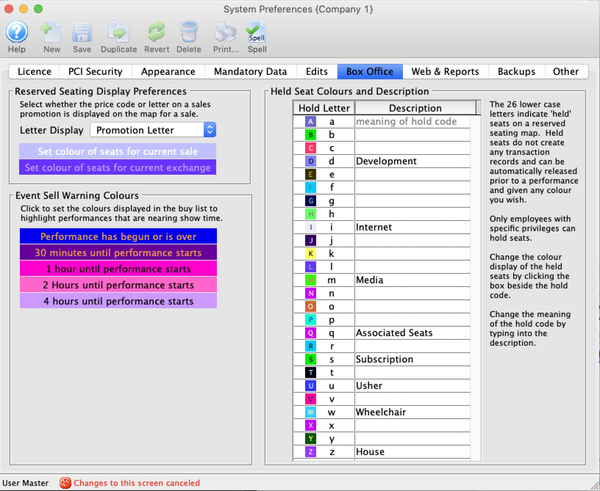
Reserved Seating Display Preferences Top
Letter Display
Determine if the price code or the seat code from the Buy Window shows on the seat in the map display.
If you change the setting to or from Price Code and Promotion Letter, you will need to verify future performances to change the actual letter display on the map.
Set Color of Seats for Current Sale
Click on this box to bring up the Colour Palette Window. You can select both the foreground and background colours.
Set Color of Seats for Current Exchange
Click on this box to bring up the Colour Palette Window. You can select both the foreground and background colours.
Event Sell Warning Colours Top
Performance Has Begun or Is Over
Click on this box to bring up the Colour Palette Window. You can select both the foreground and background colours.
30 Minutes Until Performance Starts
Click on this box to bring up the Colour Palette Window. You can select both the foreground and background colours.
1 Hour Until Performance Starts
Click on this box to bring up the Colour Palette Window. You can select both the foreground and background colours.
2 Hours Until Performance Starts
Click on this box to bring up the Colour Palette Window. You can select both the foreground and background colours.
4 Hours Until Performance Starts
Click on this box to bring up the Colour Palette Window. You can select both the foreground and background colours.
Held Seat Colours and Description Top
Hold Letter
Click on this box to bring up the Colour Palette Window. You can select both the foreground and background colours. Seat hold letters are always represented with lowercase letters.
Hold Description
You can define the meaning of the seat hold code by entering a Description beside each of the 26 lowercase letter codes.
Web And Reports Tab Top
The Web Tab is used to set some global behavior of all web listeners for all outlets in the database such as:
- Are any of them allowed to be active? (this is a global shutdown switch)
- The hold letter to be used for internet sales (common across all outlets)
- The hold letter to be used for social distance or associated seats (common across all outlets)

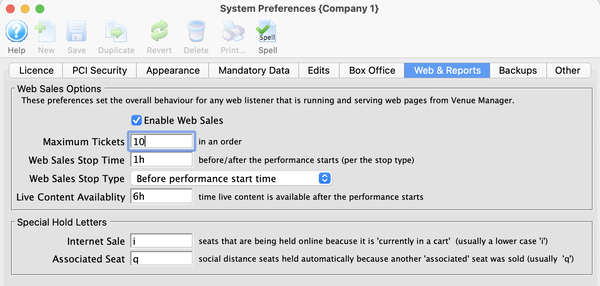
Web Sales Options Top
Enable Web Sales
Checking this box enables the use of the web sales module.
Maximum Tickets
The maximum number of tickets that can be purchased in a single web order. This is a global total for all tickets in a cart and can be overridden on the:
- Event Window to give different limits for an entire event.
- Performance Web Tab to give different limits for single performance.
Regardless of override settings above, at no time can there be more tickets in a cart than the value in this field.
Web Sales Stop Time
Number of minutes before/after the performance start time in which to remove a performance from the internet. This is the default time for all events. This can be overridden in individual events.
The stop time affects emailing of PDF tickets. You cannot email tickets from the box office if the performance is no longer onsale online. This would be after the start time plus/minus any 'web sales stop time'.
Web Sales Stop Type Indicates whether the stop time is before or after the performance begins. Typically, you want the performances to cease being sold online before the actual performance time. However, there are instances where you might to stop sales after the performance starts, such as:
- All Day Events, where you want online sales to be available after the gates open.
- Courses, where you may want to allow late registration, say up until the second class.
- On Demand Streaming, where a video streamed through the ticketing site can be purchased after the original start date/time.
Live Content Availability
The default time, in minutes, after the start of a performance in which live-streaming sales will be available.
Special Hold Letters Top
Internet Sale
Specify the hold letter that will be displayed on the map when a web sale is in progress. We recommend altering the colour of this hold code to make it stand out on the map during the sales process.
Social Distance or Associated Seat
Specify the hold letter assigned to associated seats. The lower case letter q is suggested as the default. We recommend altering the colour of this hold code to make it stand out on the map during the sales process and afterward as permanent holds.
You can create unique social distance seating on each pricing map to suit your needs.
Backups Tab Top
There are 3 basic settings for backups in this window, and one setting in TM server to make it all work.
- Settings in System Preferences
- Local Backup Settings
- Backups are always created on the local machine running a TM Server.
- On this window, you indicate the frequency and how many of these you want to retain.
- Remote Backup Settings
- After a backup is completed, it can be migrated to a remote machine by the TM server.
- On this window, you indicate when you want these backups to go.
- If you do not pick a remote backup option, then you will have no offsite backups (unless you are using other backup tools that watch for a new file in the backup directory).
- Backup Status and Notification Settings
- You can change the error notification settings to indicate when you want to receive a message at login if backups do not run.
- Local Backup Settings
- TM Server Settings
- Once the setting have been made in system preferences, you need to designate a TM Server to do the actual backups. This includes the location on that machine where the backups are stored.
- Please make sure there is adequate disk space to store all the historical backups you configured above.
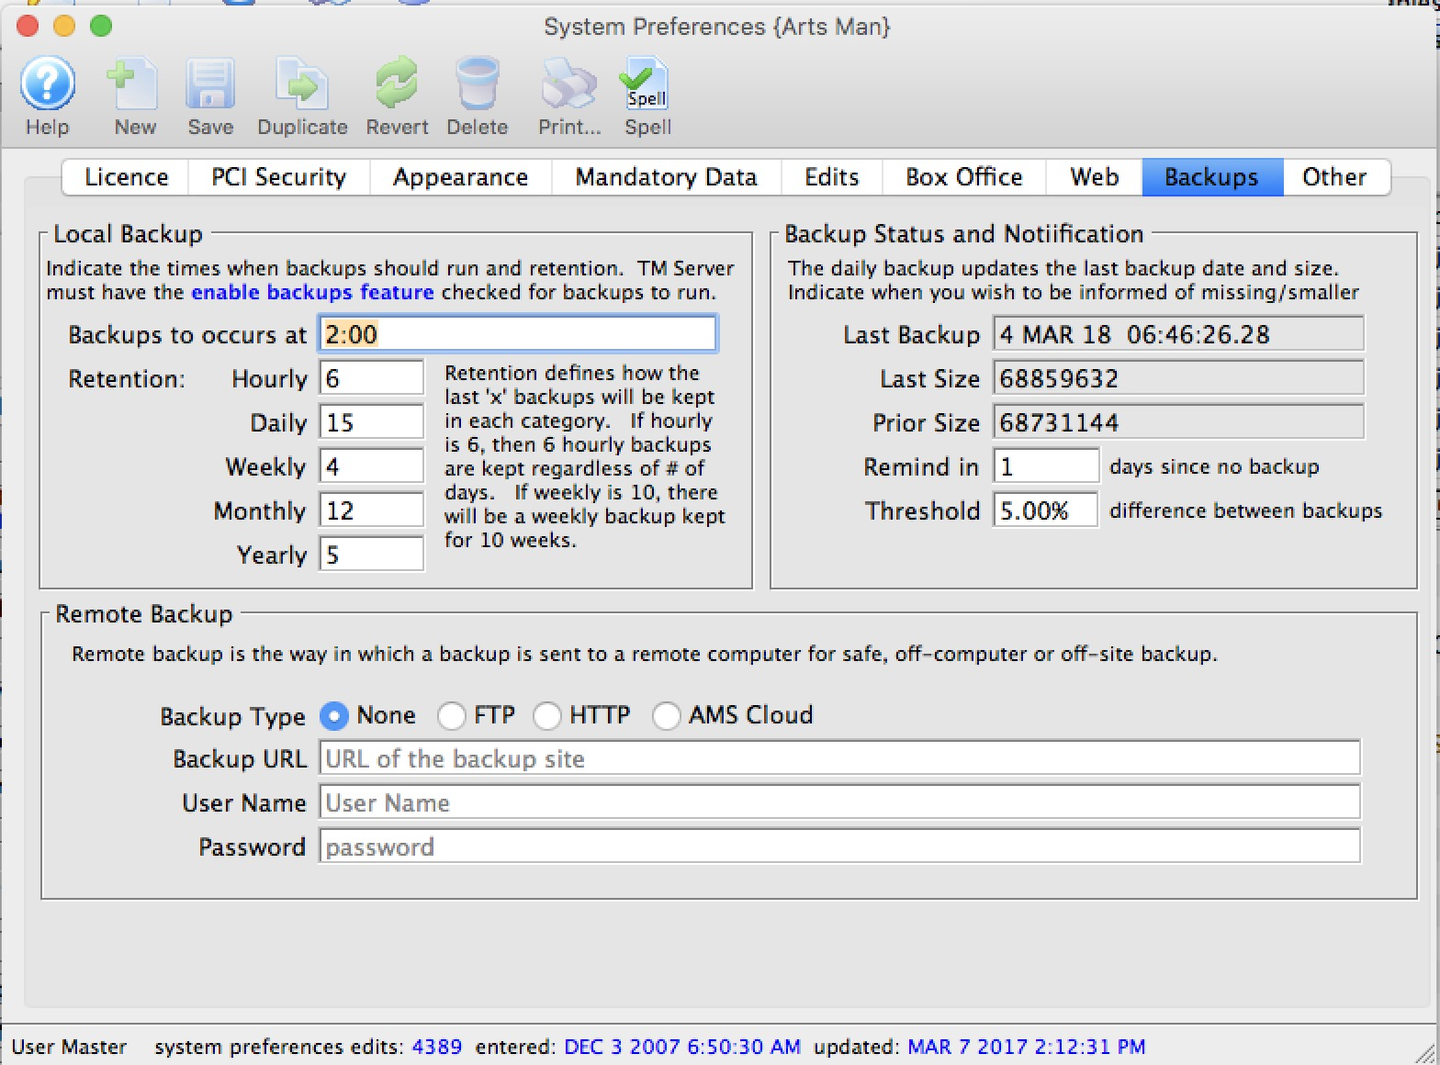

Local Backup Settings Top
The schedule of backups can be set here along with retention. A TM server on a designated machine will coordinate the backups. Here are the setting details.
Backups Occur At
Enter one or more times of the day that you want backups to run. Generally, it is recommended to set up at least two daily backups (e.g. 2:00 am and 2 pm). Having only one daily backup could be acceptable if one of the following situations is established:
- You have streaming replication enabled.
- Your database is set up on the AMS cloud where backups are done daily and moved offsite.
Hourly
This is the number of hourly backups that you want the system to retain. This number can be greater than the number you want to run in any one day. If so, then more are kept across multiple days. (E.g. 9 hourly and 3 daily results in 3 backups per day for each of the past 3 days.) 4 to 6 hourly backups are recommended.
Daily
The number of days of daily backups that will be kept. 15 days (half a month) or more is recommended. If backups are not run for 5 out of the past 15 days, then 15 days of daily backups means that 15 distinct days are kept, which will be across 20 days in total.
Weekly
The number of distinct weeks of weekly backups that will be kept. Between 4 and 8 weekly backups are recommended. If you keep 4 weeks of backups, but one week got missed for some reason, then TM will keep the 5th week as well.
Monthly
The number of months of monthly backups that will be kept. 12 or more monthly backups are recommended.
Yearly
The number of years that an annual backups should be kept. About 5 yearly backups are recommended. You may want to set this to coincide with any government (IRS/CRA) requirements for electronic storage.
Backup Status And Notification Settings Top
The daily backup script will update the date of last backup in the database. If the backup does not run, you can decide how long you want to wait without a backup before the message is displayed in Theatre Manager's Startup Notification Window. Here are the setting options:
Last Backup
The date and time that the backup script was last known to have run. If this field does not change, then backups are not running.
Last Size
The file size of the last backup. This number should generally increase in size.
Prior Size
The file size of the second to last backup. This should also increase in size.
Remind In
The number of days to wait until a reminder is created at a startup that the backup did not run. This can be set between 1 and 7 days. 2 is the recommended value for venues on the AMS cloud. 1 is recommended for all self-hosted databases.
Threshold
Enter a threshold for the differences between the current and the prior backup sizes. If the difference is over this threshold, you will receive a warning. We recommend setting a small value like 0.5%.
Remote Backup Settings Top
This section allows you to send the backups off to another machine in the office or offsite if you want to push backups to a second safe place. Use of remote backups is strongly recommended. Here the setting details:
Backup Type
Indicate what kind of offsite backup you want:
- None
- No offsite back will be attempted.
- FTP
- This is used to send your backup to an FTP site.
- TM Server will attempt secure connections and fall back if necessary.
- You can use tools like Filezilla to set up your own PC-based storage.
- HTTP
- Will send your backup data over HTTPS to a server.
- AMS Cloud
- Enable this setting if you have purchased remote backup storage from AMS.
- Each of your backups will be sent to a secure storage location in the AMS cloud. No other credentials are required.
- It cannot be enabled in a training or demo database.
Backup URL
The URL that the backup will be sent to. Only applicable to the FTP and HTTP methods. For AMS cloud, this will be specified for you.
User Name
The user name to log into the remote backup location.
Password
The password used to log into the remote backup location
Other Tab Top
The Other Tab contains details on miscellaneous information with Theatre Manager.

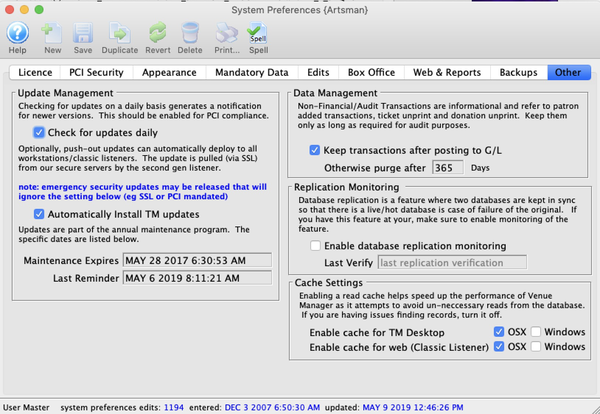
Update Management Top
Check for Updates Daily
When this box is checked, your theatre Manager system will check on a daily basis to see if there is a newer version available. This should be done for PCI compliance by enabling the update checking port for this. No download will happen, it is a notification only.
Automatically TM Minor Updates
When enabled
- TM will automatically pull down and update itself with newer versions. This is done via a secure connection (using TLS 1.2) to our update servers.
- Versions that cross any release boundary that require new database fields for new features will download only after the TM server has added the new fields into the database.
- Listeners restart themselves after updating.
- Users at workstations are reminded every four hours that the release is waiting for them if they ready to install it.
- On a new startup of TM, a workstation will be automatically updated.
Data Management Top
Keep Transactions After Posting to G/L
Checking this box causes some non-financial transactions to be kept after posting to the GL. Unchecking it allows those transactions to be purged after a period of time
Otherwise Purge After
Determine the number of days to keep the non-posting transaction records before purging them.
Replication Monitoring Top
Enable Database Replication Monitoring
- Some sites have specifically set up live-streaming database replication in order to have a fail-over database with the most current information, should the machine hosting it fail.
- Replication is done automatically for cloud venues.
- Self-service venues who wish this feature must set it up and maintain it themselves.
- Enabling this flag will cause Theatre Manager server to monitor the replication process and update the Last Verify Date. This can be used through the API to find out if monitoring is working. if this option is:
- Not checked - the API will return
disabled - Checked - the API will return
Ok, if the last replication time check is within a recent time periodyyyy-mm-ddThh:mm:ss+00:00, a full ISO8601 timestamp (with timezone) representing the last time that replication was verified as runningNone, if replication is not enabled and running for the database
- Not checked - the API will return
Last Verify
The date and time that the last replication verification occurred successfully.
Cache Settings Top
Enable Cache for Theatre Manager Desktop
Theatre Manager tries to optimize how it reads data from the database and will avoid reaching out to get some data in a number of cases. If you are having trouble with messages saying record not found, when it is really there, you can disable most of the cache.Uncheck this to stop the cache being used for the desktop. It will apply to all workstations. You can specify mac platform and windows platforms independently.
Enable Cache for Web Sales - Classic Listener
Uncheck this to stop the cache being used in the classic listeners. They have very little need for caching, so you may want to uncheck this if you have problems with some carts checking out a ticket. You can specify mac platform and windows platforms independently.