The Company (Outlet) Preferences, also called Company Preferences, window allows customization of each outlet within a database. From this window, many of the features and behaviors of Theatre Manager specific to the company can be modified.
In the outlet version of Theatre Manager, a master user will first need to create a Company Preferences record for each participating company. The companies can then set their own preferences to have different box office policies, names for entities, development defaults, etc.
Company Preferences Window Top
Company Tab Top
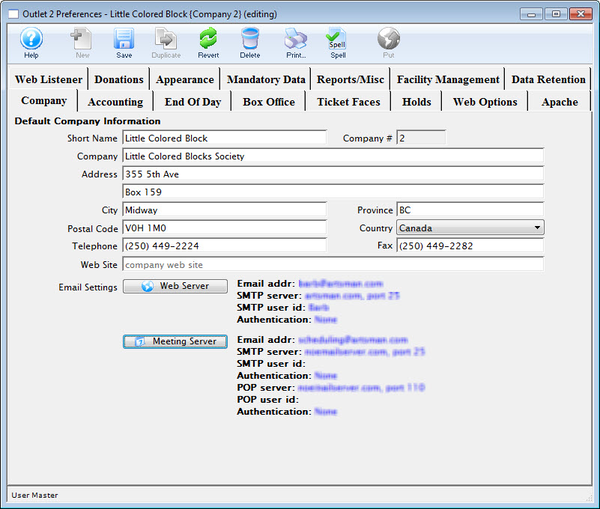
The Company Tab contains all the information about the company.

Short Name
A shortened version of the company's name. The shortened company name is printed on all reports.
Company
The full legal name of the company.
Address
The location of the company offices.
City
The city in which the company is located.
Province/State
The province or state the company is in. The default title of this field can be changed under the Appearance Tab. However, if addresses are indicated to be in Canada or the USA, this field will change automatically to reflect the location.
Postal/Zip Code
The postal/zip code of the company. The default title of this field can be changed under the Appearance Tab. However, if addresses are indicated to be in Canada or the USA, this field will change automatically to reflect the location.
Country
The country in which the company is located.
Telephone
The company telephone number.
Fax
The company fax number.
Web Site
The internet website for the company.
Web Server Button
Display a window showing web server SMTP settings.
Meeting Server Button
Displays a window showing meeting server settings.
Web Server Top
Caution
Please note that there implications to using Gmail or using Office 365 as email providers, and we recommend against them.
Caution
If emails are not sending, please refer to the pending email troubleshooting.
This window is accessed from Company (Outlet) Preferences >> Company Tab and controls the settings for outgoing system emails.

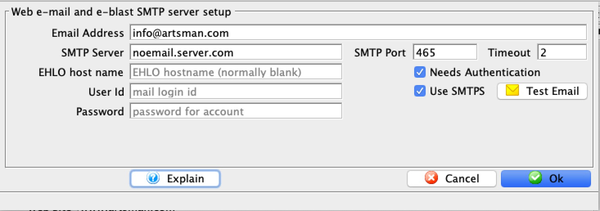
Email Address
The transactional email address for the company.
SMTP Server
The email server for sending batch emails.
EHLO Host Name
Some SMTP servers require you to provide the EHLO host name as part of the protocol to talk to them as an anti-spam measure. Most SMTP servers do not require this to be entered and the field should be left blank. Check with your email provider to verify as it helps your spam score (Google and Office 365 may require it).
User ID
Name required for email authentication.
Password
Password required for email authentication.
Rate Limited Until
If the field is visible, you will see a rate-limit timestamp. This indicates the next time that Theatre Manager will attempt to send an email using this account since it believes you have reached your maximum allowable email limit as determined by your ISP.
SMTP Port
Port to use for SMTP. This is usually:
- Port
25for typical email servers - Port
587if the server supports TLS/StartTLS- Office 365 typically uses this
- Port
465if the server uses SMTPS- Gmail can use this, but is known to also support port 587
Timeout
Timeout period
Needs Authentication
SMTP server requires password authentication. Encryption methods supported are:
- NONE
- LOGIN
- PLAIN
- CLEARTEXT
- CRAM-MD5
TM Server does not currently support NTLM authentication in exchange servers. Please use any of the above. Use SMTPS if you are using that methodology. If using TLS/StartTLS, Theatre Manager will figure that out.
Use SMTPS
Indicate if emails are to be sent using SMTPS. This usually goes with port 465 (see explanation of difference, but the exact settings are dependent on your ISP). Regardless, all emails are sent using the Theatre Manager server. If this checkbox is:
- Checked
- Emails are sent using SMTPS protocols automatically where TLS encryption is started automatically before any SMTP level communication.
- You will typically need to set the port to 465.
- Not Checked
- Sending of emails will be attempted using the best encryption as possible. The preference is StartTLS ( email over TLS), and if that fails, it then falls back to lesser protocols.
- You will typically need to set the SMTP port to 587 for StartTLS or perhaps 25.
If using gmail, you may need to use secure settings because Gmail is warning users if email comes over insecure servers and may not access email unless it is sent with TLS enabled. Google seems to support both TLS/StartTLS or SMTPS.
If using Office 365, you will likely need to uncheck this and set the port to 587 for STARTtls.
Test Email Button
This sends a test e-mail to verify that all settings have been entered correctly. If you get errors with emails, please refer to the SMTP errors web page to help diagnose issues.
Meeting Server Top
Caution
Please note that there implications to using Gmail or using Office 365 as email providers, and we recommend against them.
Caution
If emails are not sending, please refer to the pending email troubleshooting.
This window is accessed from Company (Outlet) Preferences >> Company Tab and controls the settings for Facilities Management meeting invite and reminder emails.
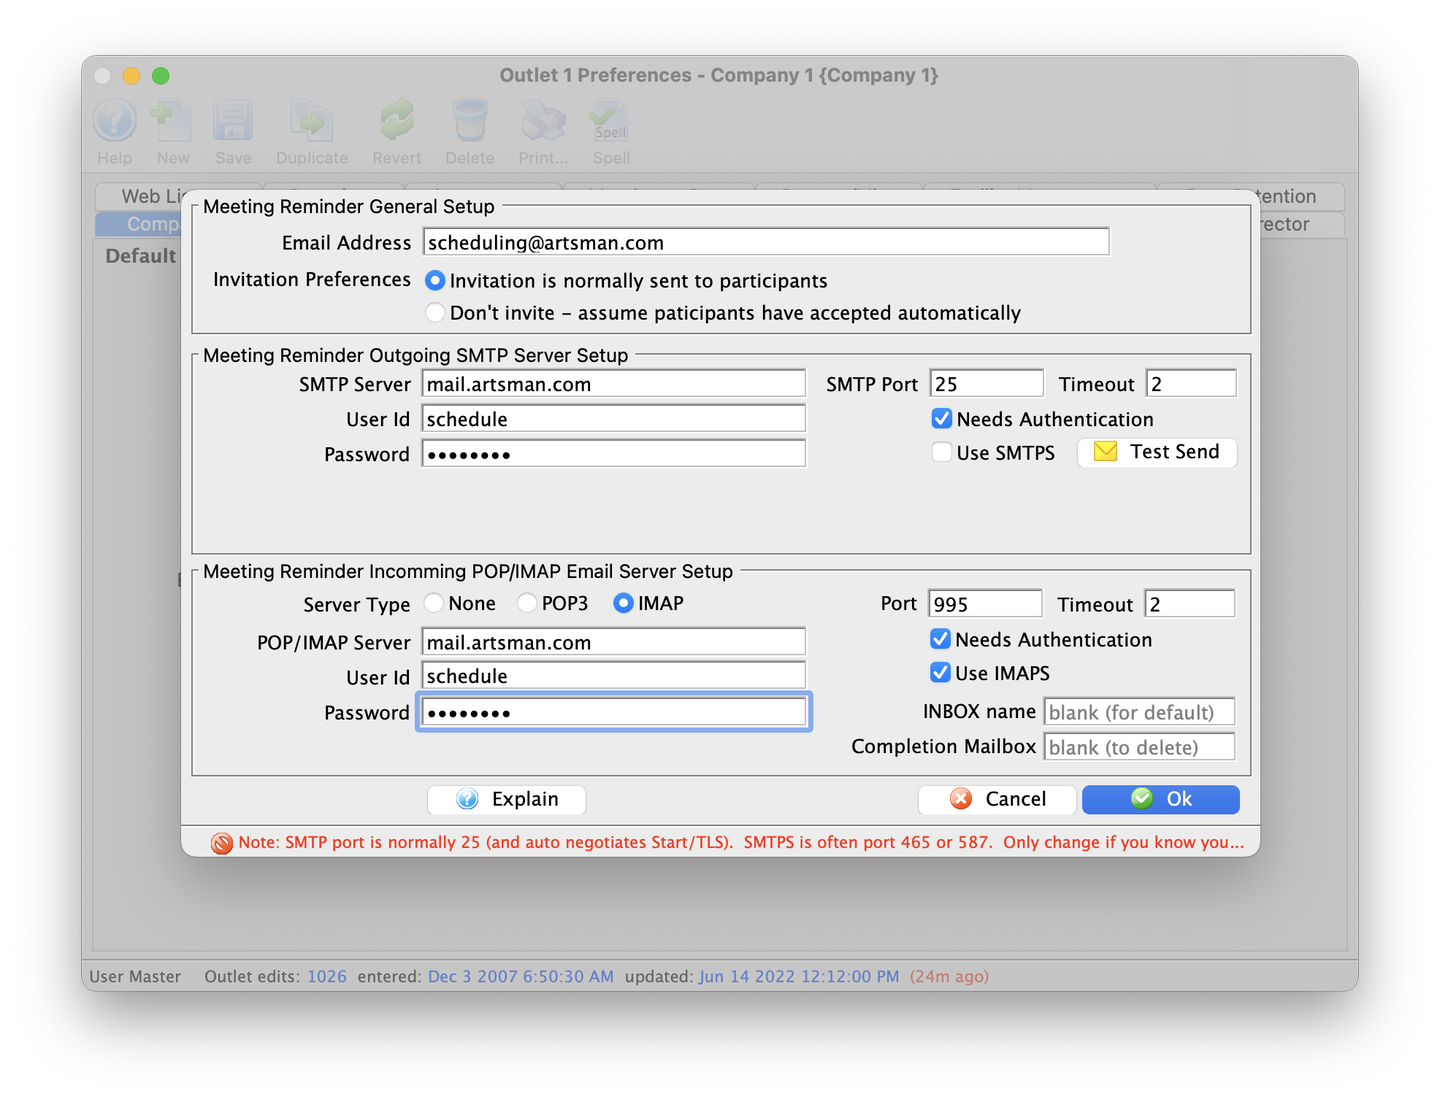
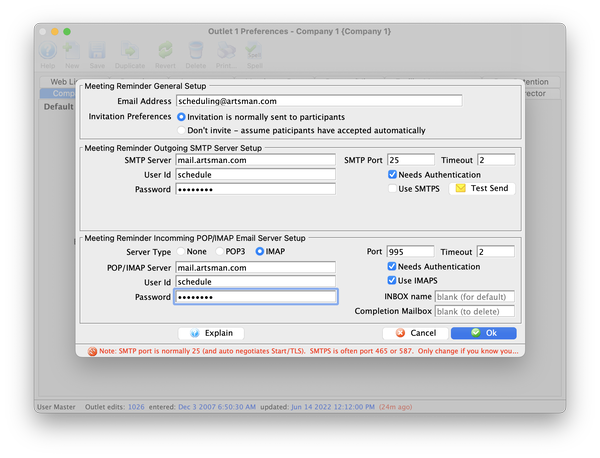
Email Address
The internet email address for the company.
Outgoing: SMTP Server
The email server for sending batch emails.
Outgoing: User ID
ID name required for email authentication.
Outgoing: Password
Password required for email authentication.
Outgoing: Rate Limited Until
If the field is visible, you will see a rate-limit timestamp. This indicates the next time that Theatre Manager will attempt to send an email using this account since it believes you have reached your maximum allowable email limit as determined by your ISP.
Outgoing: SMTP Port
Port to use for SMTP.
Outgoing: Timeout
Timeout period.
Outgoing: Needs Authentication
SMTP server requires password authentication. Encryption methods supported are:
- NONE
- LOGIN
- PLAIN
- CLEARTEXT
- CRAM-MD5
Outgoing: Use SMTPS
Indicate if the SMTP server requires SMTPS. If set, emails that are sent by the second generation server will attempt TLS variants of SMTPS protocols automatically. This accounts for ALL emails sent by Theatre Manager.
Outgoing: Test Email Button
This sends a test e-mail to verify that all settings have been entered correctly.
Outgoing: Default Acceptance Status for Invitations
Select Needs Invitation or Don't Ever Invite to indicate whether email invitations need to be sent out or not.
Incoming: Server Type
There are three choices that can be used to tell Theatre Manager Server how to handle incoming emails:
- None
- Does not bother to try to retrieve and interpret scheduling email responses
- POP3
- Reads incoming scheduling emails from a POP3 server
- IMAP
- Reads incoming scheduling emails from an IMAP server If you select this, you may need to specify an INBOX (if the default inbox is not inbox) and a a COMPLETION mailbox.
Incoming: POP/IMAP Server
The email server for receiving incoming emails.
Incoming: User ID
ID name required for email authentication.
Incoming: Password
Password required for email authentication.
Incoming: POP Port
Port to use for POP.
Incoming: Timeout
Timeout period.
Incoming: Needs Authentication
SMTP server requires password authentication. Encryption methods supported are:
- NONE
- LOGIN
- PLAIN
- CLEARTEXT
- CRAM-MD5
Incoming: Use SMTPS
SMTP server requires SMTPS. StartTLS (Transport Layer Security) is supported automatically.
Incoming: Inbox Name
Create a customized name for the inbox. Leave blank for the system default.
Incoming: Completion Mailbox
Create a customized mailbox name for completing a meeting request. Leave blank for the system default.
Incoming: Test POP Button
This checks the POP Email server to verify that all settings have been entered correctly.
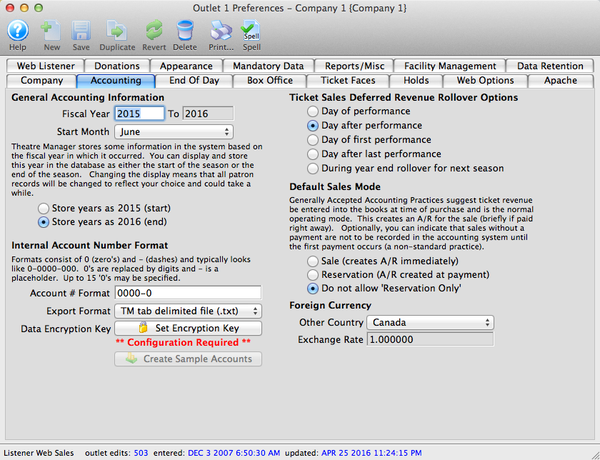
Accounting Tab Top
The Accounting Tab allows changes to the company's accounting formats. Adjustments to the fiscal year and accounting format can be made here.

General Accounting Information Top
Fiscal Year
This is the fiscal year that the company is currently in. Alter by clicking in the field and retyping the year. If you are ending one fiscal year and beginning another, you MUST use the Year-End Rollover Process (instead of changing this value).
Month Start
This is the month that the company's new fiscal year starts each year. Alter by clicking in the field and retyping the month. If the fiscal start month is changed after sales information has been posted to the G/L accounts, it may be necessary to recalculate G/L totals.
Store Years As - Start
If selected, the year stored in the G/L will be the year at the beginning of the fiscal year (e.g. 2015/2016 fiscal year dates will be stored as 2015). This also applies to the data in the supporting records (e.g. a donation with fiscal year of 2016 means that the donation is for the 2016-2017 season).
Store Years As - End
If selected, the year stored in the G/L will be the year at the end of the fiscal year (e.g. 2015/2016 fiscal year dates will be stored as 2016). This also applies to the data in the supporting records (e.g. a gift certificate with fiscal year of 2017 means that the donation is for the 2016-2017 season).
Internal Account Number Format Top
Account # Format
Allows the account number to be up to 15 digits, excluding dashes, in any combination of numbers and dashes.
Export Format
Select the export format to use for exporting G/L entries that is most compatible with your accounting software. Options include:
- Tab-delimited format (.txt)
- Comma-delimited format (.csv)
- Excel Workbook 97-2004 (.xls or .xlsx)
- Banner FINFEED (.xml)
- HTE Software II, G/L Interface File Structure (.txt)
- iCity (.csv)
- Microsoft Dynamics GP 2016 (.txt)
- MUNIS Systems, Standard Long Account Formats (.csv)
- Quickbooks 2007-2018 Desktop PRO and 2019 Desktop PRO versions (.IIF)
- Quickbooks Online (.csv)
- Sage 50 Accounting (.csv)
- Sage Accpac version 5.6 (.csv)
- Sage Intacct (.csv)
- Solomon Accounting Software (.xlsx)
- Unit4 Business World (formerly Agresso Financials) (.txt)

Create Sample Accounts Button
This button will create a set of sample accounts if no accounts have been seƒt up under Accounting >> G/L Accounts.


Set Encryption Key Button
This button will edit the data encryption key used for data encryption processes.
Ticket Sales Deferred Revenue Rollover Options Top
Day of Performance
Moves money for the performance from deferred to sales on the day of the performance.
Day After Performance
Moves money for the performance from deferred to sales on the day after the performance.
Day of First Performance
Moves money for the play from deferred to sales on the day of the first performance.
Day After Last Performance
Moves money for the play from deferred to sales on the day after the last performance date.
During Year End Rollover for Next Season
Moves money for the play from Deferred to Sales on the during the year-end rollover.
Default Sales Mode Top
Sale (crosses A/R immediately)
Adds transactions to the accounts receivable ledger immediately.
Reservation Only (A/R created at payment)
Financial transactions are not created in the general ledger until the order has one or more of the following events happen to it:
- First payment is made on the order
- The order contains a donation or anything else except tickets
- A user un-clicks this option next time it is put on account
- The user tells the system to convert some or all orders from reservation only to real orders during end-of-day sales posting (it could depend on if the performances that the tickets are for has passed)
If you allow this feature, you may wish to set a preference for each employee for their default during order creation.
Do Not Allow Reservation Only
Will prevent the reservation only option from appearing at checkout. This is the PREFERRED option.
Foreign Currency: Other Country
This is where an optional country can be selected for accepted foreign currency when selling tickets. If the organization does not accept foreign currency, set the country to the home country.
Foreign Currency: Exchange Rate
This is where the exchange rate for converting from the local currency to the currency of the foreign country is entered. If the organization does not accept foreign currency, set the exchange rate to 1.000000.
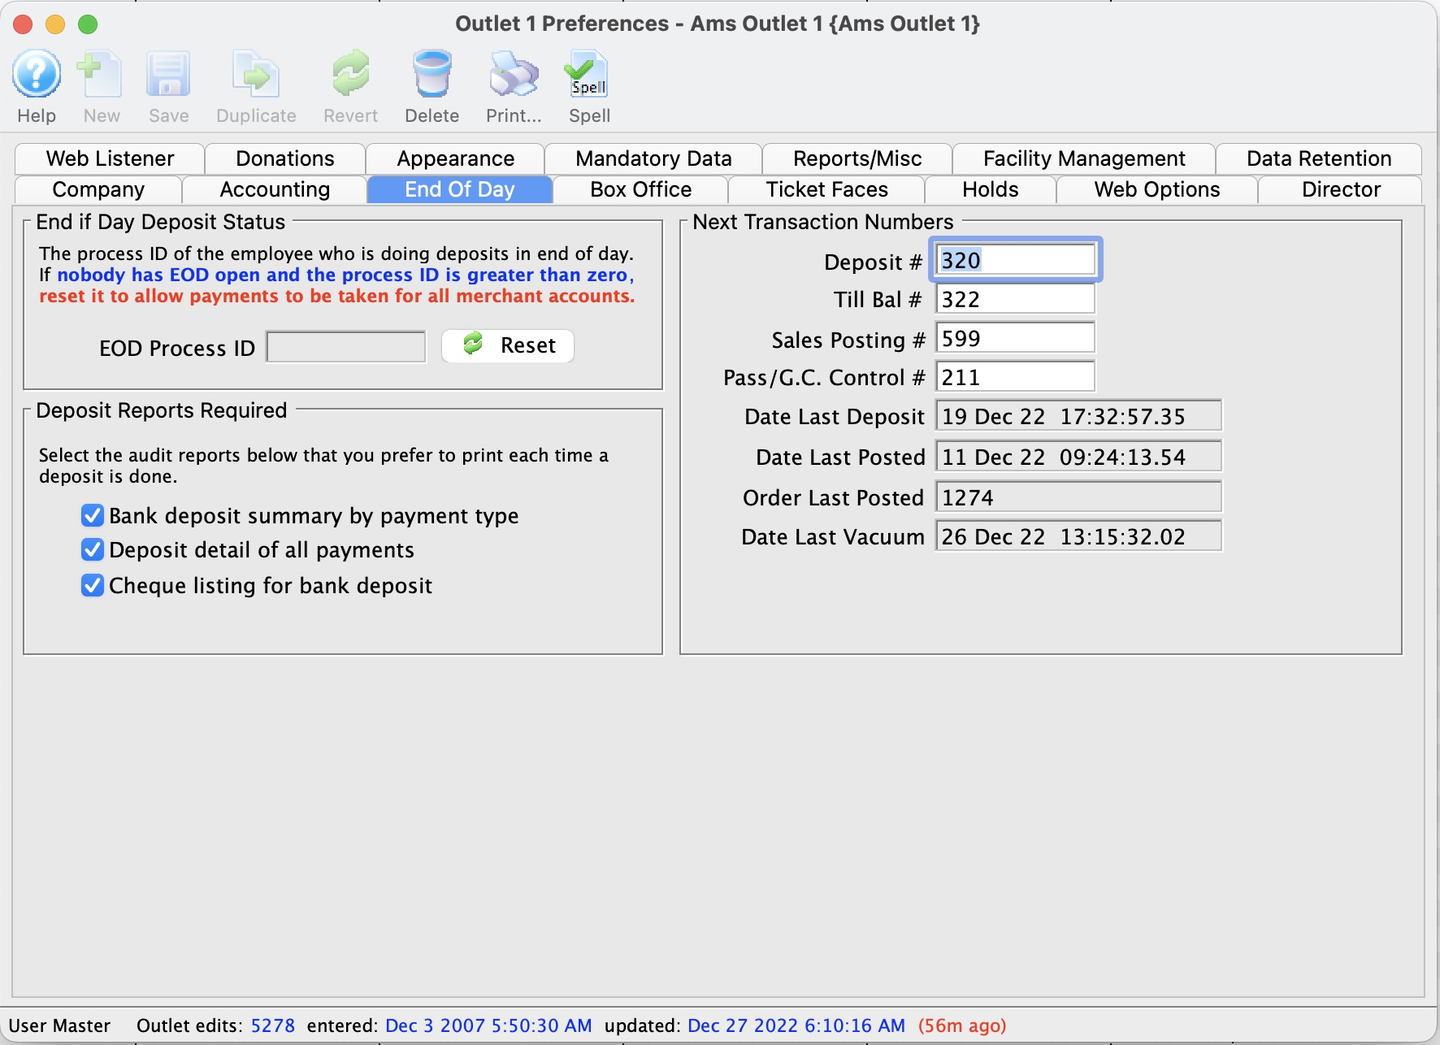
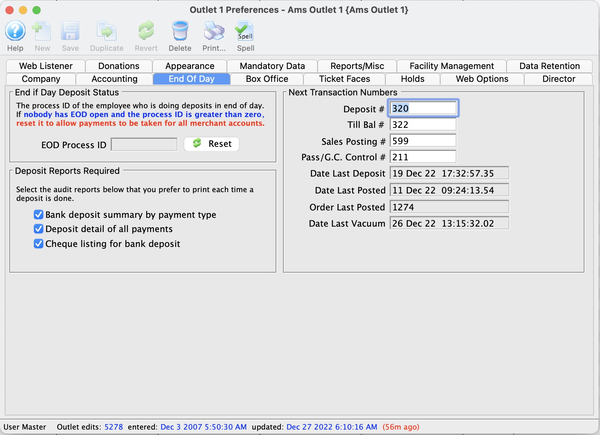
End of Day Tab Top
Caution
This screen has an important button on it to reset the end-of-day process ID. You may have to do this if you receive the message about a deposit in progress during end-of-day wizard.
The End of Day Tab set several important components of the end-of-day (EOD) process.
End of Day Wizard and Posting Options Top
Allow Sales While End of Day Wizard is Open
Click to allow employees to continue with the day's sales while EOD is being run.
EOD Process ID
This tracks the employee ID of who is currently doing an EOD deposit. If nobody is in the deposit window, yet the End-of-Day (EOD) process ID is not zero, then the Reset button can clear the process ID field. This reset option allows you to resume accepting payments everywhere and run the EOD. It also clears the merchant in-use settings if you receive a deposit in progress message that prevents accepting payments.
Deposit Reports Required Top
Bank Deposit Summary by Payment Type
When checked, a summary of all payments, sorted by type, will print automatically during EOD. This report is found in Reports > Order and Payments > Bank Deposit - Totals.
Deposit Detail of All Payments
When checked, a detail report of all payments in the deposit, sorted by patron, will print automatically during EOD. This report is found in Reports > Order and Payments > Deposit Detail.
Cheque Listing for Bank Deposit
When checked, a list of cheque detail in the deposit (suitable for taking to the bank) will print automatically during EOD. This report is found in Reports > Order and Payments > Bank Deposit - Cheque Listing.
Next Transaction Numbers Top
Deposit Number
The next bank deposit number. This value should not be set less than the current number.
Till Balance Number
The next till balance number. This value should not be set less than the current number.
Sales Posting Number
The next sales posting reference number. This value should not be set less than the current number.
Member Control Number
The next member control number. This value should not be set less than the current number.
Date Late Deposit
The date of the most recent successful (completed) EOD deposit in Theatre Manager.
Date Last Posted
The date of the most recent balance of the EOD (posted to G/L) in Theatre Manager.
Order Last Posted
The last order number posted to the G/L during EOD.
Box Office Top
Adjustments to how the Box Office operates can be made from this tab.
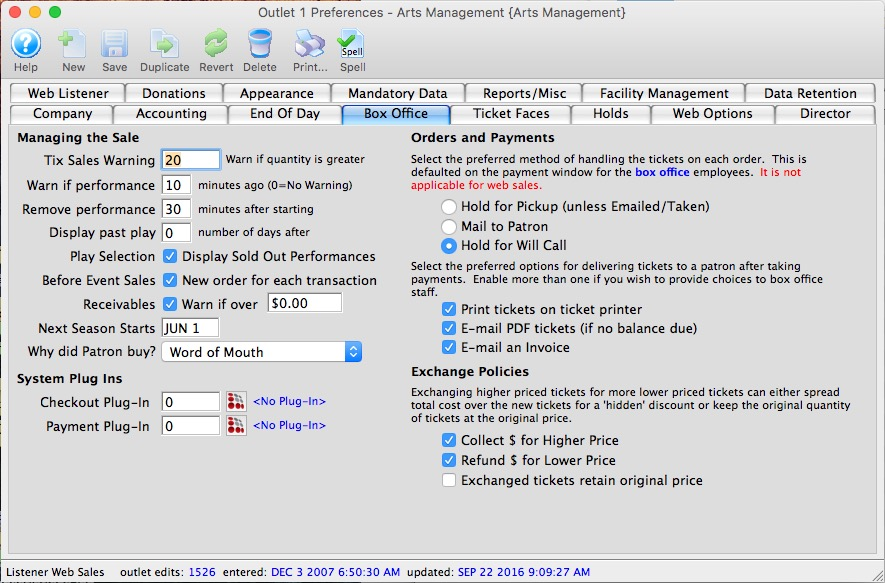
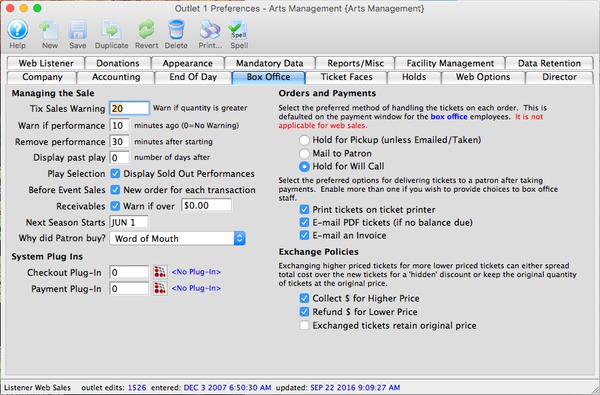
Managing the Sale Top
Tix Sales Warning
A warning notification is displayed on the screen if the number of tickets being sold is greater than this number.
Warn If Performance
Displays a warning on screen once a performance start time has gone past the denoted amount of time.
Remove Performance
Removes the performance from the sell list once this much time has elapsed past the start time. Users with past performance access can still sell to this performance.
Display Past Play
Number of days to still list past performances.
Play Selection: Display Sold Out Performances
Checking the box will show sold out performances from the Buy Window.
Before Event Sales: New Order for Each Transaction
Checking the box will create a new order for each ticket transaction (generally each walk up patron). Artsman advises leaving this checked because a new order separates each walk-up transaction so that if you need to find a specific interaction with a patron based on card used, then you can narrow down everything to the one order and a small range of Theatre Manager transactions. Doing otherwise leaves all items purchased in the various parts of the order (except the Ticket Tab) so you'll see a build up of fees, etc.
Warn If Receivables Over
Checking the box will issue a warning to the screen when a patron's receivables exceed the value denoted.
Next Season Starts
Denotes when the next season starts.
Why Did Patron Buy?
The option selected from the dropdown will show on the Payment Window of an order as the default option for the patron's reason for buying the order. Options for the dropdown are set in Code Tables.
System Plug Ins Top
Checkout Plug In
Allows the selection of a plugin to be used after the order has been placed. Press the Plugin Search button to see all available plugins.
Payment Plug In
Allows the selection of a plugin to be used for after the payment has been taken. Press the Plugin Search button to see all available plugins.
Orders and Payments Top
Hold for Pickup/Taken
If selected, this option will be the default on the Payment Window and indicates that tickets are generally held to be taken by the patron or are immediately taken by the patron (walk-up).
Mail to Patron
If selected, this option will be the default on the Payment Window and indicates that tickets are to be mailed to the patron.
Hold for Will Call
If selected, this option will be the default on the Payment Window and indicates that tickets are to be held for will call for the door sale of the performance.
Print Tickets on Ticket Printer
Indicates that people generally print tickets on ticket printers for box office sales.
E-Mail PDF Tickets
If selected, the print tickets button within Theatre Manager will change to print/email tickets on all places where tickets can be printed. When the print/email button is clicked on those windows, it will show a list of email addresses for the household, as well as an option to add another email for the patron. Emailing tickets sends out a PDF of the ticket that is exactly the same as if the patron had purchased the ticket online. Please refer to the list of possible reasons why an e-ticket cannot be sent.
E-Mail an Invoice
If selected, the user will have the option to email invoices from the Print Invoice Screen on the Order Window.
Exchange Policies Top
Collect Difference for Higher Price
If selected, the difference between the exchanged tickets and the new higher priced tickets will need to be collected.
Collect Difference for Lower Price
If selected, the difference between the exchanged tickets and the new lower priced tickets will need to be refunded.
Exchanged Tickets Retain Original Price
If selected, this means that when tickets are exchanged for a lower price value, the lower priced tickets adopt the price of the original tickets.
Ticket Faces Tab Top
The Ticket Faces Tab lets you set and manage how physical tickets and card tax receipts are printed and tracked.
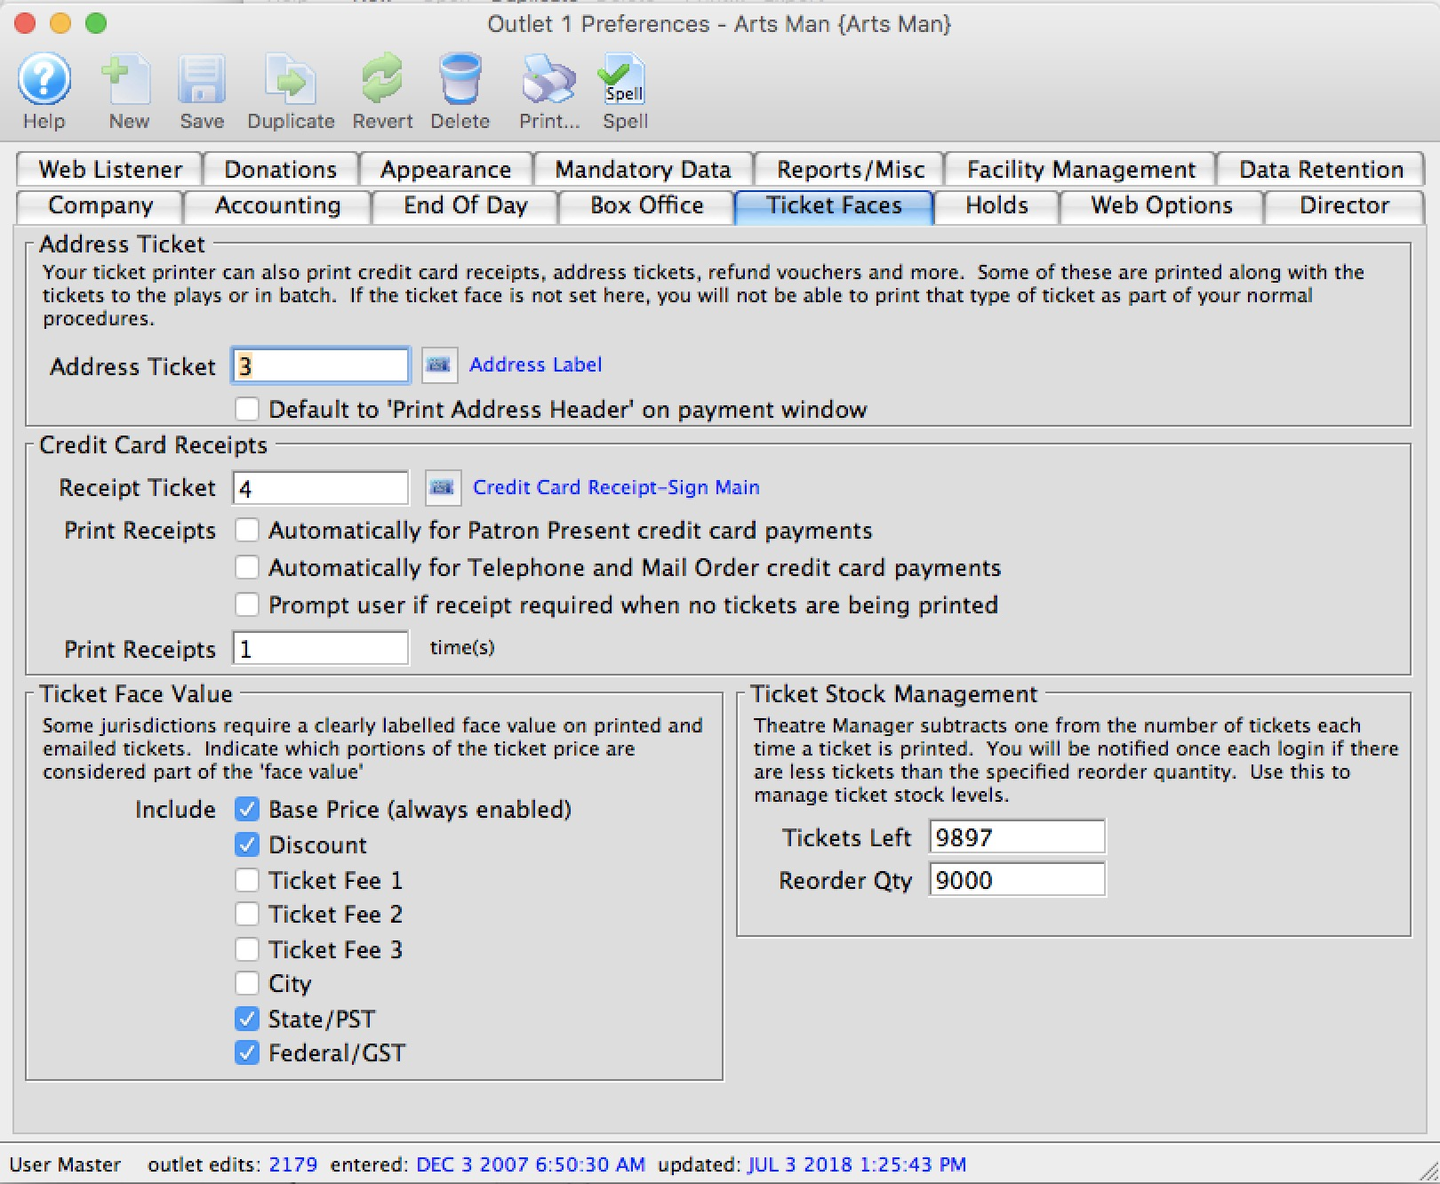
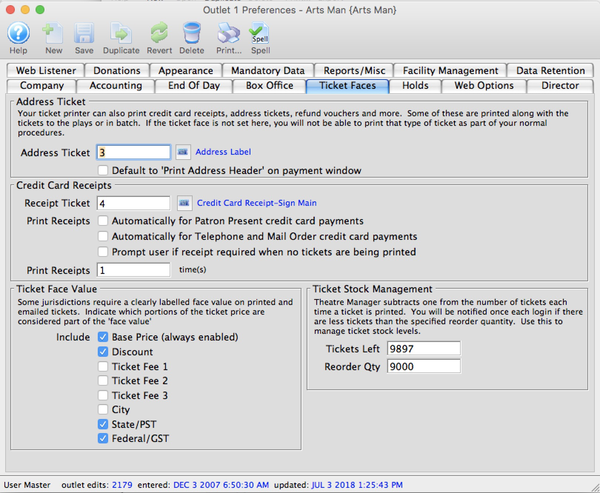
Default Ticket Faces Top
Address Ticket
The address ticket face number.
Default to Print Address Header
When checked, this will set the address ticket to always be selected for printing by default on the Payment Window.
Credit Card Receipts Top
Receipt Ticket
The receipt ticket face number.
Print automatically for Patron Present
Prints a credit card receipt automatically if a card is swiped in the box office (e.g. the Payment Source is marked patron present).
Print Automatically for Telephone and Mail Orders
Prints a credit card receipt automatically if a card is keyed in manually in the box office (e.g. the Payment Source)(https://help.theatremanager.com/theatre-manager-help/payments-window-details-tab) is marked telephone or mail).
Prompt User If Receipt Required When No Tickets are Being Printed
When selected, a window will open during payment that prompts the user to select a credit card/address ticket receipt option when tickets are not being printed in the order (e.g. when Accept Payment is clicked instead of Print Tickets on the Payment Window).
Print Receipts
The number of times the credit card receipt should be printed.
Ticket Stock Management Top
Approx. Tickets Left
The count of the number of blank tickets that you currently have in stock. Since Theatre Manager counts each ticket that is printed, the purpose of tracking ticket inventory is so that you do not run out of tickets at a critical time. Read about using Theatre Manager to manage ticket stock inventory.
Reorder Level
The point at which Theatre Manager will show a reminder to you to order more ticket stock. You will get a warning if the approximate count of tickets dips below this number. We recommend setting this number to be the number of tickets you will print in an average month (see these reports for more information on determining how many tickets you use).
Ticket Faces Value Top
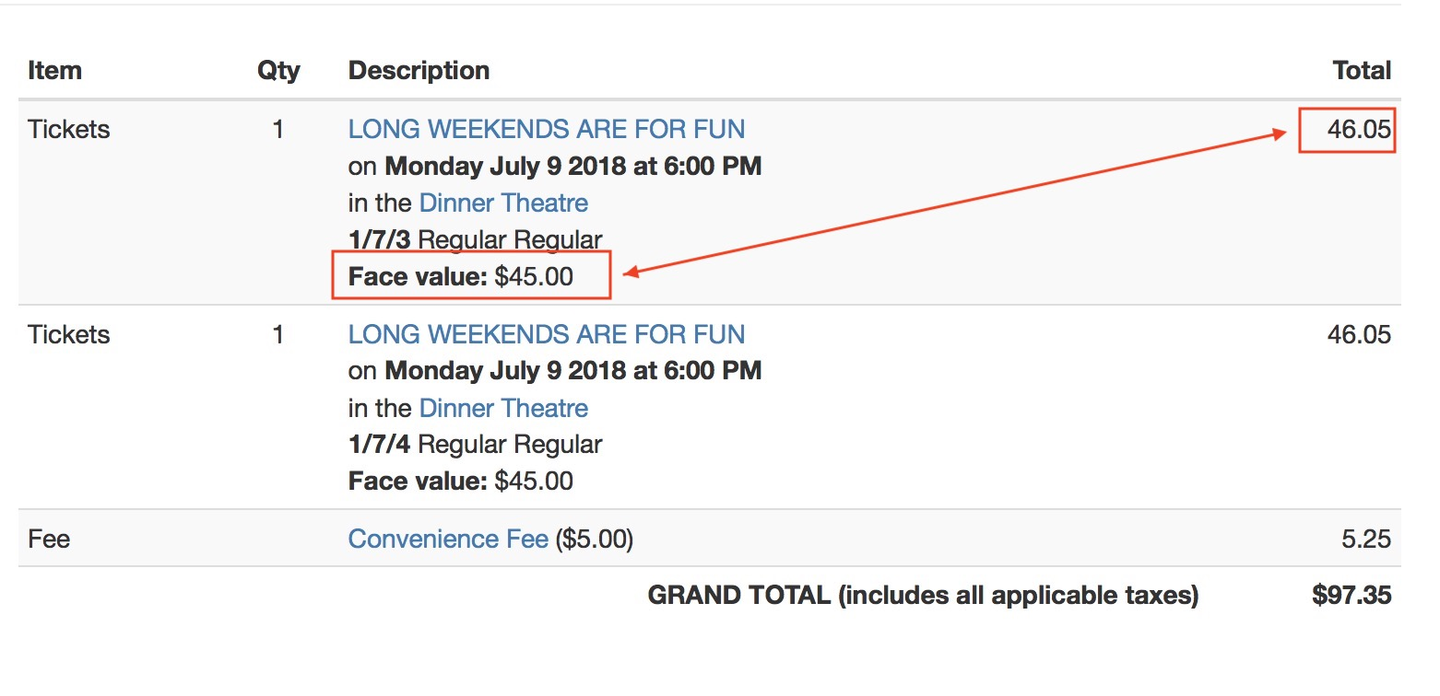
The full price of a ticket is determined by the base price after applying a sales promotion. The components can include a discount, up to 3 fees, and up to 3 taxes. Some jurisdictions (like Ontario, Canada), require that a face value be determined for all tickets. You can specify which components are to be included in the face value by selecting the appropriate checkboxes.
If this applies to your venue, change your ticket faces to show the face value by adding or using the Face Value field. For e-tickets, you may need to set the Web Options to show face value on e-tickets or display the price breakdown per this image.
Holds tab Top
The Holds Tab defines the appearance, release time, adn access for held seats in reserved seating maps.
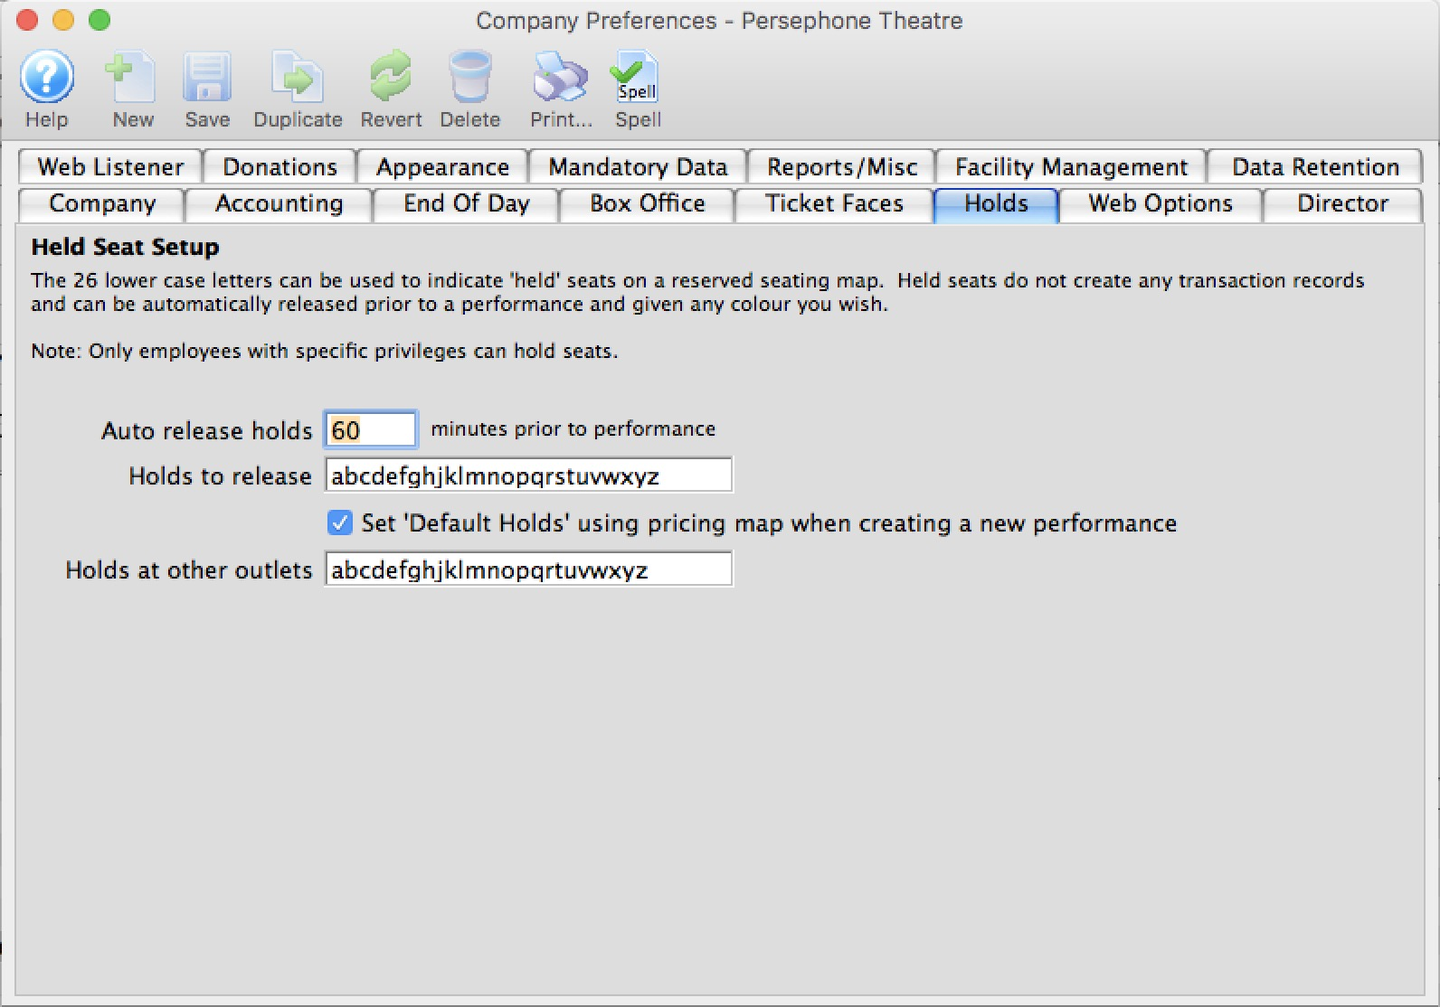
Auto Release Holds
The number of minutes prior to a performance that held seats will be automatically released.
Holds to Release
The letters, representing a held seat, to be released.
Set Default Holds Using Venue Map
Use the map holds as the default setting when creating a new performance.
Holds at Other Outlets
These holds codes may be released by sales people working at other outlets if they have access to those hold codes in their own outlet.
Web Options Tab Top
The Web Options Tab contains outlet-level settings to customize the online shopping experience for patrons.
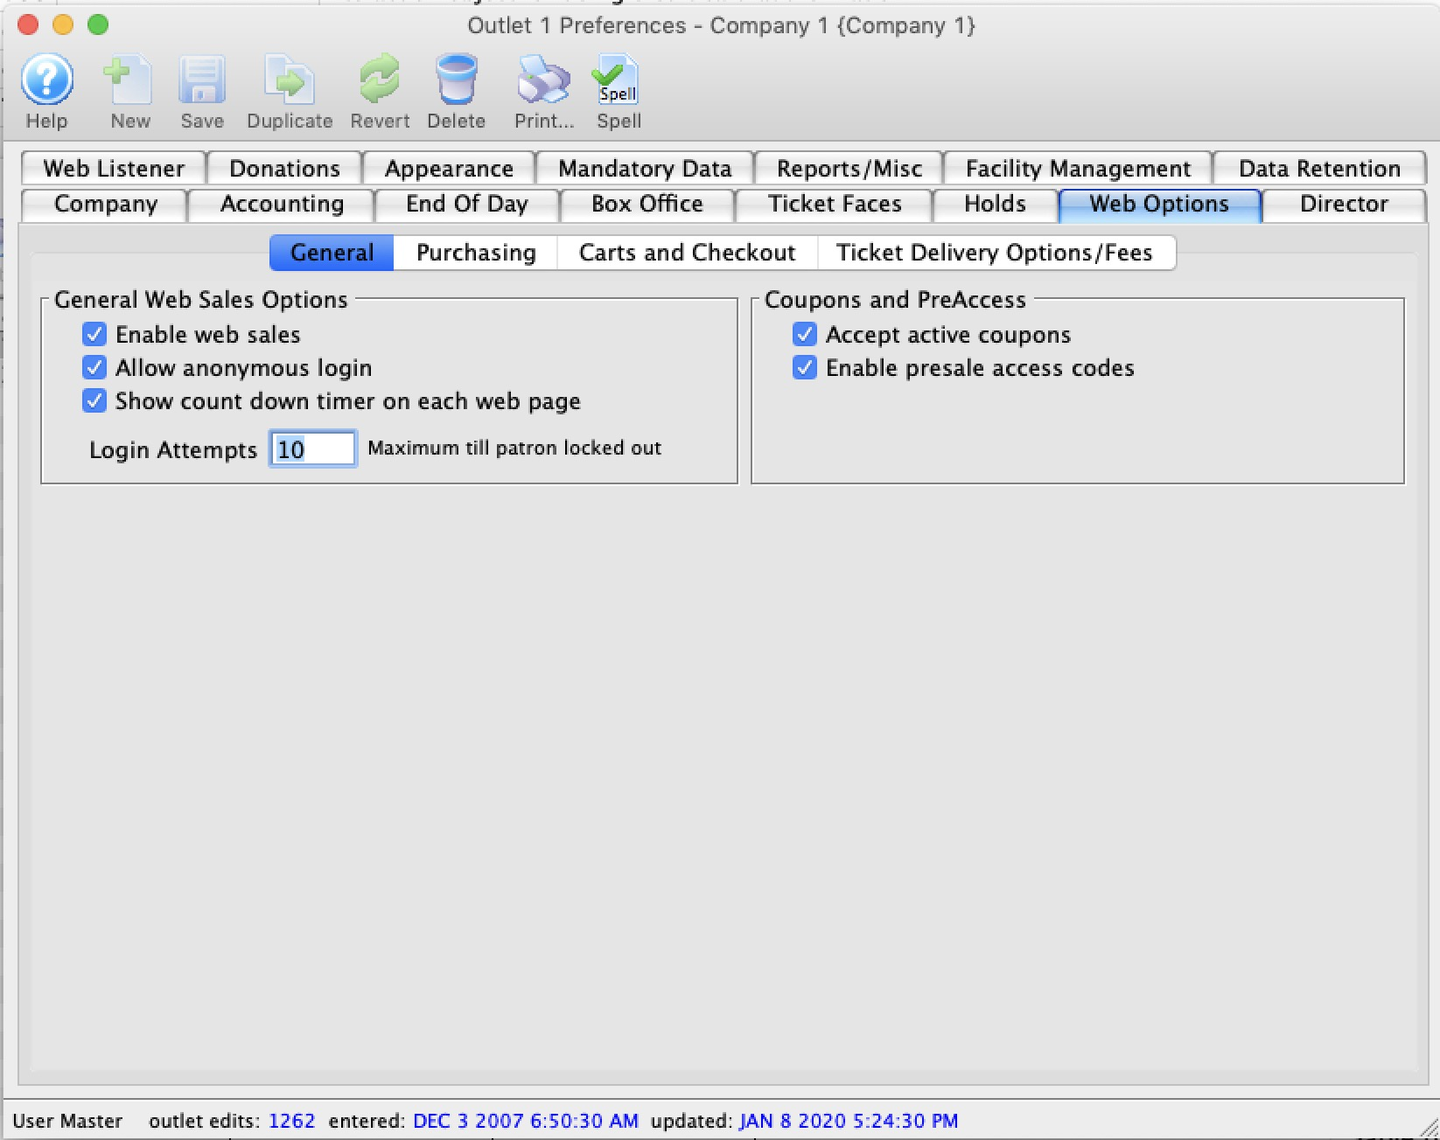
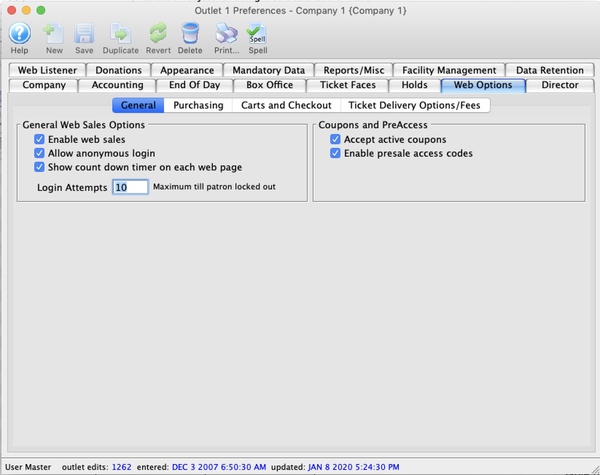
GENERAL TAB Top
The General Tab controls which items are available for sale online and how patrons can access the web store.


General Web Sales Options Top
Enable Web Sales
This enables or disables sales to occur on the web.
If turned on (checked), a directory must exist on the Theatre Manager primary server for both:
- This outlet (e.g.
1/WebPagesENor2/WebPagesENfor each of multiple outlets that are active) - Each language that is active for the outlet (e.g.
WebPagesENandWebPagesFRif supporting both English and French)
Listeners will not start if the Director requires full web pages and either the outlet directory and/or the WebPagesXX directory is missing. If the Director requires only custom pages, the web services will start using the current template pages.
If turned off (unchecked), patrons will receive a message that the site is down.
Allow Anonymous Login
Enabling this feature allows patrons to shop and add items to a shopping cart without identifying themselves first. When the patron is ready to check out and pay, they will need to either:
- Login to an existing account
- Create a new account if they have never purchased before
Optionally, if you also want patrons to be able to checkout without an account, enable the limited profile patron option.
Show Count Down Timer
When enabled, a timer will appear on the web pages menu bar (beside the cart icon) that shows how much time is left before the web listener releases all items in the cart. The timer will appear once there is something in the cart and is reset every time the patron looks at a new web page.
Login Attempts
The maximum number of login attempts before the patron's account is locked out, and they must request their password to continue.
Coupons and Presale Access Codes Top
Accept Active Coupons
When selected, patrons will be able to enter a coupon code at checkout.
Enable Presale Access Code
When selected, patrons will be able to enter a presale access code on the Online Event List to see shows which are not yet for sale to the general public.
PURCHASING TAB Top
The Purchasing Tab controls which type of items are available for sale online and how they appear to a patron progressing through a shopping cart.
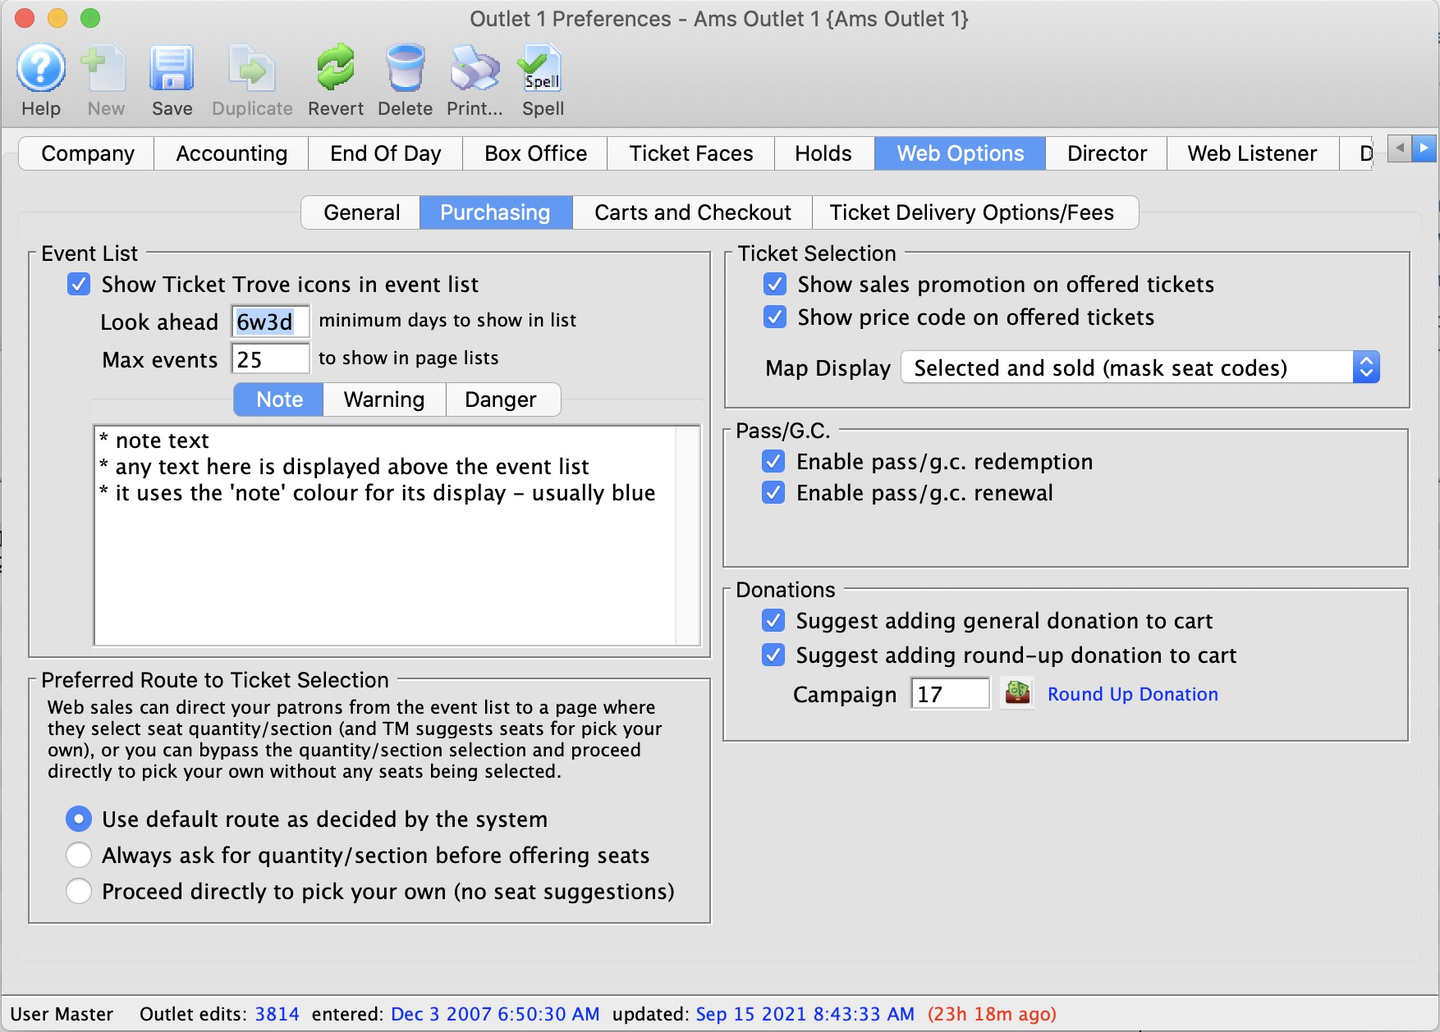

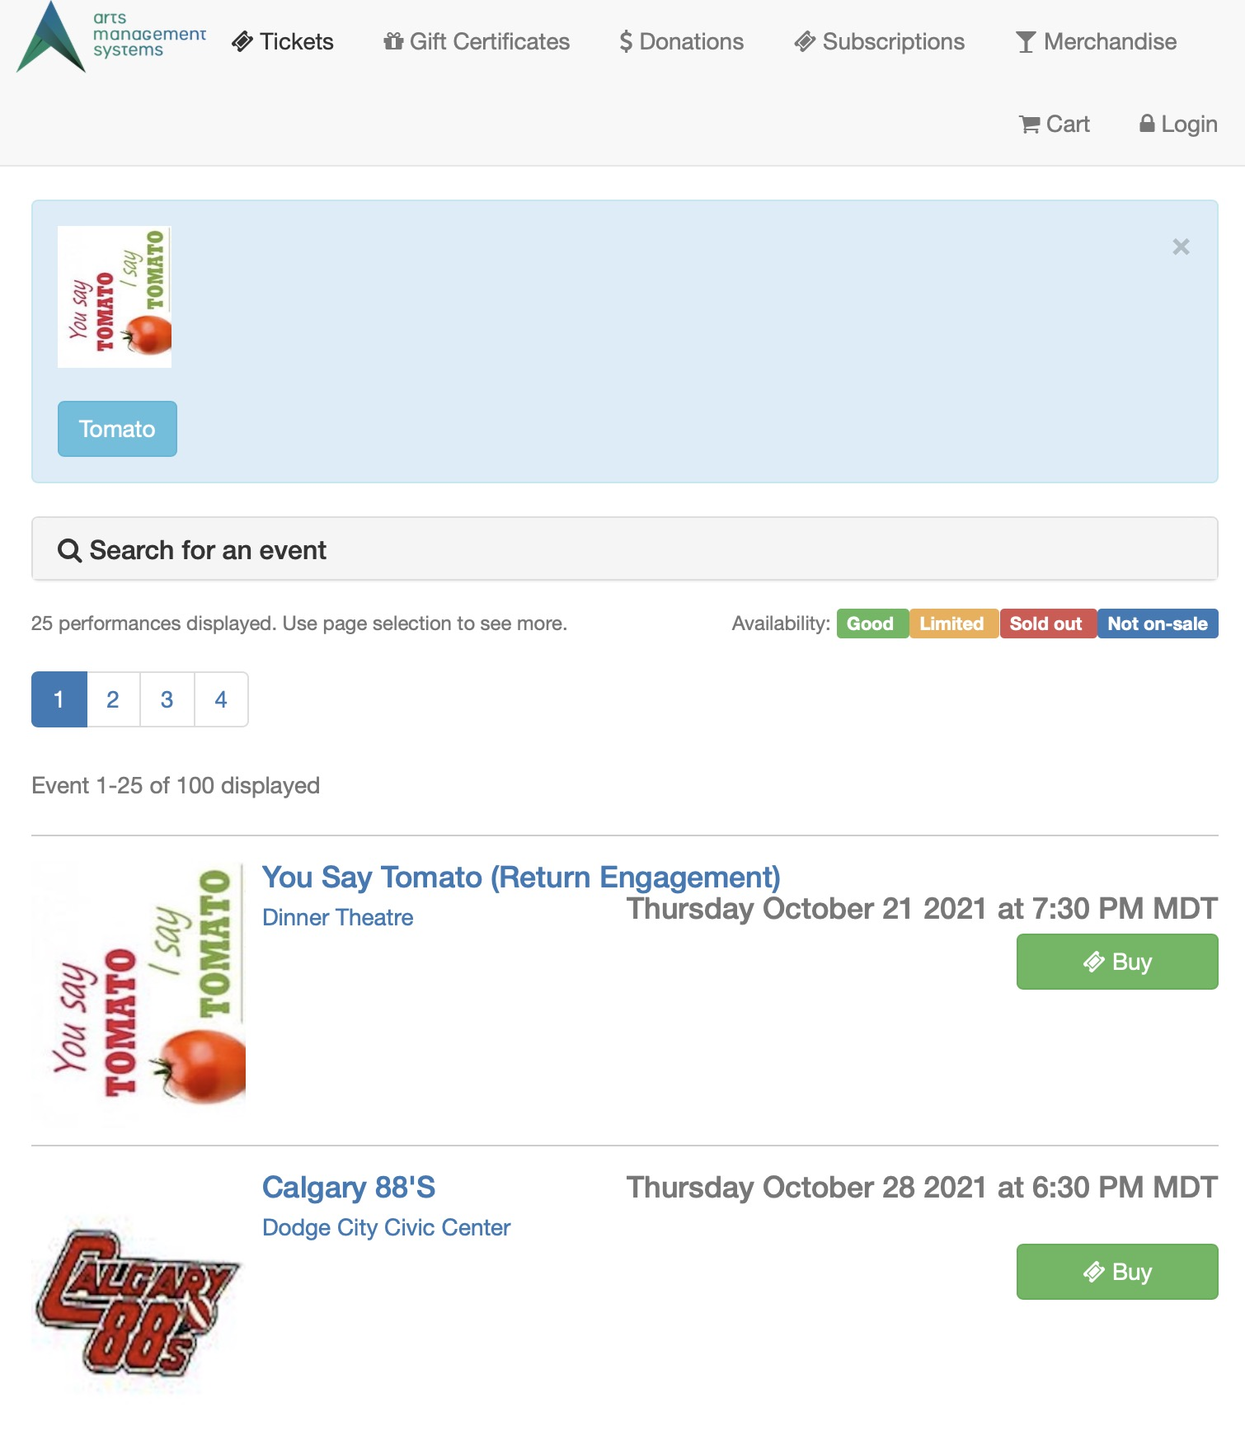
Event List Top
Show Ticket Trove Icons on Play List
Displays the event icon from the Event Detail Window >> Marketing Tab in the Online Event List.
Look Ahead
Number of days in advance that events should be displayed. If this is:
- Zero
- Only the current month events are shown
- On the last day of the month, only that day's events show
- Non-Zero
- Indicates the number of days (in advance of today) that events are to be displayed for
- A typical value is 45 (e.g. when searching for the current month, 45 days of events will be shown, which includes some events into the next month)
- Has no effect when searching for months entirely in the future
Max Events (Pagination)
The maximum number of events to be displayed on any one page in the Online Event List. If the patron requests more events than the maximum, the event page becomes paginated and the patron can go forward or backward to see the rest of the events.
Using 25 is a good balance between performance and amount of data to display. Since the last page always shows a full list (by design), if you have 27 performances found by the current search, the first page shows the first 25 events and
the second page shows the last 25 events (e.g. 3 to 27).
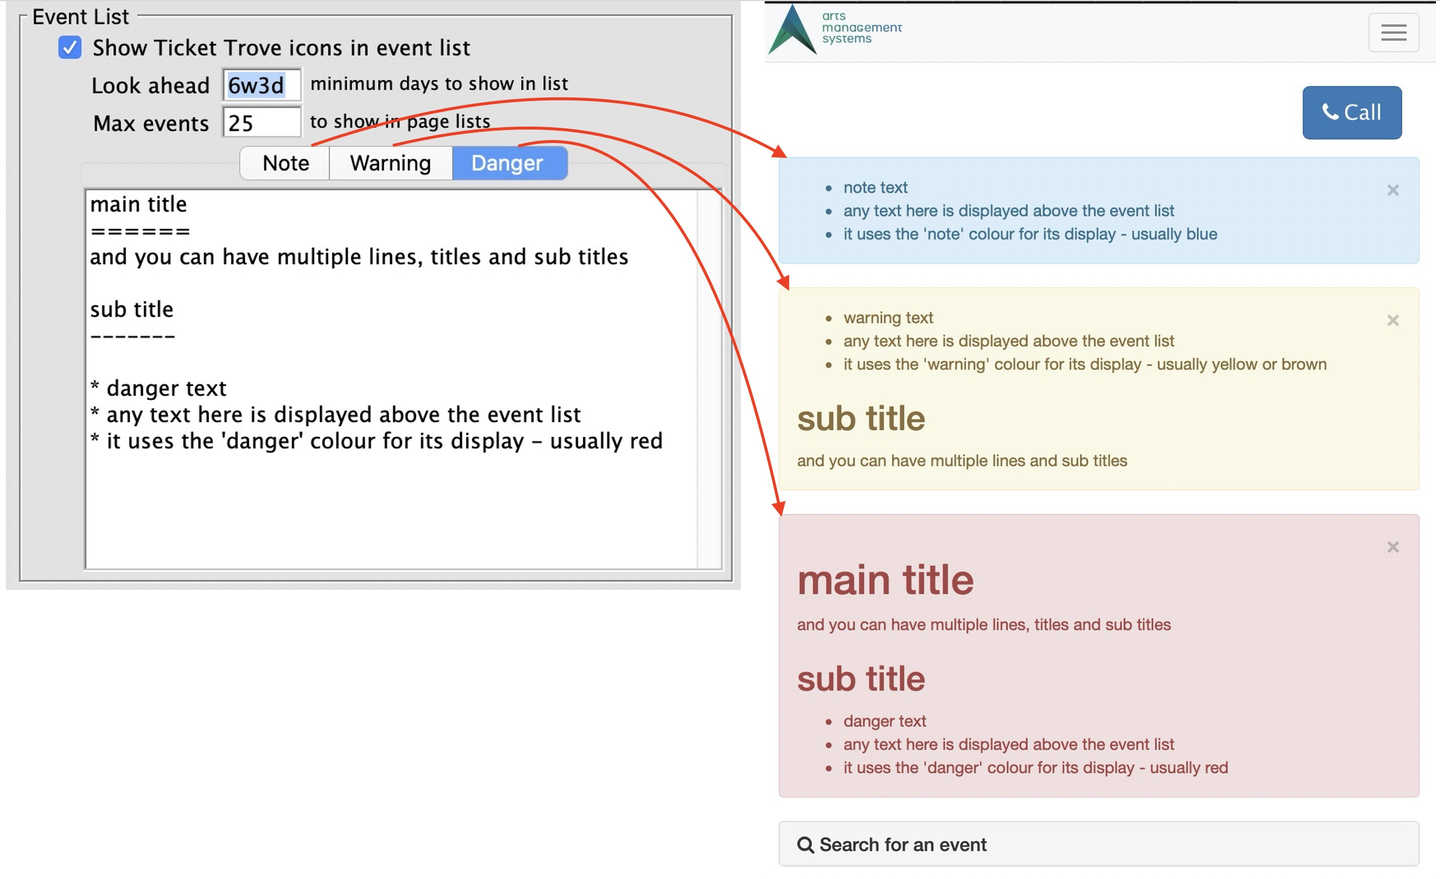

Note, Warning, Danger Alerts
You can add a Note and/or Warning and/or Danger alert to the top of your Online Event List. These will appear at the top of each page in the online sales. All three fields accept plain text, HTML or Markdown. This example shows using all three note fields, including Covid attendance protocols.

Using Note Field with HTML for Quick Pick Event Links
The Note and/or Warning and/or Danger fields can be used with HTML (as per this example) to add quick links for certain events. This could be a good use for popular on-sale days so patrons don't have to search or scroll to find the event.
Preferred Route to Ticket Selection Top
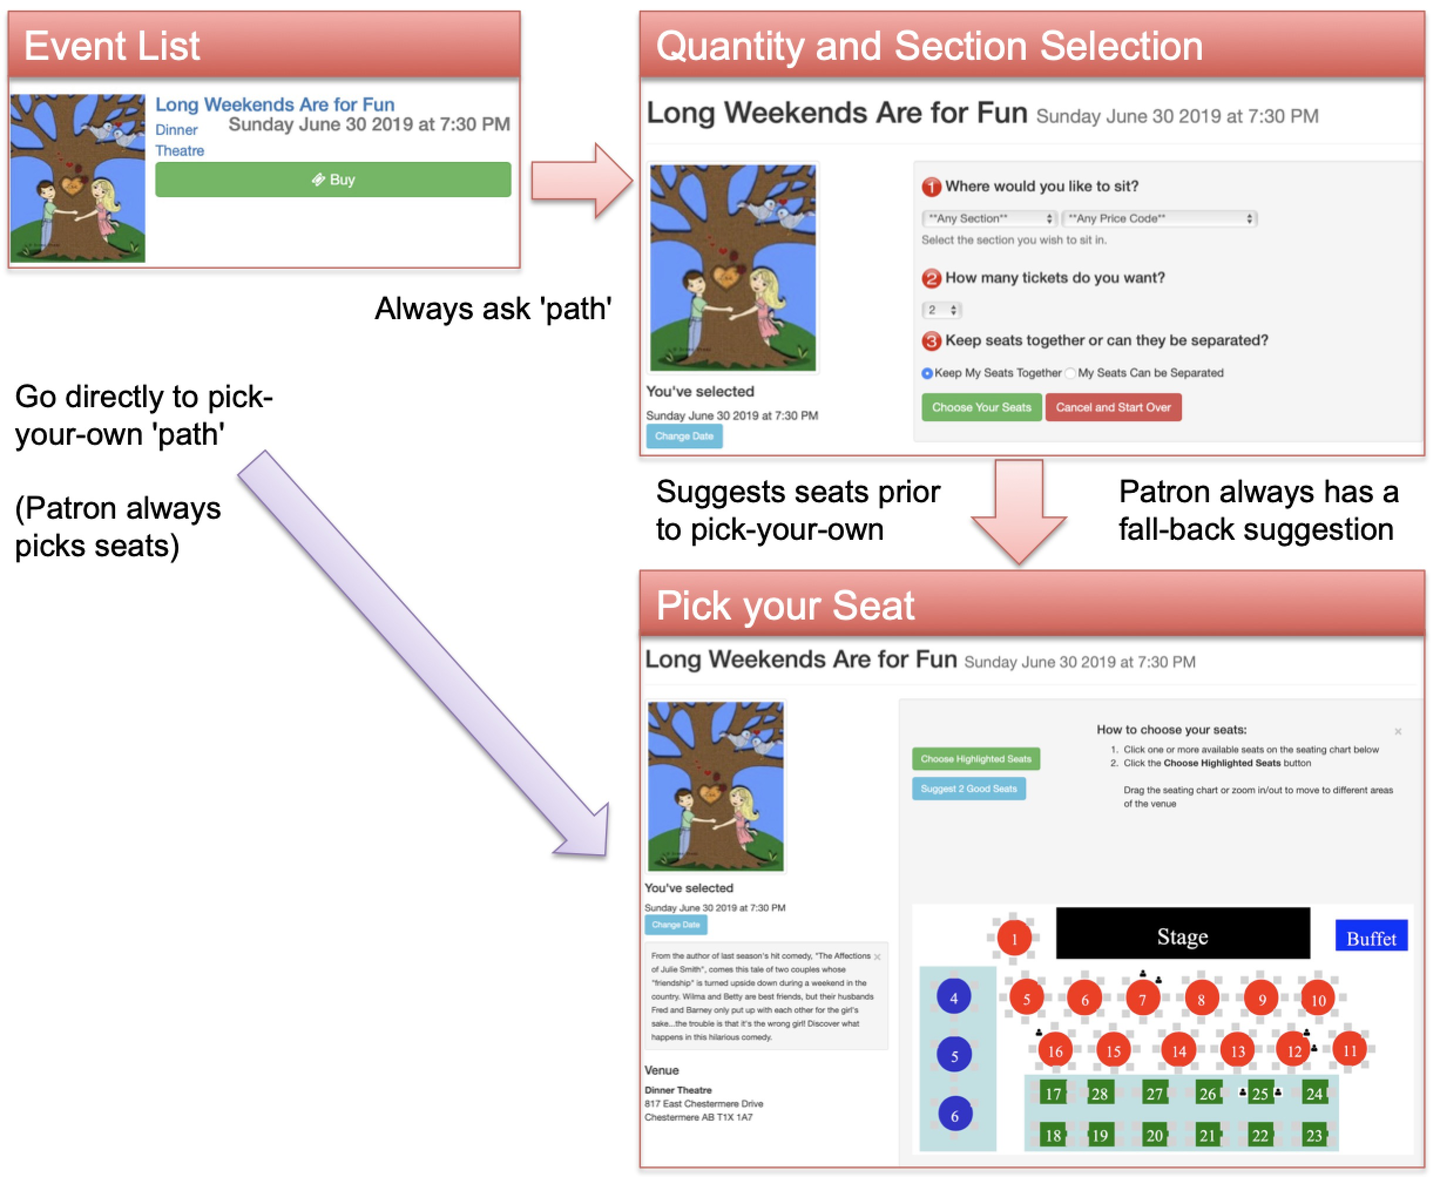

Preferred Route to Ticket Selection
This section describes the path taken from the Online Event List to the seat selection step of a shopping cart. This diagram illustrates the different flow options listed below.
Use Default Route
Unless explicitly selected below, the web listeners will take the default path to the seat selection window as decided by Artsman. Currently, the default path is to ask the patron where they want to sit and the number of tickets, but that may change as a result of feedback from venues in accordance with dominant marketing thinking. If you prefer one option over the other, please select it.
If not using pick-your-own seating in a venue, events sold in that venue will always ask for quantity/section.
Always Ask for Quantity and Section
This option provides the patron an intermediate step that asks for the number of tickets they want and the section they may want to sit in. This adds one page to the selection process and has the advantage that a user will always be guaranteed seats before they start the pick-your-own process.
Proceed Directly to Pick Your Own
This option brings the patron directly to pick-your-own seat selection, with no tickets pre-selected for them by the system. It is one webpage (and click) shorter than the other option, but does not guarantee patrons seats since they must be manually selected. When you send a patron directly to pick-your-own, there is a button for a quick suggestion of seats. The quantity suggested is the same as the suggested ticket purchase quantity in the Performance Detail Window. You can customize this per performance.
This option is NOT recommended for large on-sales as it may cause patron frustration if they try to pick some seats and find their selection being taken by others. Some ways to address this are:
- Manually modify the Ticketing Site link for the marketing website event page to automatically suggest a couple of tickets and thus provide a hybrid option.
- Globally disable the pick-your-own option during a large on-sales by picking the ask for quantity approach on this window. You can re-enable later and treat it as a temporary measure.
- Temporarily disable the pick-your-own setting for the map you are using for the on-sale. If pick-your-own is not enabled, then the events in that venue will use the ask-for-quantity approach and other events using different pricing maps will use the pick-your-own approach.
Ticket Selection Top
Show Sales Promotion on Offered Ticket
When selected, the Sales Promotion External Description will be visible to patrons online during seat selection. This appears on the seat selection window where tickets are offered to the patron after Theatre Manager has found them.
Show Price Code on Offered Ticket
When selected, the Price Code Description will be visible to patrons online during seat selection. This appears on the seat selection window where tickets are offered to the patron after Theatre Manager has found them.
Map Display
This setting indicates how you would like the map to display for web sales. For example, you can show patrons only the seats available with all others displayed blank, or you can show all seats with unavailable codes masked or unmasked. These setting can be overridden for individual performances. The options are:
- Selected seats only (sold are blank)
- Selected and sold (mask seat available codes)
- Selected and sold (actual seat available codes)
- Use
tmGifs/Map[x].jpgfor generic map - Do not display any map
Passes and Gift Certificates Top
Enable Pass/GC Redemption
Allows passes or gift certificates to be used as payment online. Only those pass types that have been setup for redemption online can be used online.
Enable Pass/GC Renewal
Allows the web renewal of passes or gift certificates that have been configured to be renewed online.
Donation Options Top
Suggest Adding General Donation
When selected, patrons will see a reminder at the top of a shopping cart to include a donation with their order at checkout. If clicked, the patron is taken to the Donation Screen to give to any campaign allowed online. Once a donation is given, the message disappears from the Shopping Cart Window.
Suggest Adding Round-Up Donation
If round-up donation is enabled and a campaign is specified, then a message will appear in the Shopping Cart Window and/or Checkout Window that prompts the patron to round-up their payment. The standard round-up options are to the nearest even dollar, nearest even 5 dollars, or nearest even 10 dollars. The roundup amount(s) can be easily customized in rowcartdonationroundup.html.
Once the payment amount for a Shopping Cart is an even dollar amount, the message will not appear.
The campaign must be enabled online (and you might not want to make it visible). It is recommended to make a separate campaign (named something like Round Up My Bill Donations) or to use your existing annual individual giving campaign.
CARTS AND CHECKOUT TAB Top
The Carts and Checkout Tab controls the payment processes that patrons experience online.
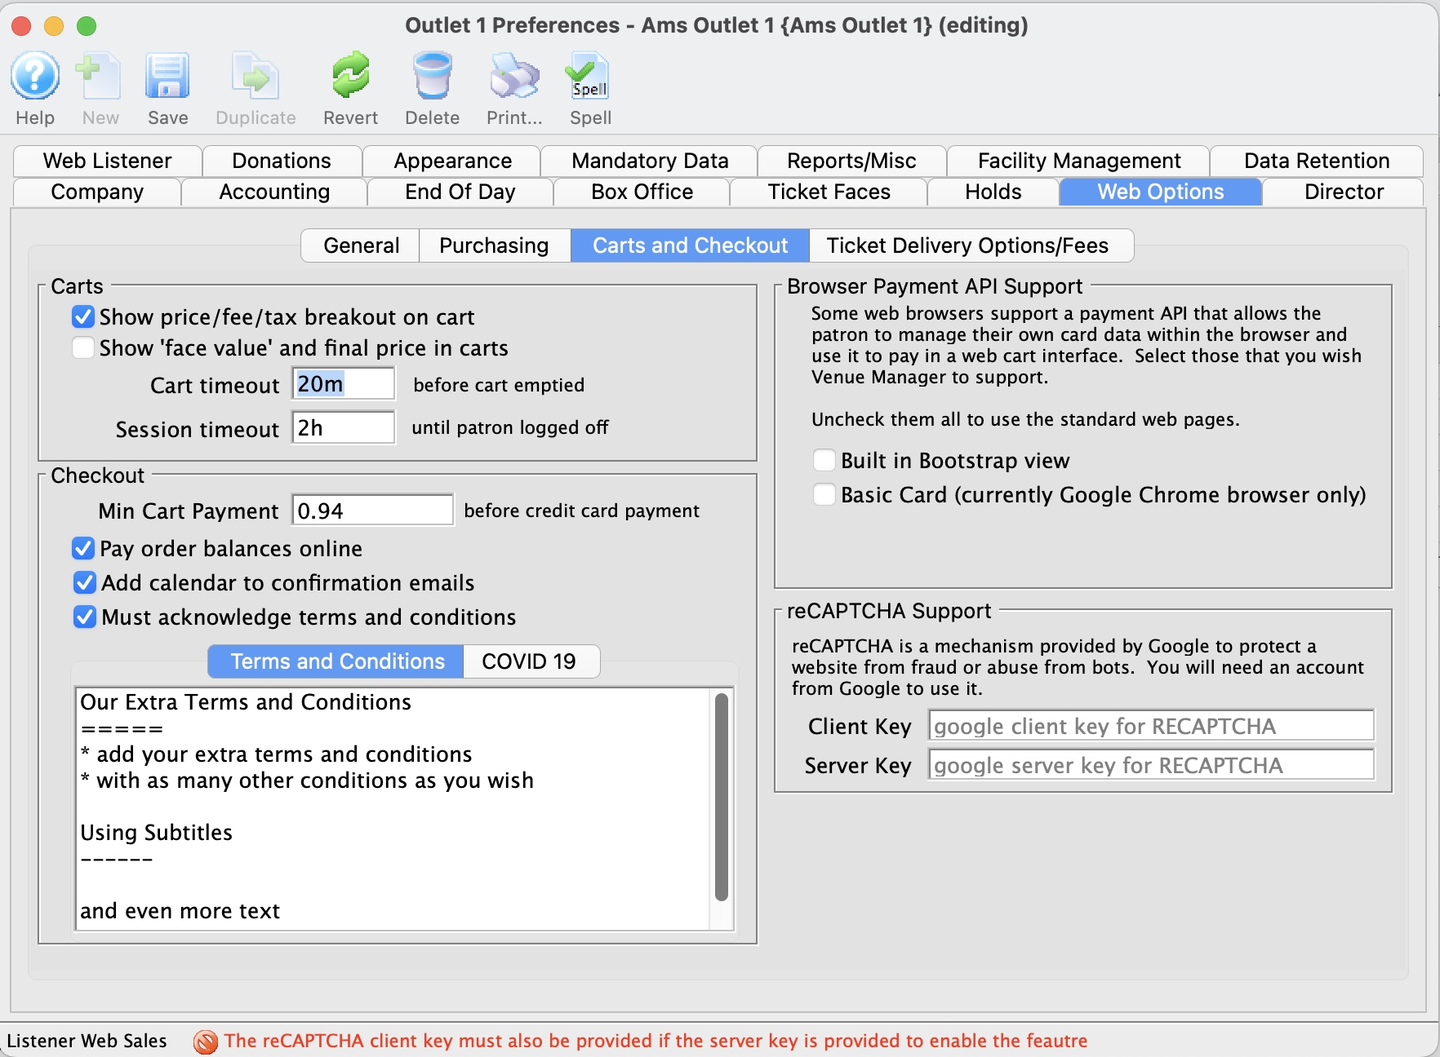
Carts Top
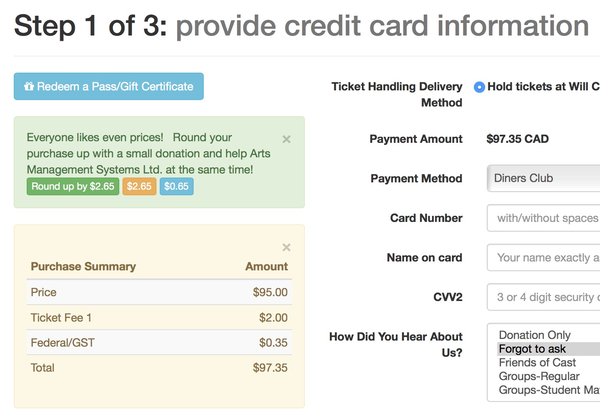
If enabled, a breakout of ticket prices, fees, taxes, etc. displays on the Checkout Page as per this image.

Show Face Value Price and Final Price in Carts
If enabled, this will show the face value of a ticket (as determined in the Web Options Tab) on all online web pages and any e-ticket emailed to a patron.
Cart Timeout
The number of minutes that a patron can do nothing after accessing a page before the cart becomes inactive and any items in cart are released. Whenever the patron requests another page to resume shopping, the timer is reset.
The cart timeout only releases items in the cart to others after the timeout is reached. If somebody is logged in, they stay logged in.
Moneris Hosted Payments requires that your cart timeout is 60 minutes. It cannot be less. This is because Moneris payment acceptance is 60 minutes, and we cannot close carts until their payment page has timed out.
Session Timeout
The number of minutes that a patron can be idle on the website before they are logged out. This must be the same or larger than the cart timeout.
The session timeout is when the patron is logged out (which also closes the cart if it is not closed). After that, the patron must login again if they attempt to complete a cart.
For streaming performances, we highly recommend increasing your web sales session timeout to be at least 1 week, and even up to a year. By extending the session timeout, patrons will not have to login as often which will smooth out the web experience and remove obstacles to purchase. This is especially true when patrons are logged in on mobile devices.
Checkout Top
Min Cart Payment
You can specify a value that the cart must meet or exceed before a credit card checkout can be attempted. This can be used to prevent "bad guys" using your website to try to verify stolen credit cards. Set it 0 to ignore the check completely. Carts containing only comp tickets or tickets completely paid for by passes are ignored by this setting.
Pay Order Balances Online
When selected, patrons will be able to pay for any outstanding order balances online for orders put on account snd marked as available for online payment. If this is disabled, then the feature of paying prior order balances is disabled completely, regardless of order flags.
If a patron pays for a prior order balance online, three (or more) payments are created in the patron record:
- 1 Credit Card Payment
- The credit card payment amount is determined based on the total value in the cart. This INCLUDES the balance on the prior orders.
- Cash Payment 1
- A CREDIT CASH payment is made to reduce the overall payment amount on the cart to the purchased value of new items (EXCLUDING totals for prior orders).
- Cash Payment 2
- A DEBIT CASH payment is made for EACH of the other order(s) that were added to the cart to be paid off.
- This allocates a CASH payment to each of the orders added to the cart to reduce its balance to zero.
The net effect is similar to a payment applied to multiple orders.
Must Acknowledge Terms and Conditions
When selected, patrons will be required to read/accept the terms and conditions at checkout (tmtermsandconditions.html). You may be able to place certain restrictions in the terms and conditions to cover exchange and refund policies, patron behaviour, age limits, scalping, etc.
Add Calendar to Confirmation Emails
If selected, a calendar item will be attached to the outgoing confirmation email as an ICS file. This can be double-clicked by the user to add their purchase dates to their calendar on their own devices.
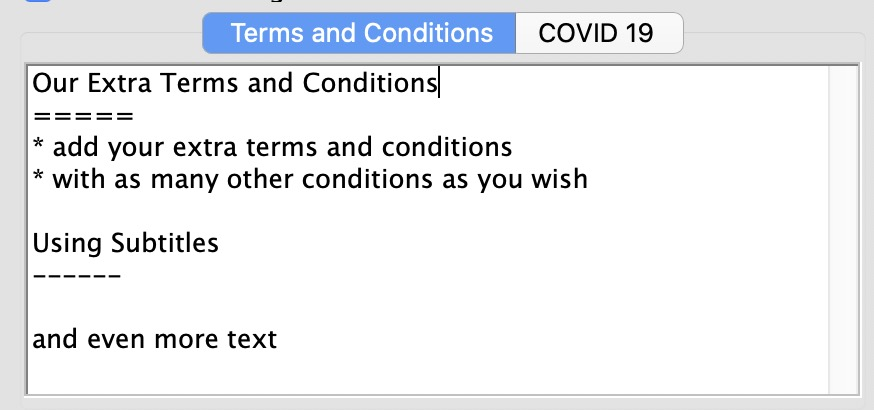
Terms and Conditions
You can add your extra terms and conditions here that show when they are requested on the checkout window.
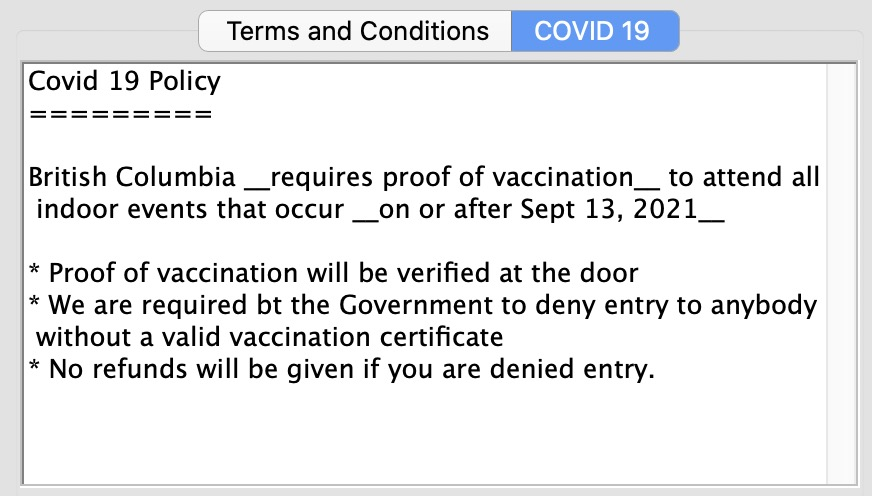

Covid 19 Note
You can enter your Covid 19 policy in plain text, HTML or Markup, and it will appear in the Ticketing Site automatically. Adding words to this tab also causes the Accept Terms and Conditions Checkbox to say that there are Covid 19 conditions. We recommend using this in conjunction with Online Event List notes so that people will see instructions both before and after ordering.
Notification
You can set up a Workflow Notification which specifies a list of email addresses that will receive a copy of all completed shopping cart emails. This can be used for audit or backup purposes.
If implemented, you will have to clean out the emails from the specified email account yourself. Use of this feature is NOT recommended if you have rate limiters at your ISP (such as Gmail).
Browser Payment API Support Top
Some web browsers support card payment options natively. This allows the patron to manage their own card data within the browser and use it to make payments in web cart interfaces. If this setting is selected, Theatre Manager will attempt to use alternate payment screens on checkout to try to simplify the payment interface.
If all are unchecked, then Theatre Manager does not try to take advantage of the APIs in a browser and uses the existing Ticketing Site Payment Screen that is designed to be the same on all browsers.
These options currently cannot be used with the Acknowledge Terms and Conditions option enabled (above).
Built-In Bootstrap View
If enabled, Theatre Manager will show a summary of the purchase and credit card input on one modal dialog using bootstrap. This causes other checkout options (like delivery options) to default. It is meant for use as a quick pay option.
Basic Card
If enabled (and the browser supports it), the browser will use its own built-in payment screen. Google Chrome is currently the only browser that implements this (since they invented it). If this option is not supported by your browser, then the built-in bootstrap view will be used (if enabled here).
reCAPTCHA Support Top
Google's security tool reCAPTCHA "uses an advanced risk analysis engine and adaptive challenges to keep malicious software from engaging in abusive activities on your website. Meanwhile, legitimate users will be able to login, make purchases, view pages, or create accounts and fake users will be blocked."
Client Key
If enabled, enter the client key that you obtained from the Google website when you signed up for the feature.
Server Key
If enabled, enter the server key that you obtained from the Google website when you signed up for the feature.
TICKET DELIVERY OPTIONS FEES TAB Top
The Ticket Delivery Options/Fees Tab controls which ticket delivery options are available to patrons online, including any related order fees. Any of these fees are optional. If you do not wish to charge them, set the fee to 0 or leave the fee setup blank.
Turning off any of the options on this window means that the delivery option (and/or fee) cannot be selected by the patron on the Checkout Window, regardless of any settings for each event.
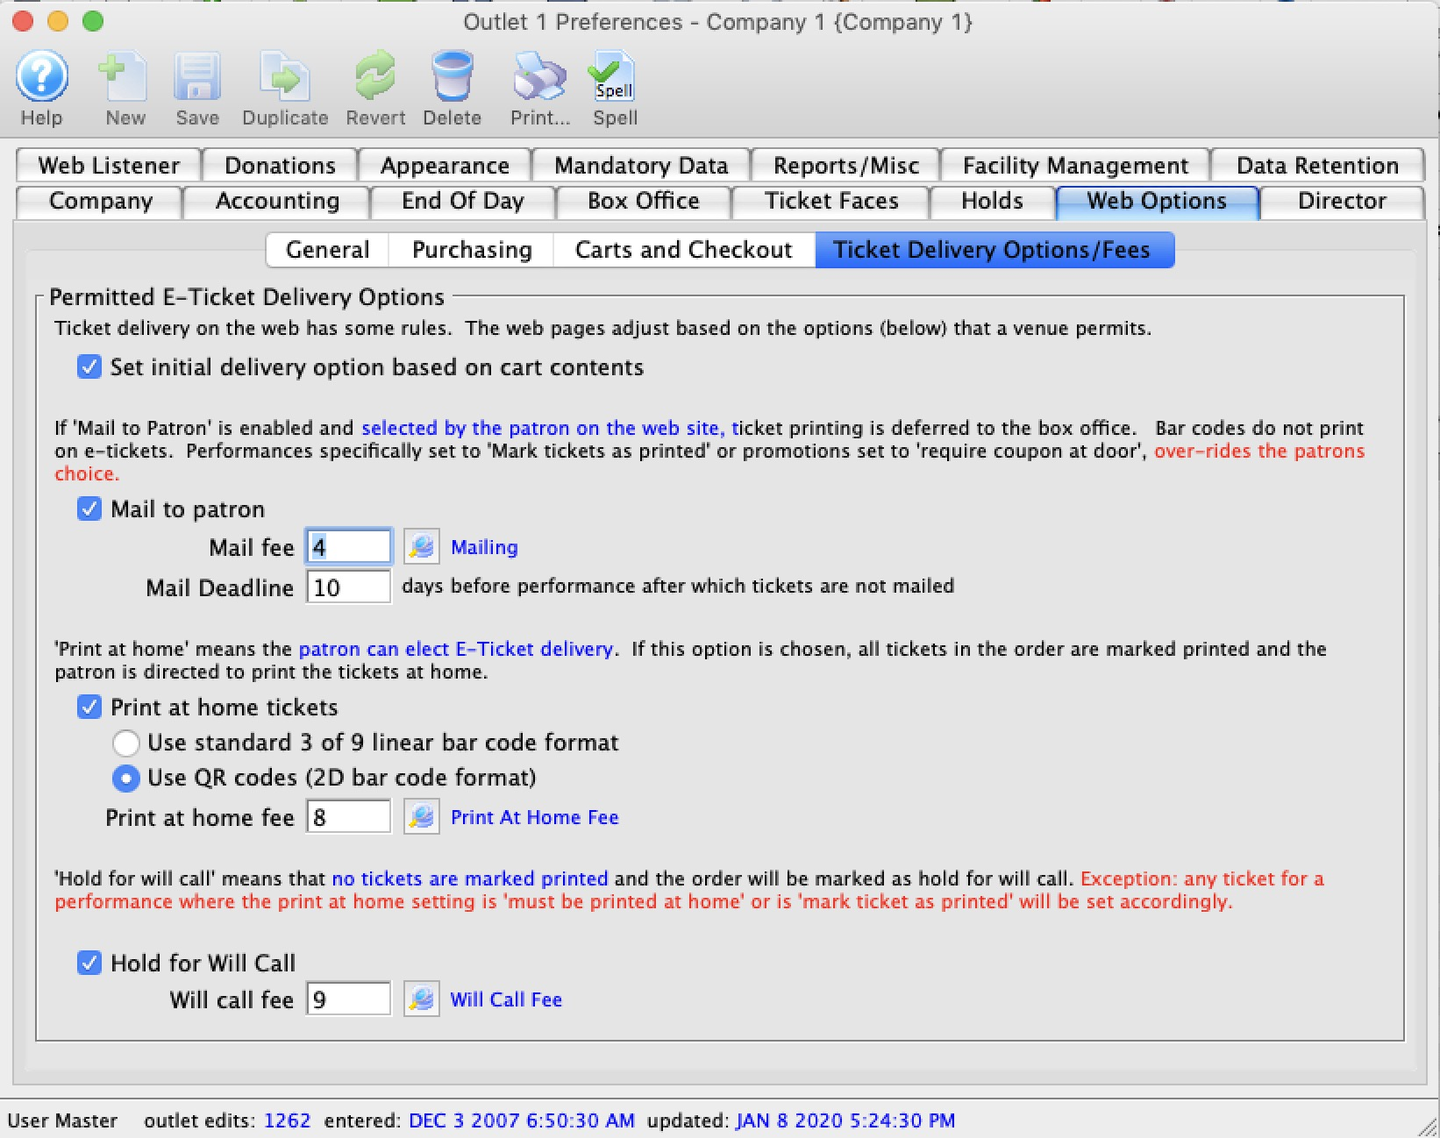
Permitted E-Ticket Delivery Options Top
Set Initial Delivery Option Based on Cart Contents
Tells the web server how to best set the ticket delivery options on the cart checkout page. If checked (the default), the web server picks the most appropriate ticket delivery option based on the contents of the shopping cart. For example, if the cart has events that allow e-tickets, that option/fee will be the default. If the cart has no e-tickets, the default becomes will call. If un-checked, the patron must always pick a delivery option manually.
Mail to Patron
Tickets purchased on the internet are marked for printing and mailing by the box office. A mail fee must be entered in order for this option to be selected. When selected, online patrons are presented with a Mail My Tickets option at checkout. This option generally includes a fee.
Mail Fee
The number of the Order Fee from Fee Tables that is designated for ticket mailing.
Print at Home Ticket
Tickets purchased on the internet are marked as printed and patrons are presented with the option to print their own bar-coded tickets. There are two bar code options:
- Standard 3 of 9 (ladder) bar code format.
- QR code format.
- The Linea-Pro scanner attachments for IOS (for iPhone/iPod) are able to scan both formats.
- The older MC55A Windows scanner attachments, no longer supported, can only scan the standard ladder codes.
If you enable print-at-home tickets in this window, there are some other action items we recommend:
- Setup some events to allow print-at-home tickets.
- Exiting events are not converted.
- All newly created events will default to print-at-home.
- Buy a test ticket to review what the PDF looks like.
- The default print-at-home ticket has space for an advertisement or other image that many clients choose to customize.
- Decide if you want to email tickets to patrons who call the box office.
- If implemented, an Email Ticket option will appear on the Payment Screen where the Print Ticket option used to appear.
- This also acts as a confirmation while allowing you to update email data for patrons.
- Review how to batch email tickets.
We have not yet had a venue ask for a fee to be included for this option, but it is included for completeness.
Print at Home Fee
The number of the Order Fee from Fee Tables that is designated for print-at-home tickets. Leave blank if you don't want to charge a fee for this option.
Hold for Will Call
When selected, patrons online can choose to have the box office print and hold their tickets in will call. The exception is any ticket for a performance where the print-at-home setting is Must Print at Home or Mark Ticket as Printed, which will force ticket delivery behavior accordingly. This option may be an emerging trend for fee inclusion as it biases the patron to choose print-at-home.
Will Call Fee
The number of the Order Fee from Fee Tables that is designated for tickets picked up at will call. Leave blank if you don't want to charge a fee for this option.
Director Tab Top
NGINX is the web server software used by Theatre Manager, which requires minimal configuration to work properly. The Director Tab is where you define most NGINX settings.
To install and setup TM Server in web services mode, click here.
For more information on the ports used by Theatre Manager, click here.

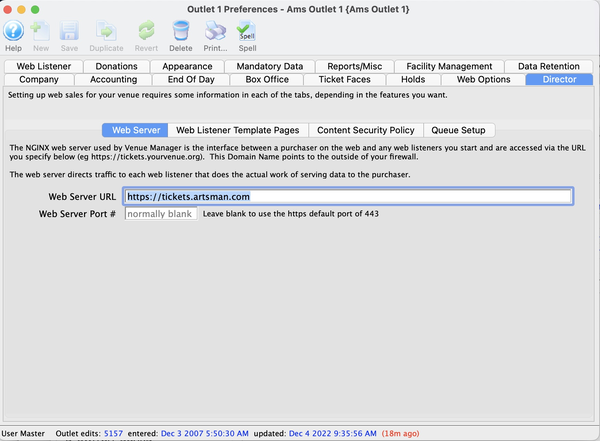
WEB SERVER TAB Top
The Web Server Tab of the Director Tab is where you define the location of your Ticketing Site.


Web Server URL
The domain for the ticketing site. Normally, this looks something like https://tickets.yourvenue.org.
Web Server Port
Enter the port number that the web server will be using for incoming connections. Normally, this is left blank to use the standard port 443 for incoming secure connections.
WEB LISTENER TEMPLATE PAGES TAB Top
The Web Listener Template Pages Tab of the Director Tab sets where and how your Ticketing Site pages are stored and updated.
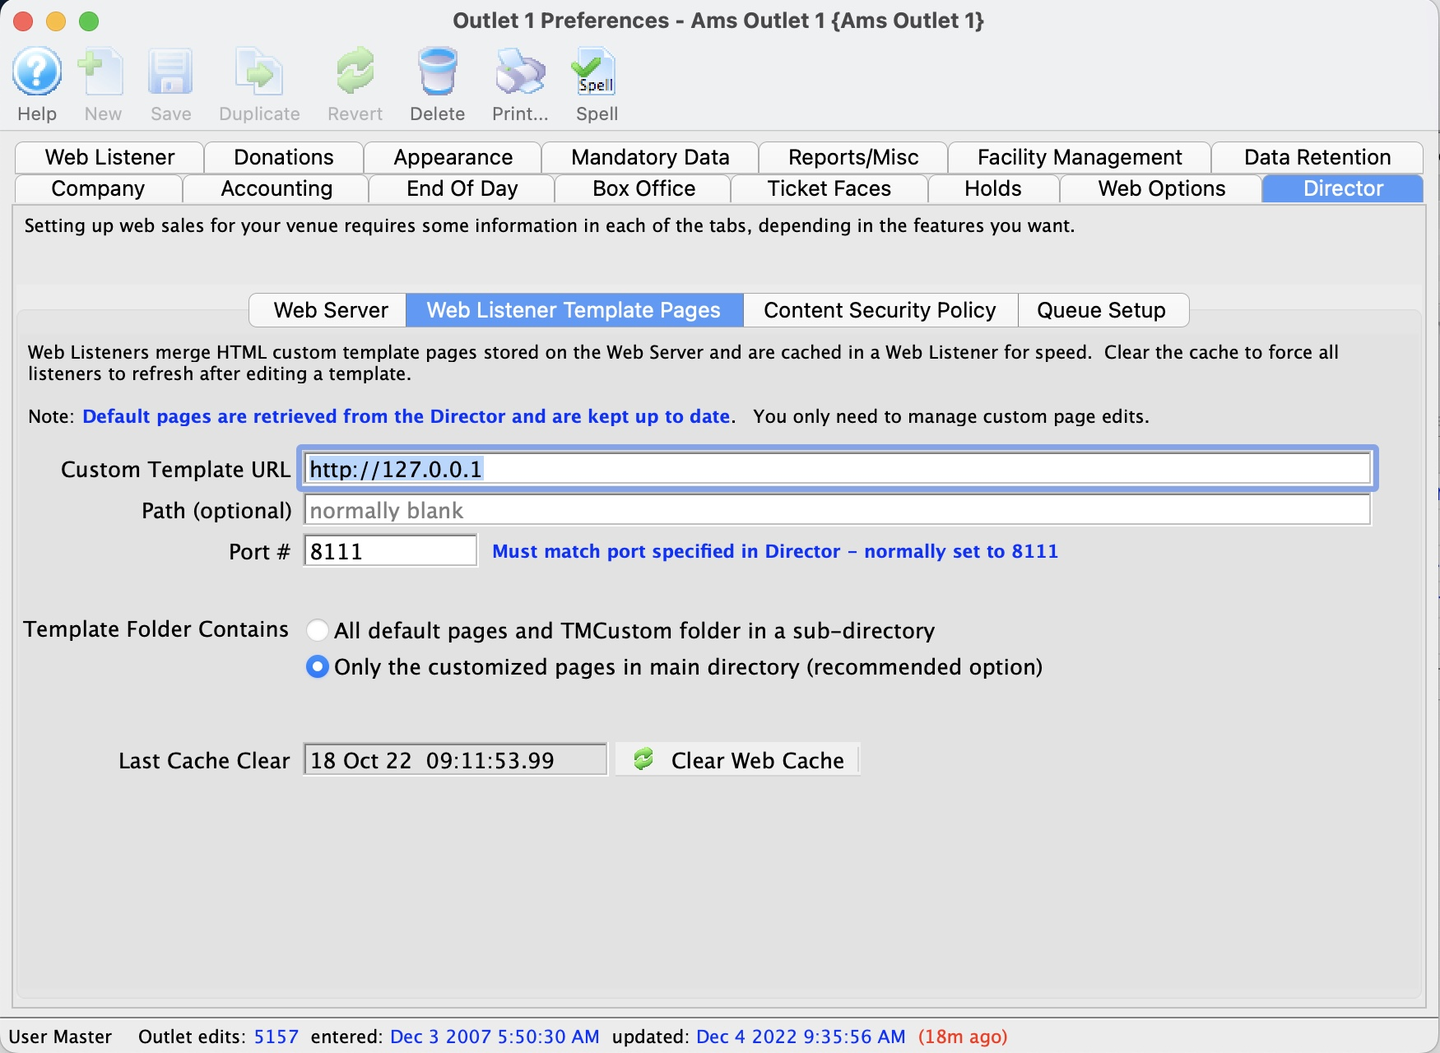
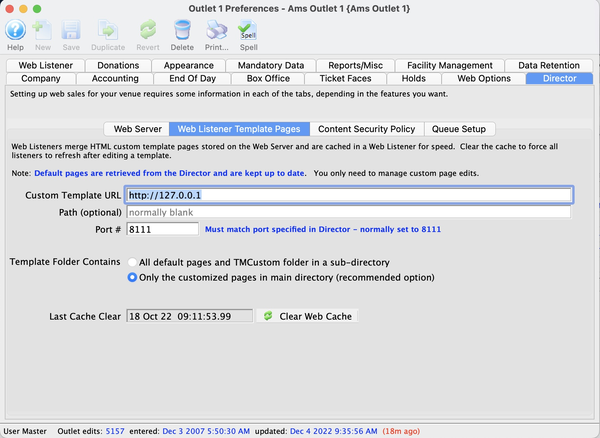
Custom Template URL
This is normally the address of the primary TM Web Server which has been designated to host your template pages. It will typically be an IP Address that looks like http://192.168.x.x.
Path (optional)
This field is used for cloud hosted clients.
Port Number
This is typically set to 8111 for the server that Theatre Manager uses to retrieve web page templates. This generally never changes unless there is a desire by your network administrator to use alternate internal ports.
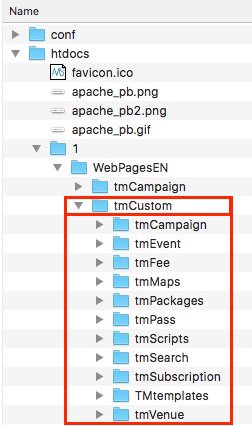
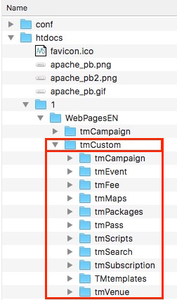
Template Folder Contains: ALL DEFAULT PAGES AND TMCustom FOLDER IN A SUB DIRECTORY Theatre Manager Server always gets the latest templates from its internal resources so the standard pages are always kept up to date. There are two choices for this setting to indicate how you want to store the custom pages. This is NOT the preferred option. Refer to typical pages that are changed for more information.
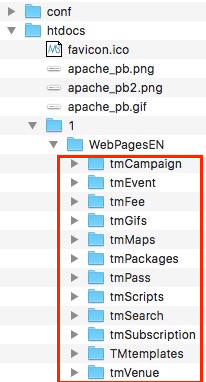

Template Folder Contains: ONLY THE CUSTOMIZED PAGES IN THE MAIN DIRECTORY Theatre Manager Server always gets the latest templates from its internal resources so the standard pages are always kept up to date. There are two choices for this setting to indicate how you want to store the custom pages. This IS the preferred option. Refer to typical pages that are changed for more information.
Last Cache Clear
The date the cache on the classic web listener was last cleared. The Clear Web Cache button to the right of this field can be used to reset or clear the cache on all currently running listeners by sending them a message that the web pages are all invalidated. It may take a few seconds as each listener re-reads them.
The listeners generally detect page changes within a minute and start using them automatically, but it will do it right away if you press this button. You can also clear the cache on the status page of any web listener.
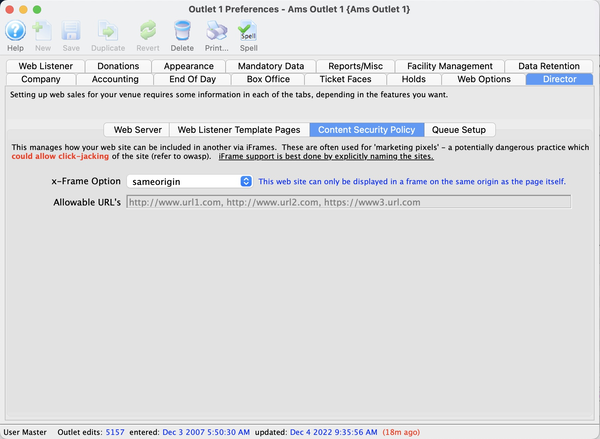
CONTENT SECURITY POLICY TAB Top
Read more about the technical meaning of x-frame options here and in Google searches.
The Content Security Tab of the Director Tab managed how your Ticketing Site can and cannot be included in another site via iFrames.
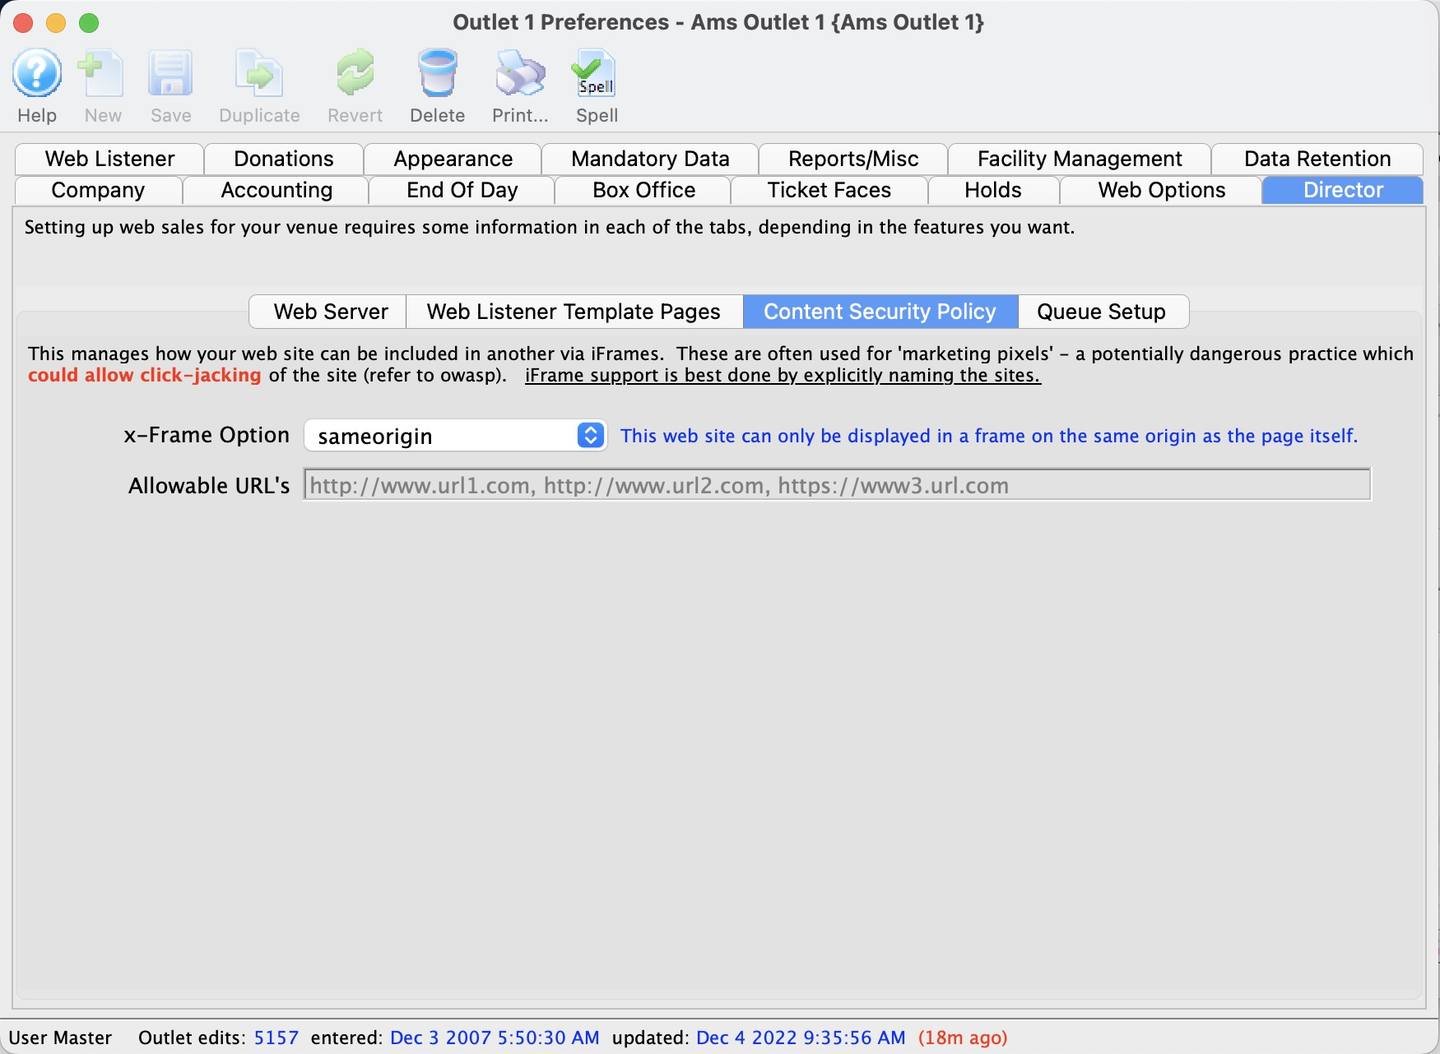
xFrame Option
The options are:
- off
- Doesn't include headers at all
- Everyone can put your site in an iframe
- sameorigin
- Only the exact same domain can use iframes
- deny
- No one can put your site in an iframe OR
- Specify any number of URLs that you would like to use (which includes same domain in addition to what you specify)
The implementation works by using the more modern Content-Security-Policy HTTP header, but it still includes the X-Frame-Options HTTP header both to pass your PCI test and to support legacy browsers.
Unfortunately, the X-Frame-Options HTTP header does not support specifying multiple domain names, so in that case, older browsers will only be able to see iframes if they are from the same domain even if you specify multiple domains in Theatre Manager.
We are passing both Content-Security-Policy and X-Content-Security-Policy and using Content Security Policy 1.0. This gives support in most browsers so the fallback issues are limited to a very small number of browsers.
Allowable URLs
When a list of allowable URLs is specified, enter the URLs that you want in this space, separated with a comma.
QUEUE SETUP TAB Top
If you aren't familiar with Ticketing Site queuing, read about the queue options before proceeding.
The Queue Setup Tab of the Director Tab is where you setup the queue process for managing periods of unusually high traffic in your online store. Generally speaking, a queue will only engage if your sales volume reaches a specified threshold.
Click the Enable Queue checkbox to enable one of the available queuing options from the dropdown (see below). Leave this checkbox unchecked to NOT use a queue, which means that no high-volume protection will be provided.


Built-In Queue Option Top

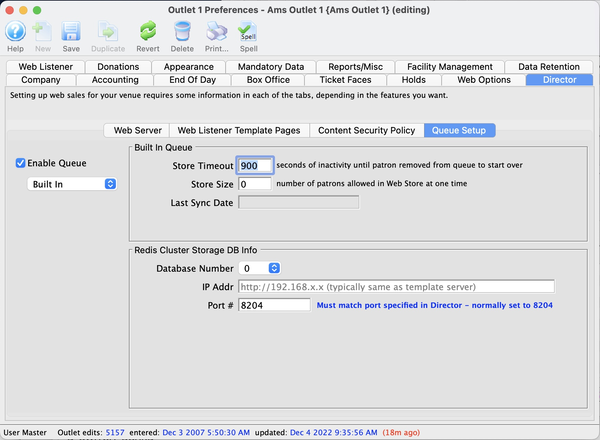
Web Server URL
The domain for the ticketing site. Normally, this should look the same as the template server if you implement the queue on the same machine as the templates are stored. Alternatively, you might wish to put it on the database server if there is a listener there.
Web Server Port
Enter the port number that the web server will be using for incoming connections. This is typically 8204.
Queue-It Option Top
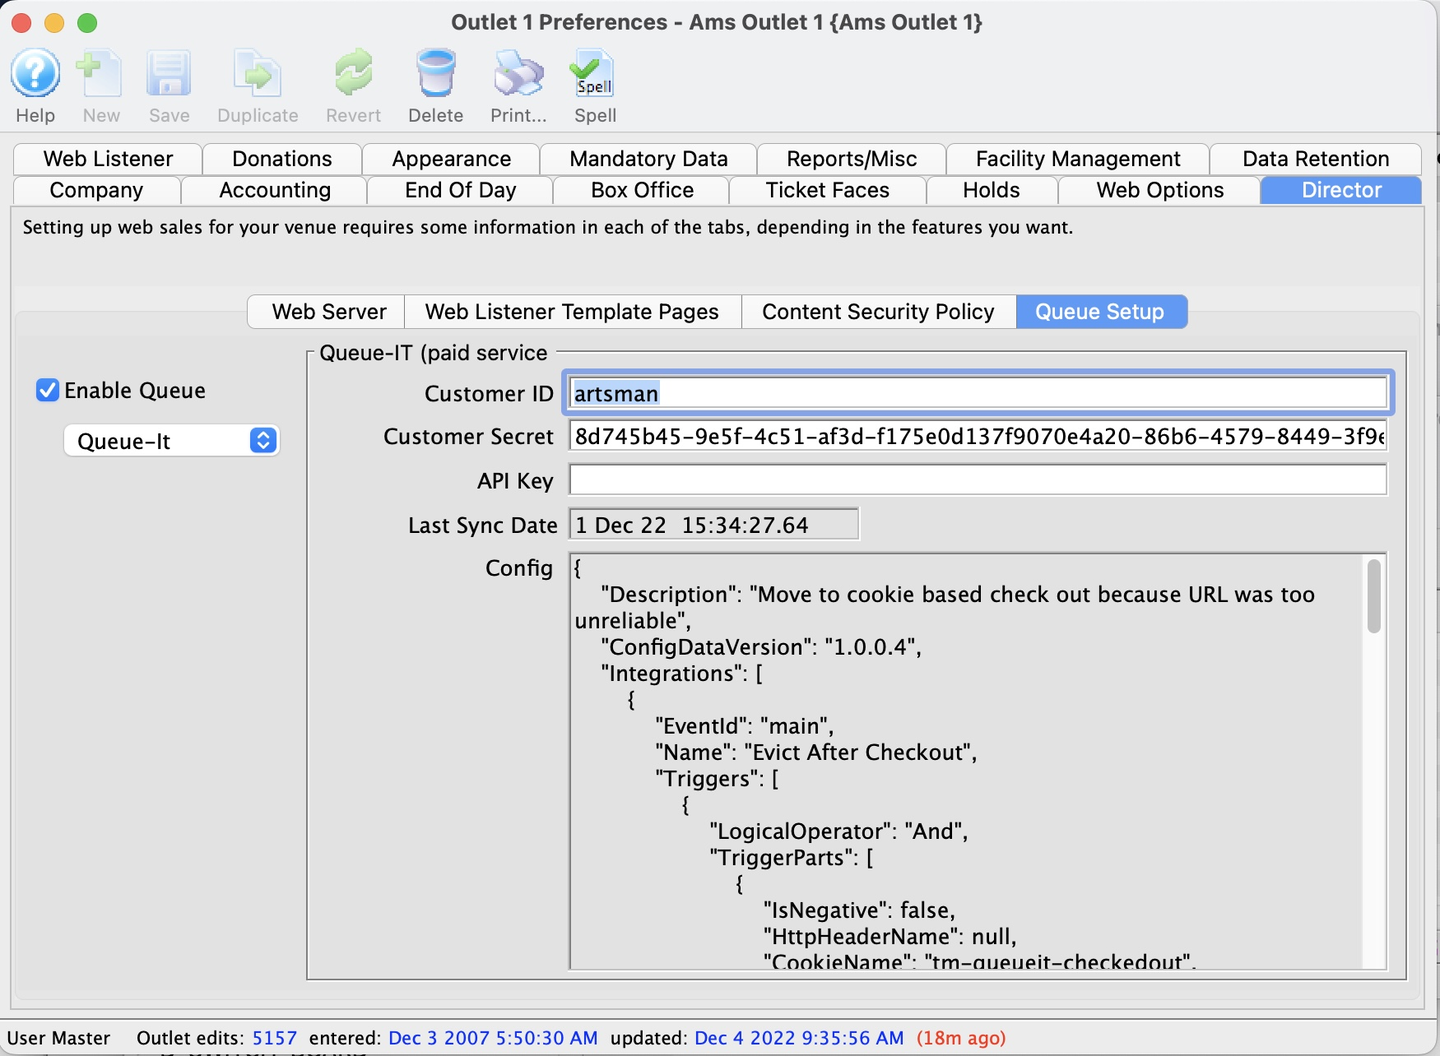
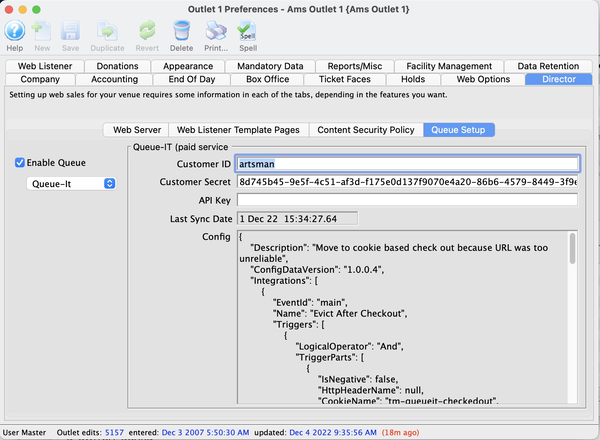
Web Server URL
The domain for the ticketing site. Normally, this should look like https://tickets.yourvenue.org.
Web Server Port
Enter the port number that the web server will be using for incoming connections. Normally, leave this blank to use the standard port 443 for incoming secure connections.
Web Listener Tab Top
The Web Listener Tab controls ways that the web listeners operate.

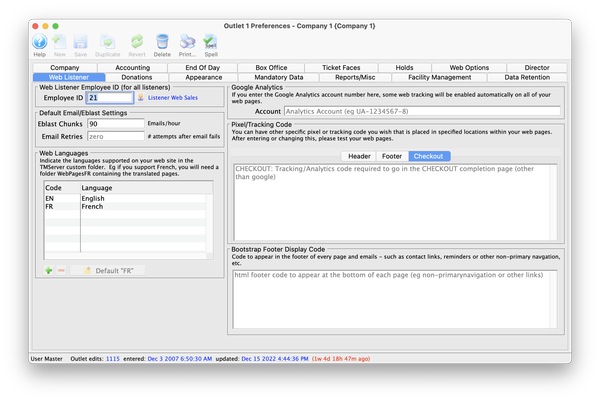
Web Listener Employee ID (for all listeners) Top
Employee ID This is the user ID under which all web sales will occur and is reserved for use by the web listener processes.
Default Email and Performance Settings Top
Eblast Chunks
The default number of emails to send per hour through the SMTP server. Set to 0 if there are no limits imposed by the SMTP server or your ISP. Set to a value a bit smaller than any hourly rate imposed by your ISP.
Email Retries
If an email fails, the number of times that it should be retried before being marked as in error. This should normally always be 0 and only be changed upon consultation with AMS support.
Transactions Create at Time of Sale
The web listener (like the box office) creates transactions at the completion of the order. However, you can change this to defer transaction creation in order to improve the performance of the web listener (this is the default setting). Deferring transaction creation for web sales affects when notifications are sent for web sales.
Google Analytics Account
If you have a Google Analytics account number, then all you need to do is enter it here and Theater Manager will automatically enable analytics for the entire website.
Bootstrap Web Page Footer
Any code that goes here will appear at the bottom of your website or emails.
Web Languages
The languages supported in your WebPages folder. Each is designated by a two-character language code (e.g. EN for English, FR for French, etc.) and will also be designated in the name of the WebPages folder(s) inside WebPages (e.g. WebPagesEN, WebPagesFR, etc.). Read about how to add a language to your online sales.
Pixel Tracking Code Top
Header
If the tracking code you use is required to go into the header of the page, paste it into this area. Please test your web pages after putting anything here.
Footer
If the tracking code you use is required to go into the footer of the page, paste it into this area. Please test your web pages after putting anything here.
Checkout
If the tracking code you use is required to go on the checkout page, paste it into this area. Please test your web pages after putting anything here. Pixel tracking codes can be usually be placed here to accomplish what you want without editing web pages. You can also edit web pages directly if you have unique requirements.
- Refer to a list of some common variables requested by Mogo, Facebook, or Google pixels.
- There is also a more extensive list of variables you can use on most web pages.
To test the pixel code, an order will need to be processed online. The pixel will appear on the https://tickets.myvenue.org/TheatreManager/1/TMcheckoutConfirmation.html page.
Donations Tab Top
The Donations Tab is where you set default values for a number of donation management features, including the patron's program recognition name, charitable number (required in Canada), typical number of donation tax receipts per gift, etc.
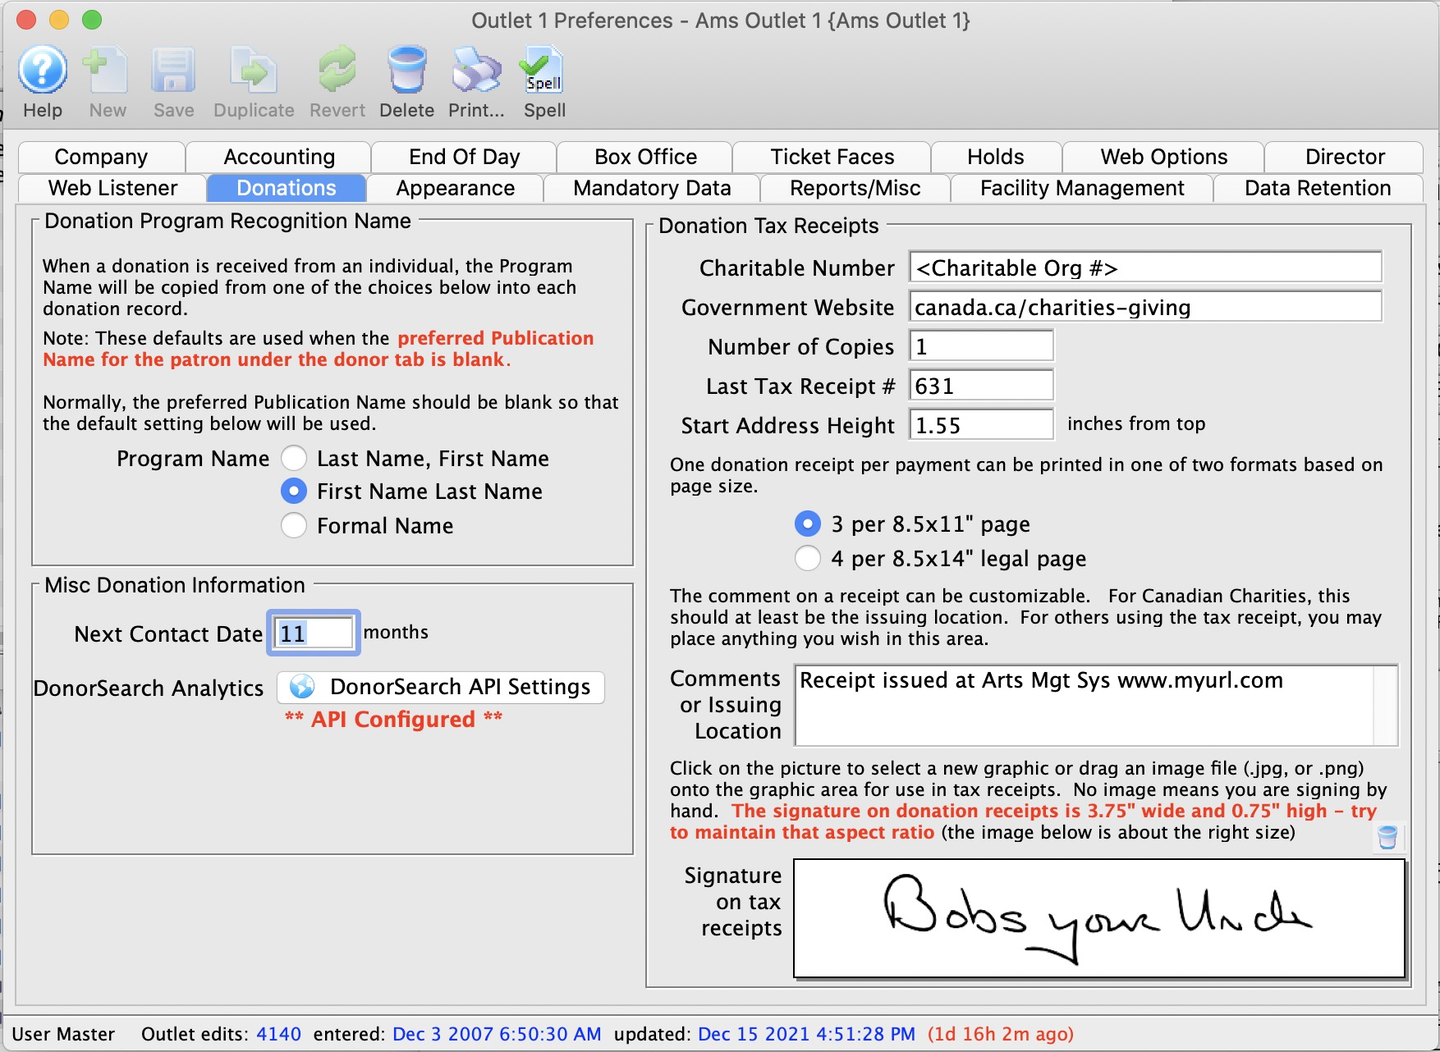
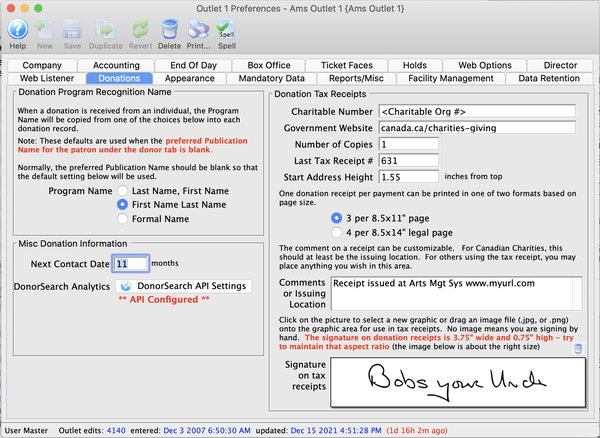
Donation Program Recognition Name Top
This determines the default Program Recognition Name for each donation. Having a default value when a donation is entered saves time. You can override the default value by entering a specific Publication Name on the Patron Donor Tab. While normally blank, this special patron name field is useful for foundations, government grants, etc. You can also always override the default value on each donation (e.g. for anonymous, in memoriam, in honor of, and similar such gifts).
Last Name, First Name
If selected, the name of the donor will appear on the program derived based on Last Name, First Name (if the publication name is not entered in the patron record).
First Name, Last Name
If selected, the name of the donor will appear on the program derived based on First Name, Last Name (if the publication name is not entered in the patron record).
Formal Name
If selected, the name of the donor will appear on the program derived based on Formal Name in the patron record (if the publication name is not entered in the patron record).
Misc Donation Information Top
Next Contact Date
The default number of months to set for the next contact with a donor. This value can be changed per donation to override the default.
Donation Tax Receipts Top
If you are going to enable online tax receipting, you should enter a signature and make sure there is a company report logo as well.
Signature for Tax Receipts
This is a facsimile signature to print at the bottom of a tax receipt. The space allotted on tax tax receipts has an aspect ratio of 3.75" wide and 0.75" high. Some notes about image sizing:
- Any image that is not this size will be scaled up/down to match this ratio.
- Reports will maintain the aspect ratio of any picture you put in.
- For best results, use a .png image with a transparent background that is the size above (or has the same aspect ratio).
Revenue Canada has some strict rules regarding facsimile signatures (not the same as electronic signatures) for tax receipts that Canadian users should review before proceeding.
Charitable Number
The organization's government-issued charitable organization number.
Government Web Site
Revenue Canada requires that all tax receipts have their specific donation related website on every tax receipt. If you enter the website here, it will print on your tax receipts. If you leave it blank, you will need to preprint the website on you charitable receipt forms.
There is an IRS website as well, but to our knowledge it is not a mandatory element for charitable receipts.
Number of Copies
The number of copies of the donation receipt to print. This is typically 3 in Canada.

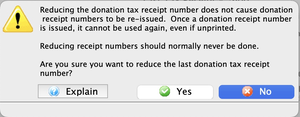
Last Tax Receipt Number This indicates the last-used tax receipt number. The next printed receipt will take on the first number greater than this. You can change this number forward, or backward. You will receive a popup message to alert you that skipping receipt numbers is not recommended.
Typically, this starts at 0 and is never changed.
Receipt numbers cannot be reused. If Theatre Manager discovers a receipt number that is used for a donation or was previously used and is now unprinted, it will skip to the next available receipt number automatically. This means printing, un-printing, and then re-printing a receipt will always result in a NEW receipt number, even if you roll back the last receipt number.
Starting Address Height
The space to leave between the top of the receipt and the address.
3 Per 8.5 X 11 Letter Page
Prints three tax receipts per 8.5" X 11" page.
4 Per 8.5 X 14 Legal Page
Prints four tax receipts per 8.5" X 14" page.
Comment or Issuing Location
The general message on the receipt for every donation.
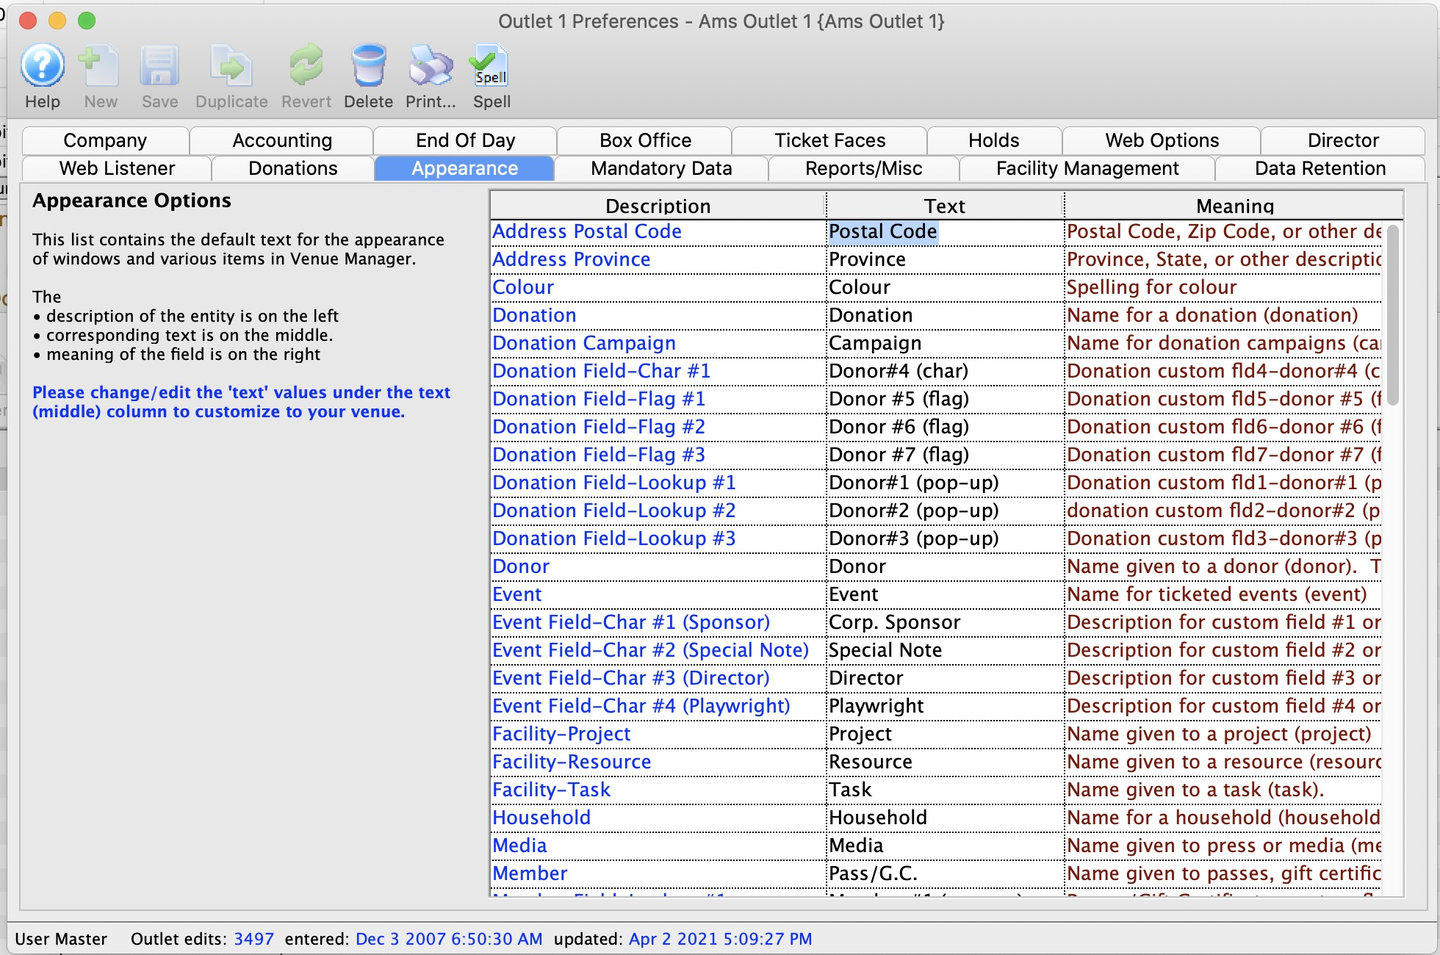
Appearance Tab Top
Caution
Changing these values will change the corresponding information on the website, so care should be taken to pick words that both you and your patrons are familiar with to establish a common vocabulary.
The Appearance Tab allows the change to the titles of common fields. A common example is province versus state. To set or edit a custom field name, change the value in the Text column that corresponds to the correct row in the Description column, then click the Save button.

Some examples of alternate titles are listed below:
- Donor (e.g.
Donor,Sponsor, etc.) - Donation (e.g.
Donation,Gift. etc.) - Event (e.g.
Event,Play,Show,Game,Rodeo,Movie, etc.) - Festival Seating (e.g.
Festival,General, etc.) - Household (e.g.
Household,Family, etc.) - Internet Fee (e.g.
Internet Fee,Convenience Fee, etc.) - Media (e.g.
Media,Press, etc.) - Member (e.g.
Member,Voucher,Pass,Gift Certificate, etc.) - Membership (e.g.
Membership,Pass,Certificate, etc.) - Patron (e.g.
Patron,Customer,Client, etc.) - Performance (e.g.
Performance,Show, etc.) - Personnel (e.g.
Personnel,Volunteer,Actor,Staff, etc.) - Postal Code (e.g.
Postal Code,Zip Code, etc.) - Province (e.g.
Province,State,Territory, etc.) - Seat (e.g.
Seat,Chair, etc.) - Section (e.g.
Section,Door, etc.) - Social Security (e.g.
Social Security,Social Insurance, etc.) - Spouse (e.g.
Spouse,Partner,Parent, etc.) - Venue (e.g.
Venue,Theatre,Arena, etc.)
Mandatory Data Tab Top
The Mandatory Data Tab allows setting which fields are required on the creation of a new patron, order, donation, pass, etc.

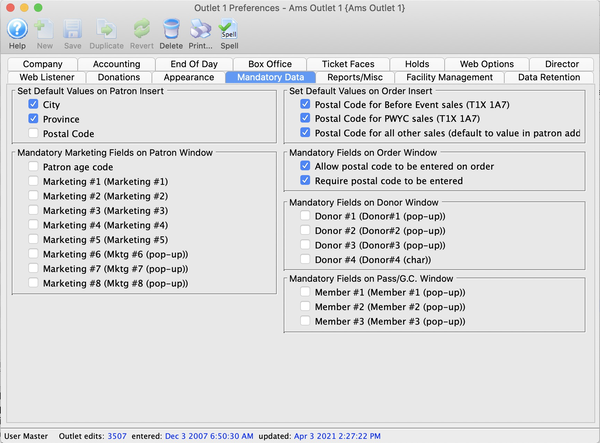
Default Data on Patron Insert Top
City
Enabling this box ensures a default city is entered when a new patron is inserted. The default city comes from Company Preferences >> Company Tab >> City Field.
Province/State
Enabling this box ensures a default province/state is entered when a new patron is inserted. The default province/state comes from Company Preferences >> Company Tab >> Province/State Field.
Postal/Zip Code
Enabling this box ensures a default postal/zip code is entered when a new patron is inserted. The default postal/zip code comes from Company Preferences >> Company Tab >> Postal/Zip Code Field.
Mandatory Marketing Data Fields on Patron Window Top
The options include Patron Age Code and all eight of the customizable patron marketing fields.
Default Values for Postal Code on Order Insert Top
Postal Code for Before Event Sales
When checked, sales entered using the Before Event Sales Feature will all pull the postal code value from the Company Tab into the postal/zip code field on the Order Window.
Postal Code for PWYC
When checked, sales entered using the Pay What You Can (PWYC) Feature will all pull the postal code value from the Company Ta into the postal/zip code field on the Order Window.
Postal Code for All Other Sales
When checked, all sales will pull the value from the postal code in the patron's primary address into the postal code field on the Order Window.
Mandatory Fields on Order Window Top
Allow Postal Code to Be Entered on Order
When selected, a field for the postal code will appear on the Order Window and may be filled in (but is not required).
Require Postal Code to be Entered
When selected, a field for the postal code will appear on the Order Window and must be filled in. It can be defaulted in the Set Default Values for Order Insert Section. The key reason to use this field is to capture generalize location data if your venue draws from a wide area during walk-up sales.
Mandatory Fields on Donor Window Top
The options include all four of the customizable donor popup fields.
Mandatory Fields on Pass/G.C. Window Top
The options include all three of the customizable member popup fields.
Reports Misc Tab Top
The Reports/Misc Tab contains company logo and summaries for reports and the online sales, fundamental date and time settings, automatic employee inactivity logout time, and other company (outlet) level parameters.
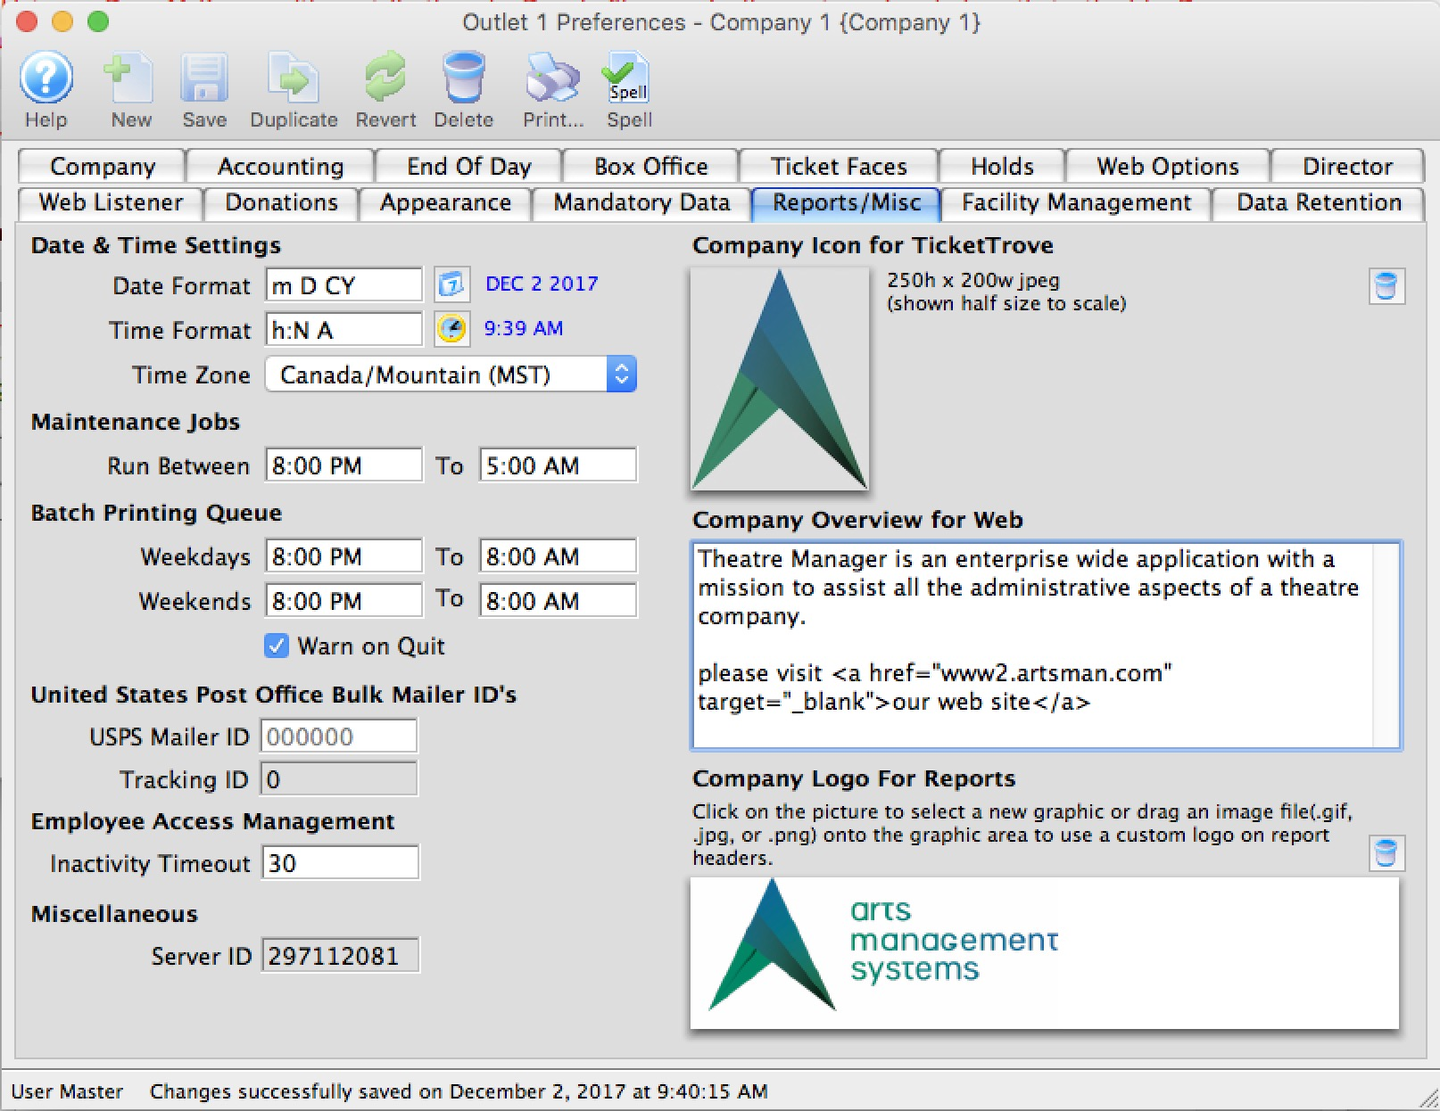
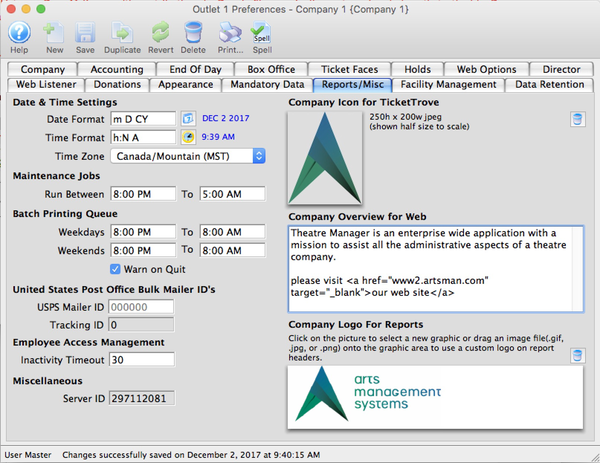
Date and Time Top
Date Format
The format for the date. Use the search list window icon to view all possible options.
{% end %}
Time Format
The format for the time. Use the search list window icon to view all possible options.
{% end %}
Time Zone
Select the time zone that your venue is in. When Theatre Manager starts, it will tell the server that this is the local time zone and if your time is different (accounting for time zone awareness), TM will inform you of the mismatch.
If any of your workstations are located in a different timezone than the database setting (this is rare), you can set a specific time zone at a specific workstation by configuring the preferences file and set it to one from the list of timezones. {% end %}
Maintenance Jobs Top
Maintenance Jobs
Maintenance Jobs are tasks performed by Theatre Manager Server that can be deferred to non-peak hours.
Run Between
Enter the Start Time and End Time to limit maintenance jobs to a specific time interval. The default is 1:00am to 5:00am, but you can schedule this to be 23:00 (11pm) to 3:00am or any such time as you wish. You many want to schedule for after your late-night backup.
Batch Printing Queue Top
The Printer Batch Queue allows users to set up reports to be created and printed during non-prime business hours.
Weekdays
The time of day for the reports in the printer queue to start printing for Monday through Friday.
Weekends
The time of day for the reports in the printer queue to start printing for Saturday and Sunday.
Warn on Quit
Click to warn a logging off employee if there are any reports in the Batch Printer Queue to be printed. At least one employee must remain logged on to have the reports in the queue to be printed during non-prime time hours.
Employee Access Management Top
Inactivity or Auto Logout Timeout
Number of minutes of inactivity before Theatre Manager will automatically log out the current user and quit the application completely. The auto logout is initially set to 15 minutes as required for PCI compliance (PCI 8.1.8). You may tighten the restriction if you wish to force logout more often.
In addition to the feature built into Theatre Manager for auto log out, you are encouraged to use the screen saver provisions that require passwords after the screen saver is activated.
Company Icons Top
To adjust, click on the picture to select a new graphic or drag and drop an image file into the graphic area.
Company Icon for Ticket Trove
250x200 pixel jpg that Ticket Trove, and it's replacement will use for your logo thumbnail. Click here for more information on how to add images to Theatre Manager for Ticket Trove.
Company Overview for the Web
A description of the organization to appear in the online sales. It is to give the patron insight into what the organization stands for.
Company Logo for Reports
The space allotted for the logo on reports has an aspect ratio of 3.75" wide and 0.75" high. Any image you place into this field that is not that size will be scaled up/down to match that ratio. Reports will maintain the aspect ratio of the picture you supply. For best results, use an image that is the size above or has the same aspect ratio.
Facility Management Tab Top
Caution
This page is still under development and further content will be forthcoming.
The Facility Management Tab contains setting to customize calendar, gantt chart, and Facility Management notifications.
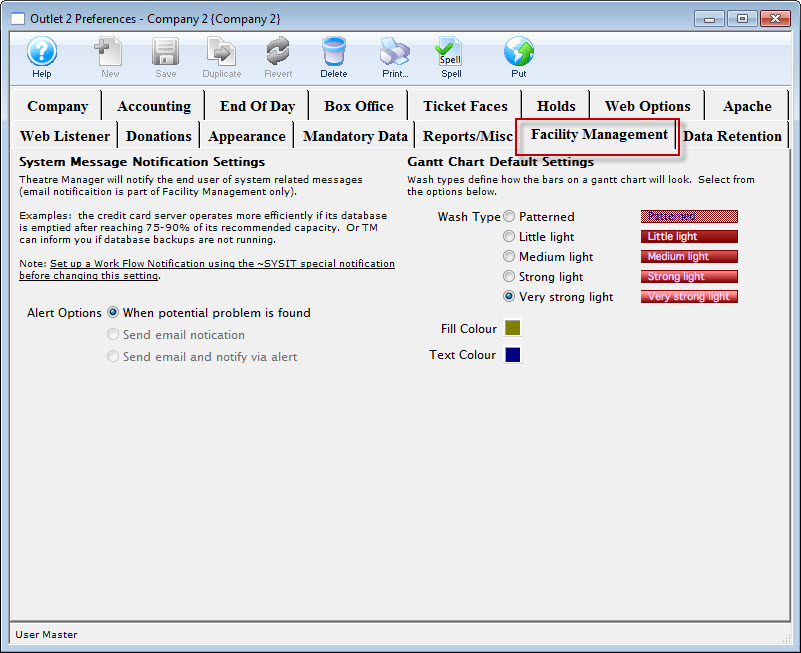
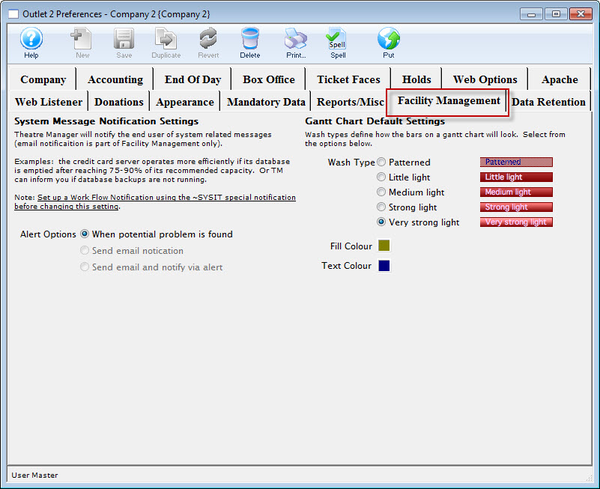
Gantt Chart Default Settings Top
Wash Type
This is the type of bar you wish displayed on the Gantt chart in the Facility Management Projects Window.
Fill Color
Select the default fill colour for new bars in the Gantt chart.
Text Color
Select the default text colour for new bars in the Gantt chart.
Data Retention Tab Top
Did You Know?
Canadian users may want to review Revenue Canada's Records Retention Requirements, which addresses documents such as tax receipts, financial records, meeting minutes, etc.
As a true CRM system, Theatre Manager retains a complete record of important patron interactions. You may consider some of the data less valuable than other data and can indicate when you want this information purged from the database. Doing this helps reduce the size of the backups. It also means that the data would not be available online and can only be retrieved by reloading a monthly or annual back up of the database.
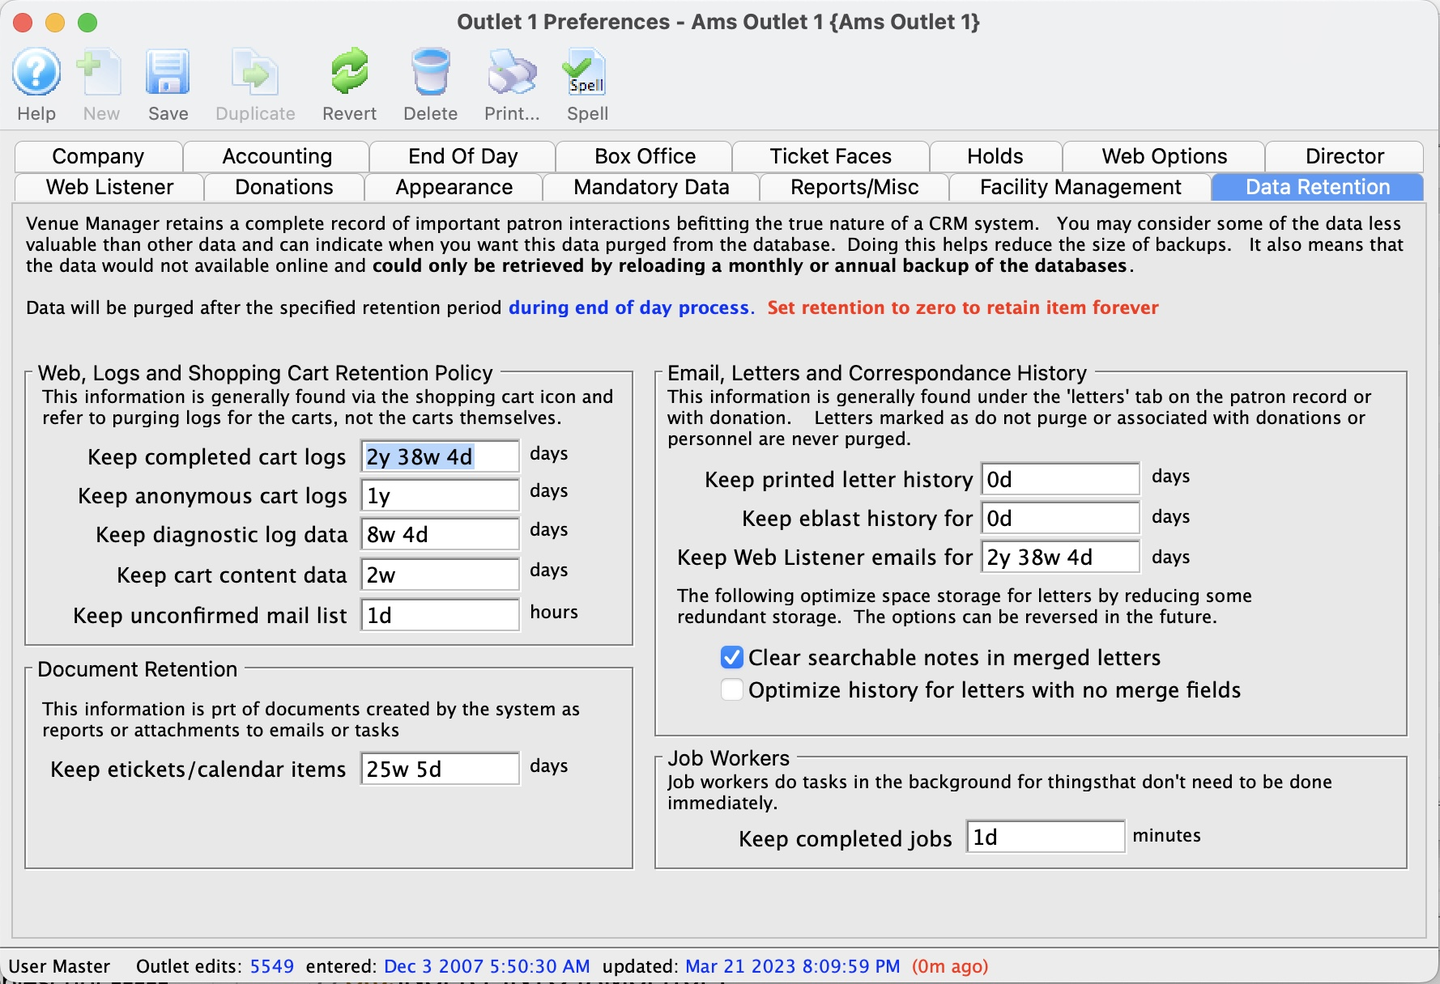

Web Logs and Shopping Cart Retention Policy Top
Purge Completed Carts After XX Days
After this many days, purge web logs for carts where a patron signed in. Only logs are purged, not actual carts.
Purge Anonymous Carts After XX Days
After this many days, purge web logs for carts which remained anonymous or were not attached to a patron. Only logs are purged, not actual carts.
Purge Misc Data After XX Days
After this many days, purge miscellaneous data entry online that is not confirmed or saved by the patron.
Purge Unconfirmed Mail List After XX Hours
This represents the amount of time that a pending subscribe to a Mail List will remain without patron confirmation (from the double opt-in web email). If a patron does not confirm in time, the patron will be removed from the Mail List.
If the patron does confirm they want added to the Mail List after the time-out, they will be re-added in double-opt-in status (for CASL).
Keep Cart Content Data
Shopping carts have multiple lines that describe what the patron placed in their cart. One very important part of the checkout process is the recorded data about prices, promotions, seats, donation amounts, levels, resources, etc.
When a cart is checked out, this data is copied to the actual tickets, donations, resources, gift certificates and is no longer needed. It is also not needed if carts are abandoned. However, it can take up significant space on a database. We recommend keeping this data for about 14 days or so as part of the audit trail, should AMS have to inspect carts to resolve issues. Other than that, it is worthwhile purging this data.
Document Retention Top
Keep E-Tickets/Calendar Items
Indicate how long e-ticket and calendar files attached to emails are to be kept around. This number indicates the number of days after the performance before the e-ticket data is cleared from the document record. The document record is kept around to track that the patron was sent the information; it is only the contents that are removed. Removing the content significantly reduces the size of the database and backups.
Email, Letter and Correspondence History Top
These settings are for retaining letters and correspondence history sent to patrons. Correspondence has the most text data and takes up the most space in backups. Letters can now can be purged en masse with two key exceptions:
- Each letter has a preference indicating any history for which it cannot be purged for and must be kept forever.
- For example, school contracts, artist contracts, etc. should be kept.
- Eblast letters are less important and after a few years should be allowed to be deleted from correspondence history.
- Any letter attached to a record that is one of donation, donation receipt, volunteer position, volunteer history, or media can never be deleted, regardless if the letter is set to delete.
- These letters are typically small in number, yet important enough tax/personnel records that they remain forever.
You can review letter history in each patron record or use the Letter Recipient List to review items sent to multiple patrons based on search criteria.
Keep Printed Letter History for XX Days
The default is 0, which keeps anything printed forever. Set to 1000 to keep any printed letter for 1,000 days after it is printed.
Keep Eblast History for XX Days
The default is 0, which keeps items forever. If you set this, then anything sent from the batch email merge or emailed to a patron individually will be deleted.
Keep Web Listener Emails for XX Days
Refers to any email originated by the web listener in response to a customer request (e.g. requests for passwords, confirmation emails, notes regarding patron info changes, etc.). These are less useful so the default is to remove them after 1,000 days. Set it to 0 if you want to keep these forever.
Clear Searchable Notes in Letter
The default is on (checked). Letters and eblasts also contain a text-only version (no html or images). This means there are essentially two copies of each letter kept for each communication with a patron. The field is not used for searching, which allows the field to be emptied to save space. It is also possible to reconstitute this data if need be.
Delete History for Letters with No Merge Fields
Some letter merges and eblasts contain no merge fields (e.g. a pure HTML eblast). By tracking that, the history is the same as the original letter. It is possible to always see the content without needing to track the merged data. Any customized letter is not the same as the original letter and would not be compressed using this technique.