Exchanging tickets can be performed for General Admission, Reserved Seating or Traveling Troupe sales:
- exchanging from one performance to another within the same event
- across events
- from a higher price to a lower price ticket
- from a lower price to a higher price ticket
There are no restrictions when exchanging tickets. The only condition when exchanging tickets is the tickets selected must exist within the same order number.
All the Exchange how to guides in this section assume that:
- A reserved seating event with multiple price points is active.
- The company exchange settings and employee settings have appropriate security controls that allow:
- exchanges for performances of past performances
- exchanges for printed tickets
- collecting or not collecting the difference in money for higher priced tickets
- refunding or not refunding the difference in money for lower priced tickets
- The original tickets being exchanged are on an order that has been paid in full and does not carry a balance owing or due.

Did You Know?
The red minus signs indicate the original tickets, now marked as exchange from, while the green plus signs indicate the new tickets, now marked as exchange to.
Change Price and Promotion Top
The following steps outline how to change the price, or sales promotion, or both, of a ticket after they have been sold. You may need to do this if the tickets were sold for the wrong price or promotion in the past.
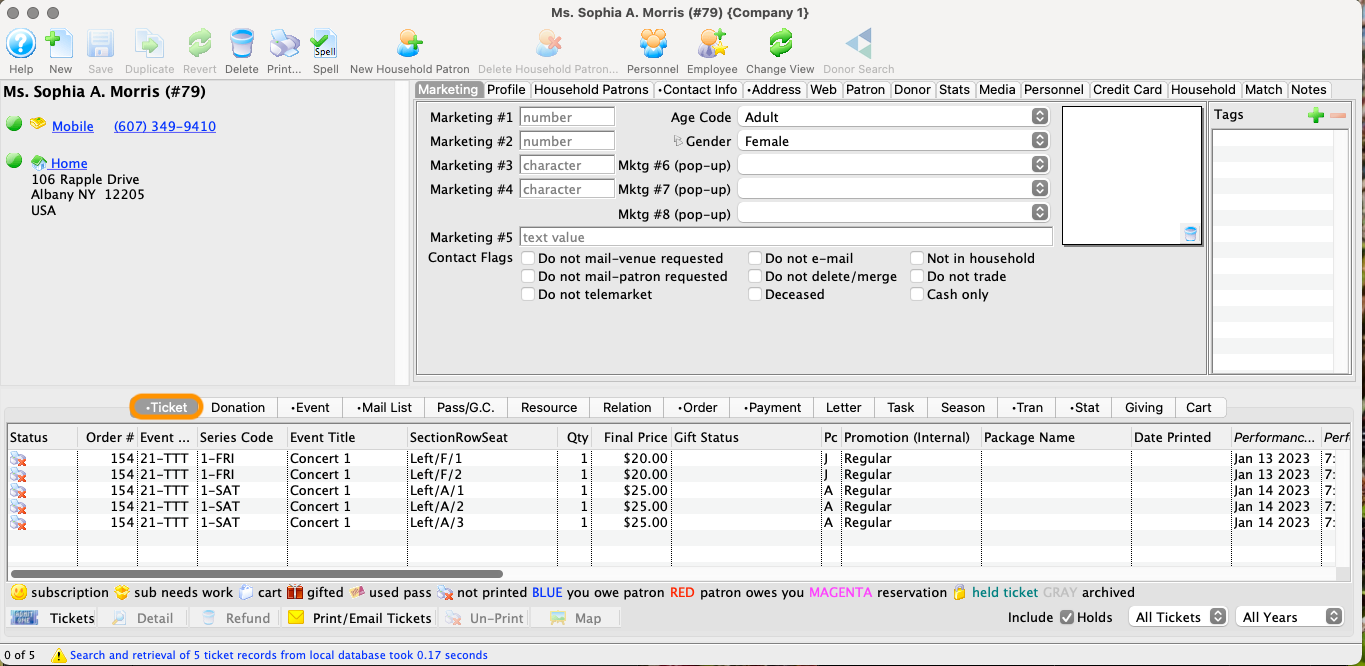
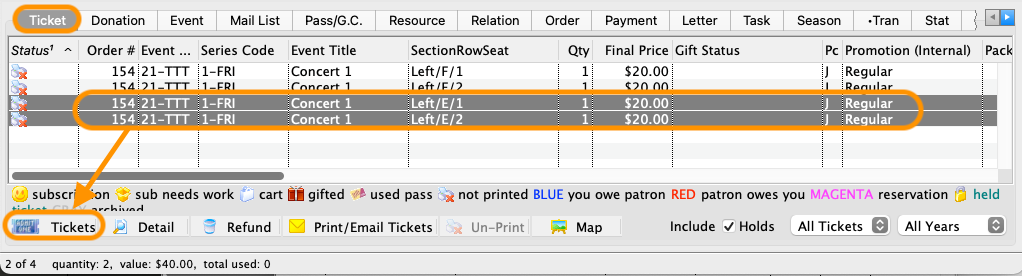
Find the Patron Wanting to Exchange Tickets.
- Open the patron profile
- Select the Tickets tab
Highlight the Tickets to be Changed.
- See next step
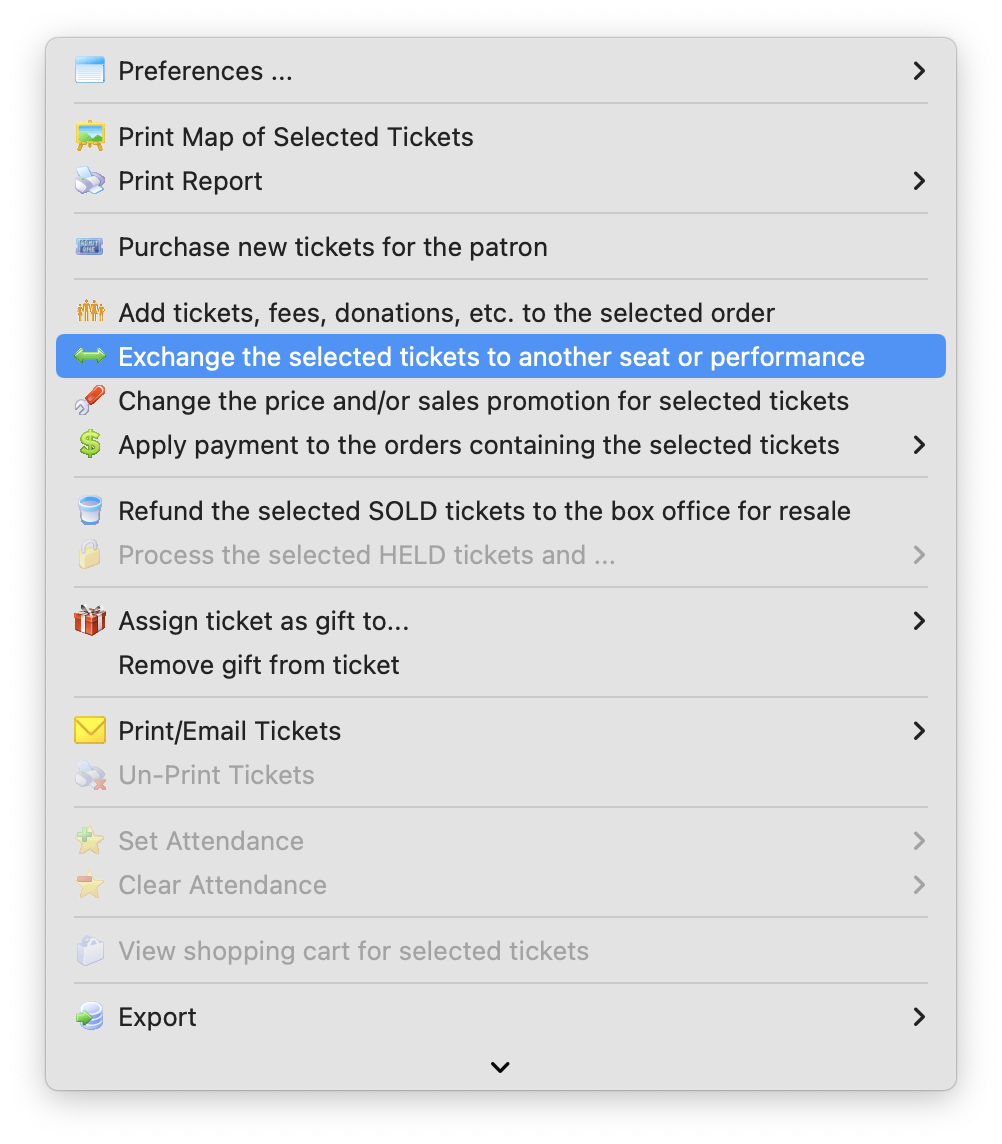
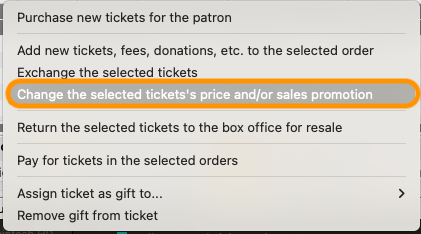
OPTION A: Select Change the selected tickets's price and/or sales promotion from the Tickets button .
- Click the Tickets button
- Select
Change the selected tickets's price and/or sales promotion

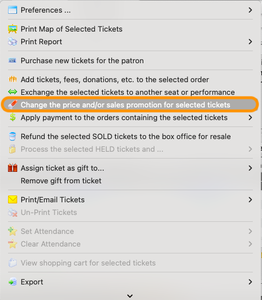
3. OPTION B: Select Change the price and/or sales promotion for selected tickets from the ticket context menu
- Right-click (Windows) or control-click (MacOS) the highlighted tickets
- Select
Change the price and/or sales promotion for selected tickets
Reprice Tickets to the New Promotion and/or Price Code.
- On the Seat Selection tab of the open order, highlight the new sales promotion and/or price code
- Highlight the tickets to be changed (which are now listed in the new ticket list)
- Click Reprice

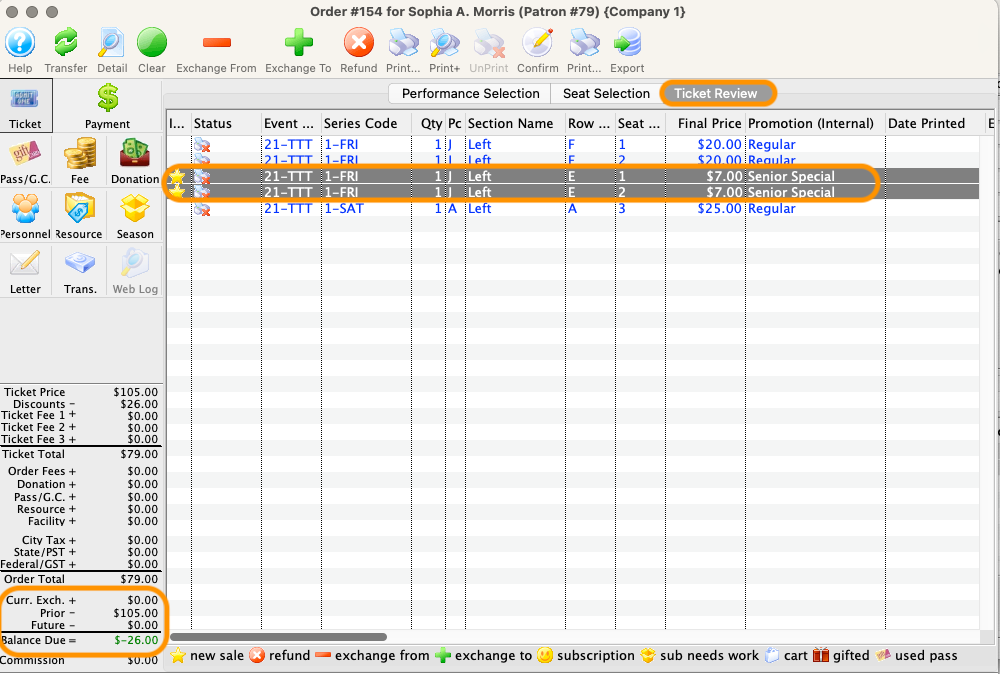
Review the Repricing.
NOTE: The yellow star icon indicates the original tickets that have been marked as new for repricing. The left-side running order summary shows any balance due or owing if the tickets are now a different price.
- Review the ticket prices and sales promotion
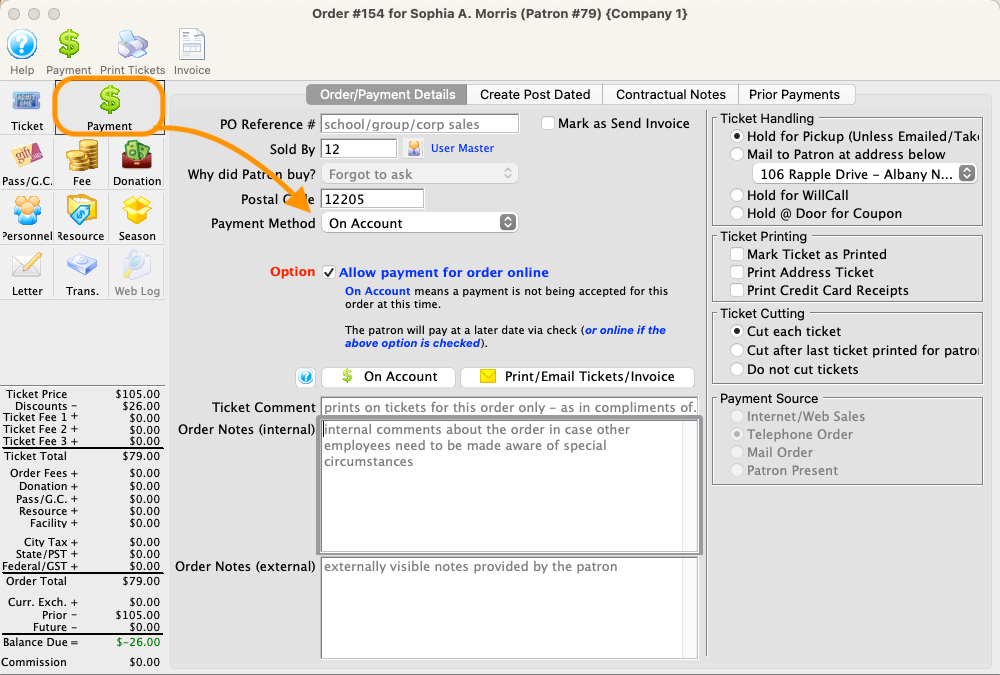
Pay for or Refund Any Price Difference.
- Click the Payment button to open the payment screen
- Select a payment method to collect from or refund back to the patron
- Click Accept Payment or Provide Refund and close the order
Did You Know?
You can also right-click (Windows) or control-click (MacOS) the highlighted tickets and select Exchange the selected tickets from the context menu.
Basic Steps (from Patron Ticket Tab) Top
Full Exchange gives the user full control over the entire procedure. In effect, the patron is purchasing new tickets to replace the selected tickets. At any time throughout the process, the user can back out from performing the exchange and the original tickets will still be sold to the patron. The first five steps are the same for all types of exchanges:
Find the Patron Wanting to Exchange Tickets.
- Open the patron profile
- Select the Tickets tab
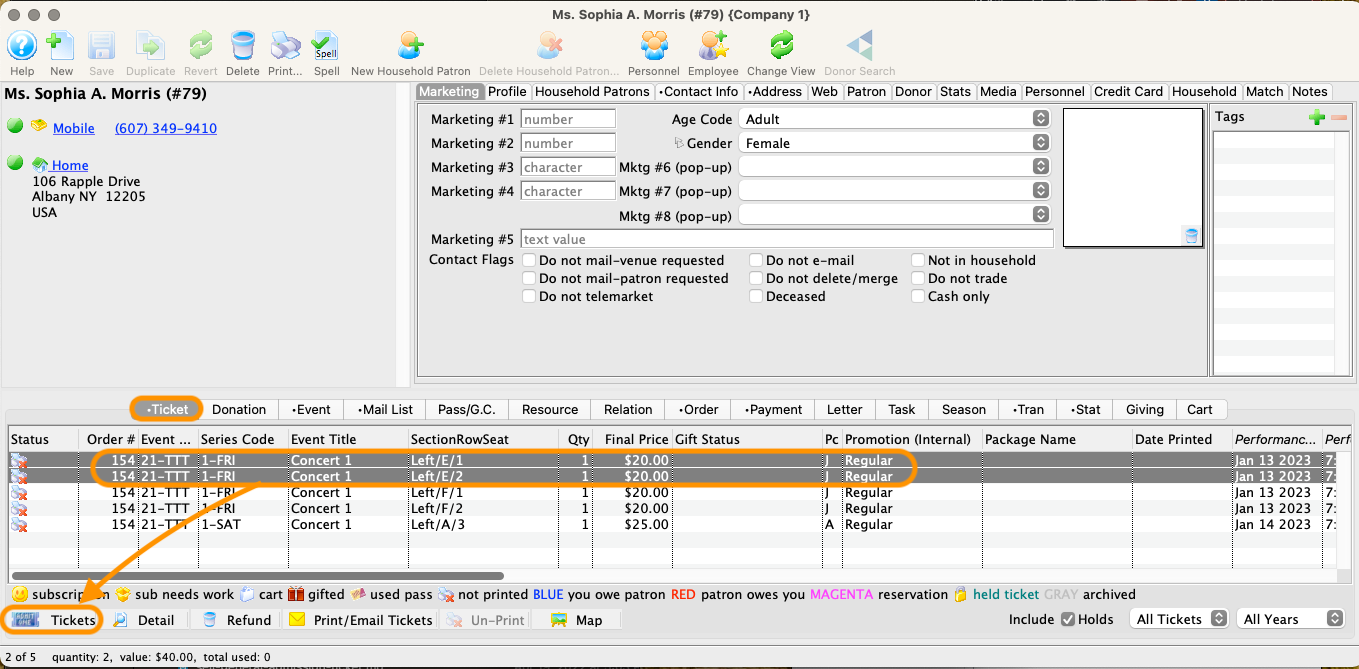
Highlight the Tickets to be Exchanged.
- See next step.
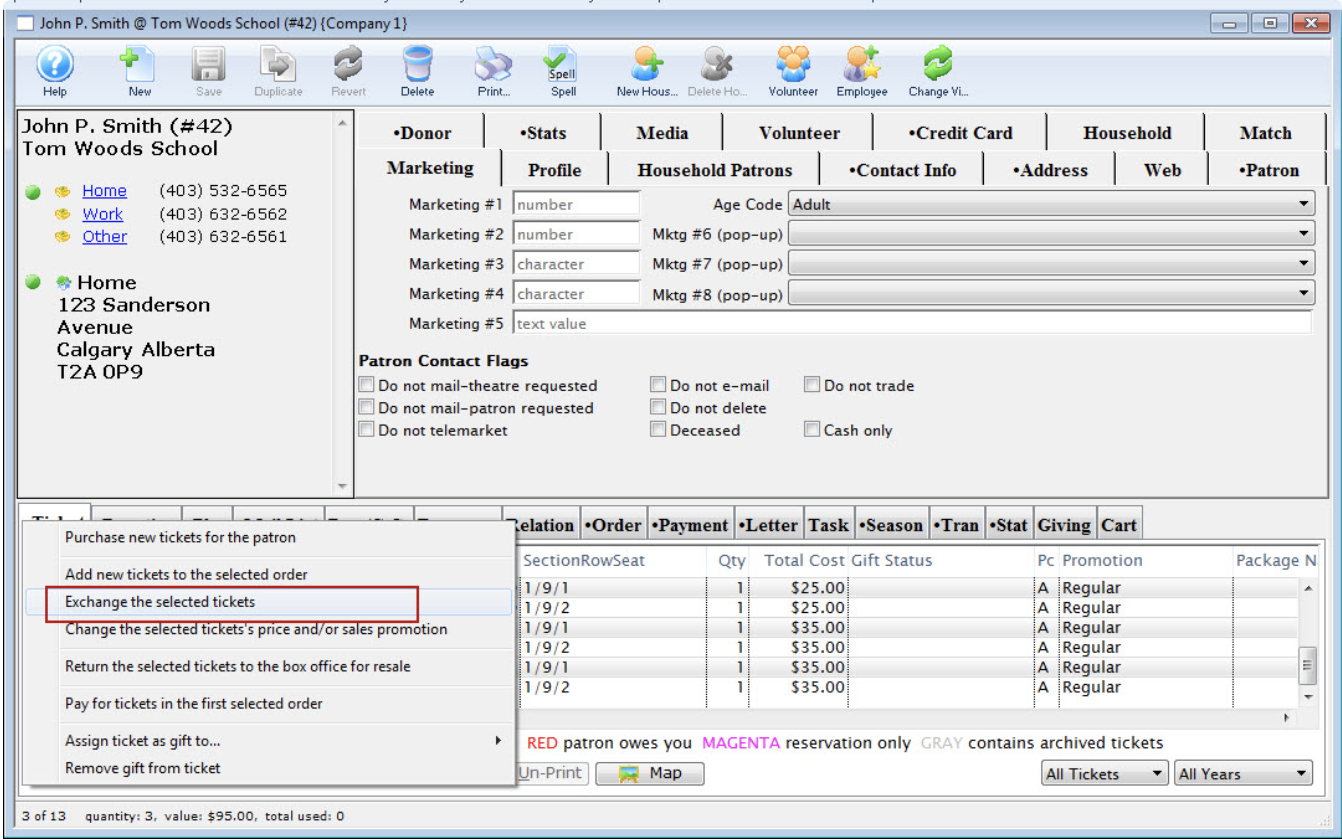
Select Exchange the selected tickets from the *Tickets* button.
- Click the Tickets button
- Select
Exchange the selected tickets

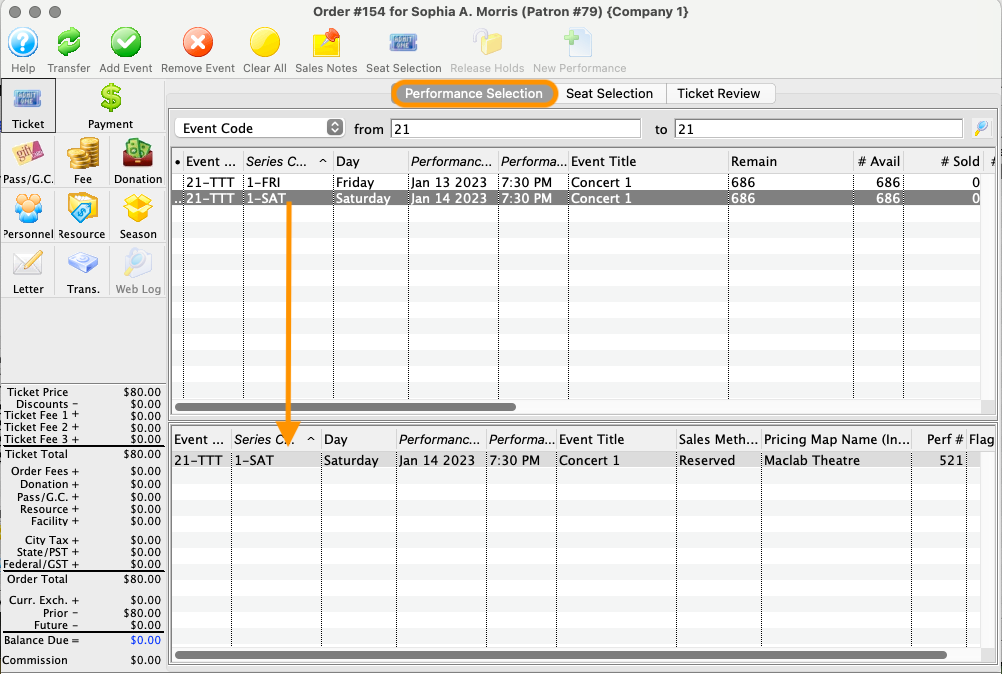
Select Performance for New Tickets.
- From the Performance Selection tab of the open order, select the list of performances you wish to review to select new tickets.
Add New Seats.
-
Click the Seat Selection tab
-
Highlight the correct new performance
-
Highlight the correct new sales promotion
-
For reserved seating, drag your mouse over seats to select new tickets
-
For general admission, enter the correct number of seats to add new tickets
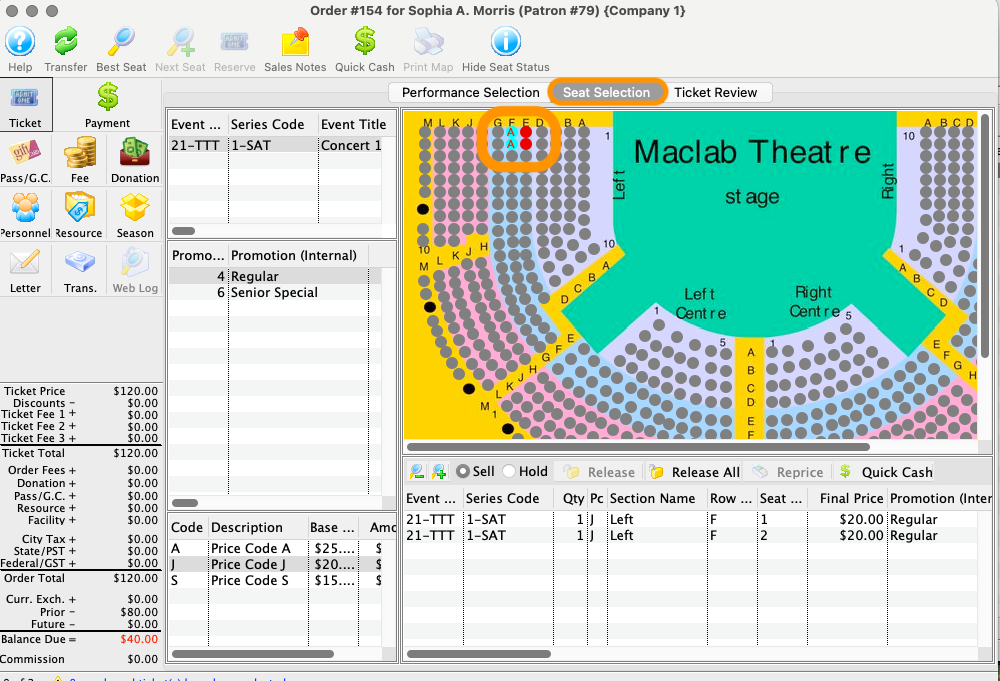
If the new performance has the same seat pricing map as the original performance, then TM will highlight the location of the original tickets in red on the new performance selection graphic map.
Proceed to the Next Steps For same price exchange, lower price exchange, or higher price exchange.
Same Price Exchange Top
Follow the first five steps shared for all ticket exchanges, then:
Review and Confirm the Exchange.
NOTE: The red minus signs indicate the original tickets, now marked as exchange from, while the green plus signs indicate the new tickets, now marked as exchange to. The left-side running order summary shows a balance due for the the total of the exchange to tickets (plus any optional order exchange fees).
- Review the new ticket dates and locations
- Make sure the Exchange from and Exchange to quantities match (review adding tickets during an exchange if relevant)
- Click the Confirm button
Review the Exchange Results.
- Quickly check that there are no more exchange from or exchange to icons and that the left-side running order summary shows a $0.00 balance.
- Enter any order notes on the Payment screen.
- Close the order.
Lower Price Exchange Top
Follow the first five steps shared for all ticket exchanges, then:
Review and Confirm the Exchange.
- Review the new ticket dates and locations
- Make sure the Exchange from and Exchange to quantities match
- Click the Confirm button
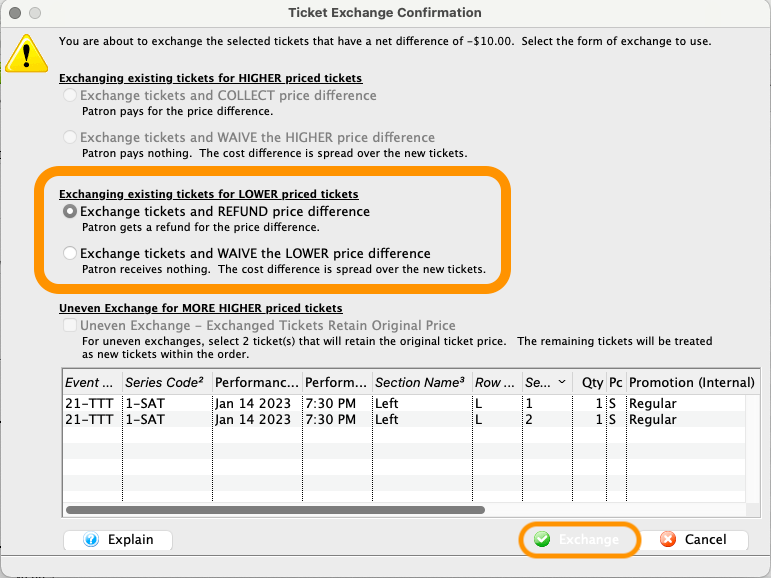
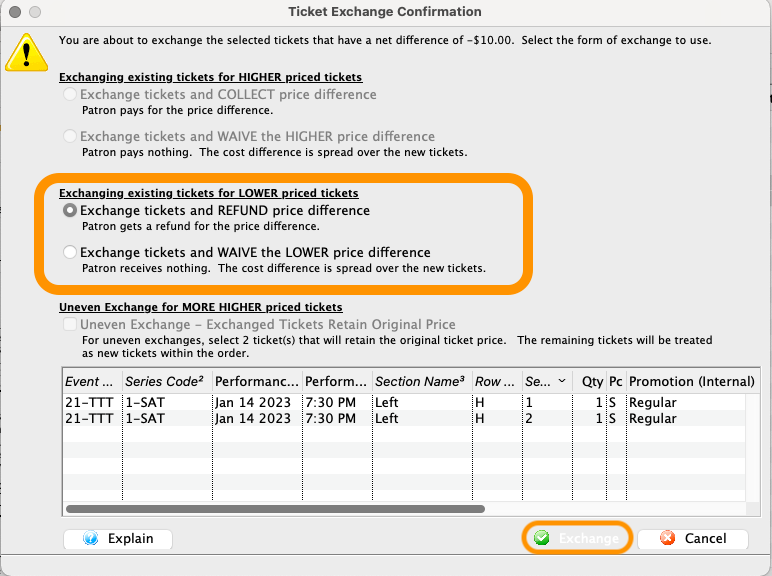
Select How TM Should Handle the Uneven Exchange.
-
Exchange tickets and REFUND price differenceis the most common option -
Exchange tickets and WAIVE the LOWER price differenceis a less common choice that waives the price difference -
Click Exchange to complete your choice.
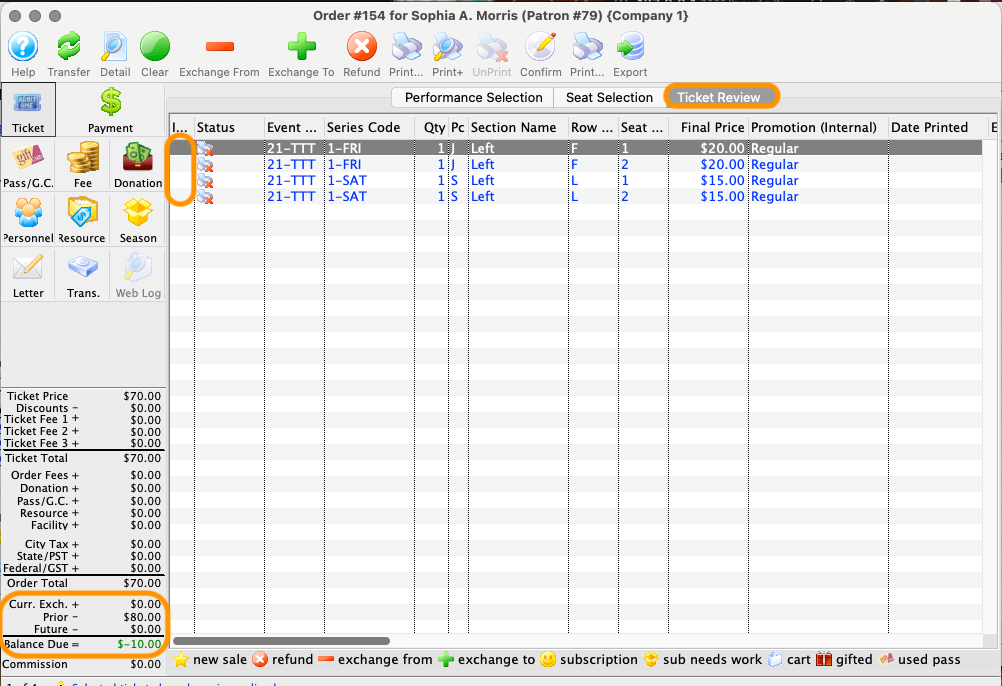
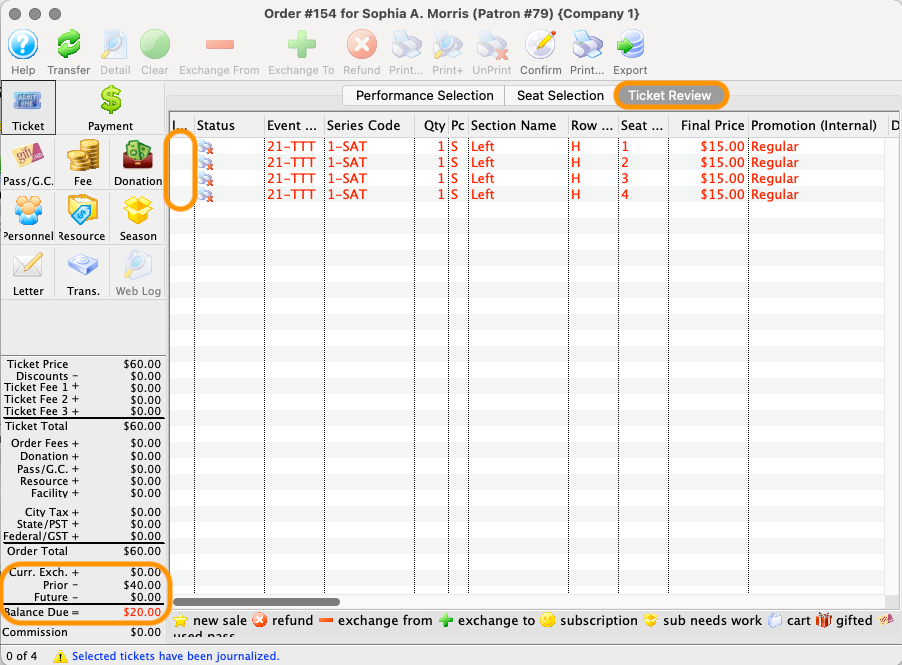
Review the Exchange Results.
Quickly check that there are no more exchange from or exchange to icons and that the left-side running order summary shows a negative balance (in green) due the patron.
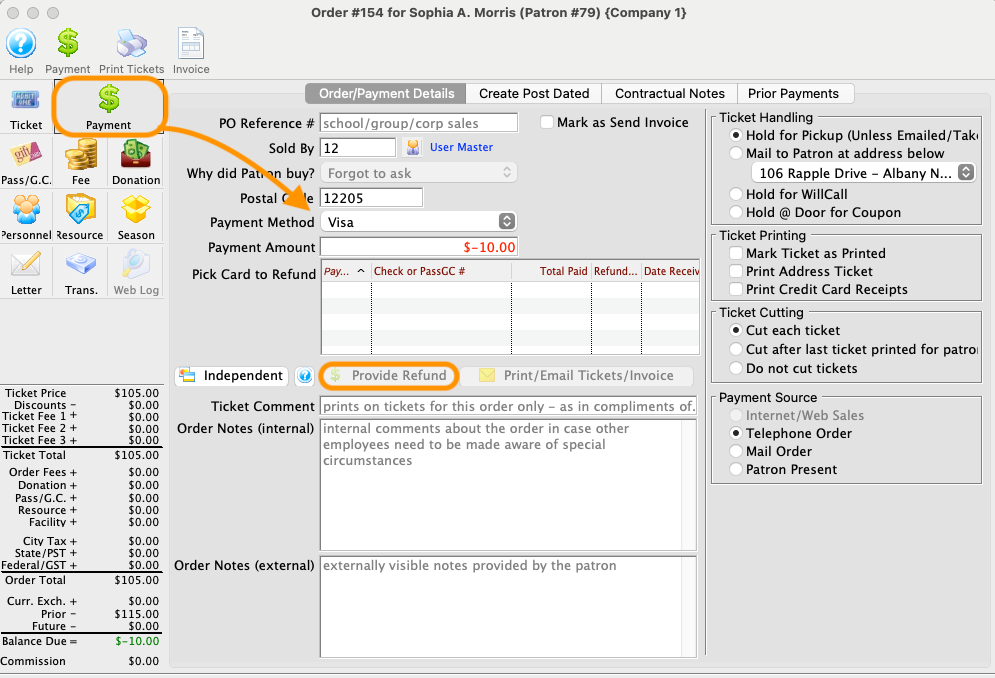
Refund the Price Difference.
- Click the Payment button to open the payment screen
- Select a payment method to refund the patron
- Click Provide Refund and close the order
Higher Price Exchange Top
Follow the first five steps Shared for all ticket exchanges, then:
Review and Confirm the Exchange.
- Review the new ticket dates and locations
- Make sure the Exchange from and Exchange to quantities match (review adding tickets during an exchange(/howto/tickets/exchanges.md#adding-tickets-during-an-exchange) if relevant)
- Click the Confirm button
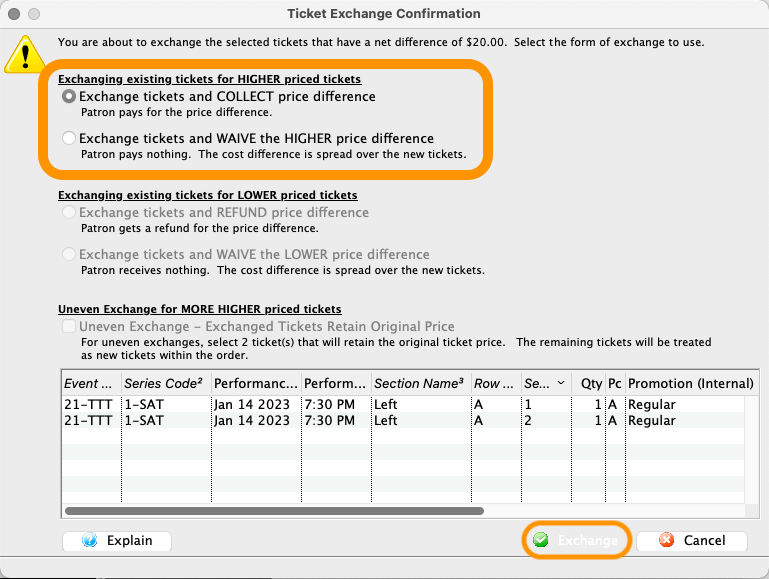
Select How TM Should Handle the Uneven Exchange.
Exchange tickets and COLLECT price differenceis the most common optionExchange tickets and WAIVE the HIGHER price differenceis a less common choice that waives the price difference
Click Exchange to complete your choice.
Review the Exchange Results.
- Quickly check that there are no more exchange from or exchange to icons and that the left-side running order summary shows a positive balance (in red) due.
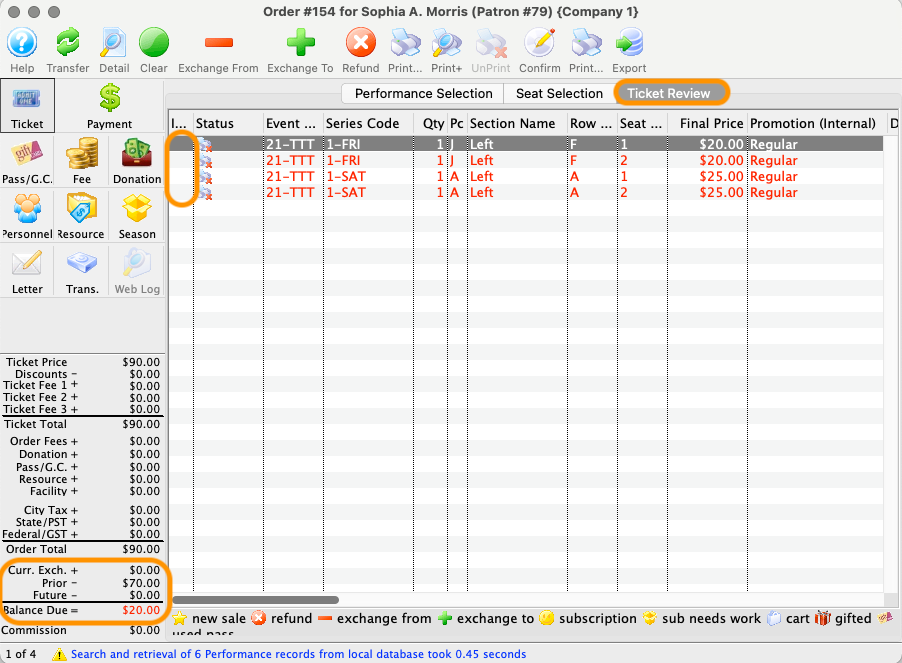
Collect the Price Difference.
- Click the Payment button to open the payment screen
- Select a payment method to receive the balance due
- Click Accept Payment and close the order

Did You Know?
The red minus signs indicate the original tickets, now marked as exchange from, while the green plus signs indicate the new tickets, now marked as exchange to.
From an Open Order Top
Most exchanges start from a patron's Ticket tab, but you can process an exchange from an open order as well.
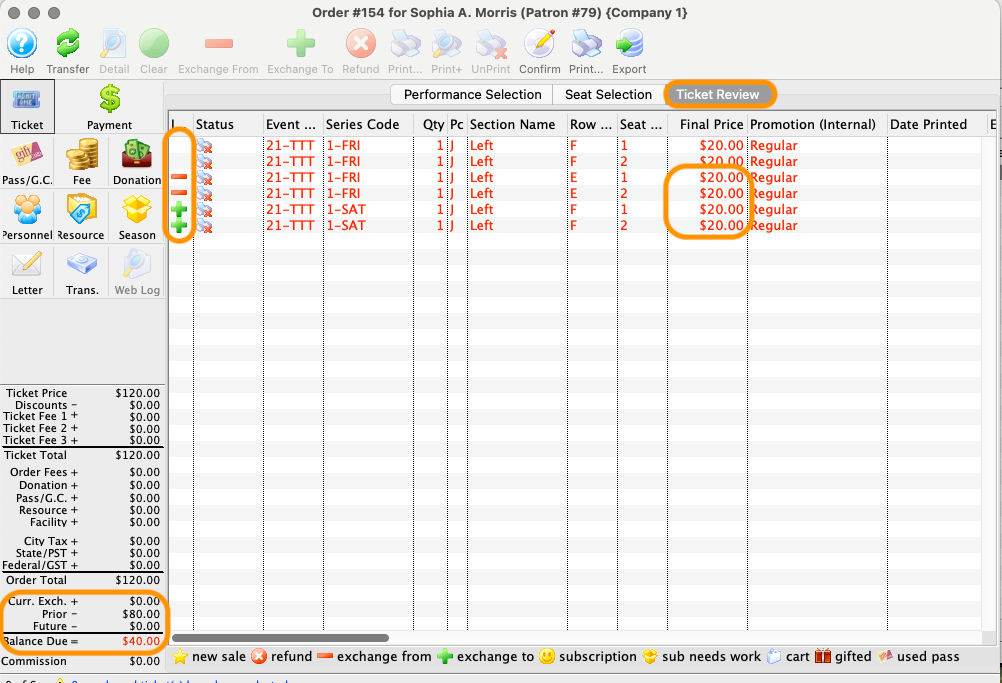
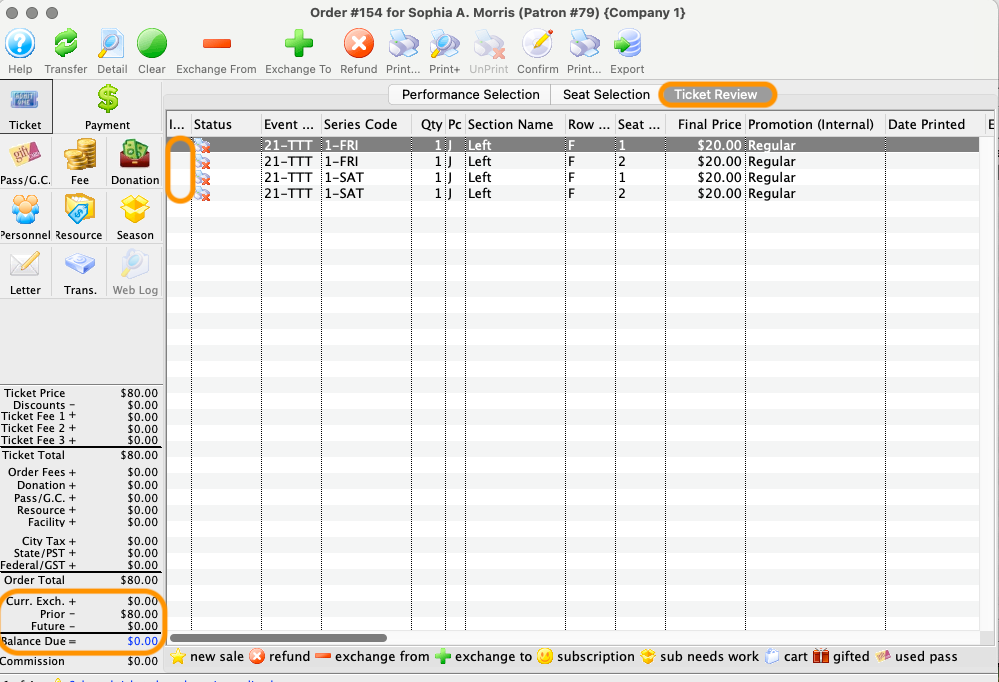
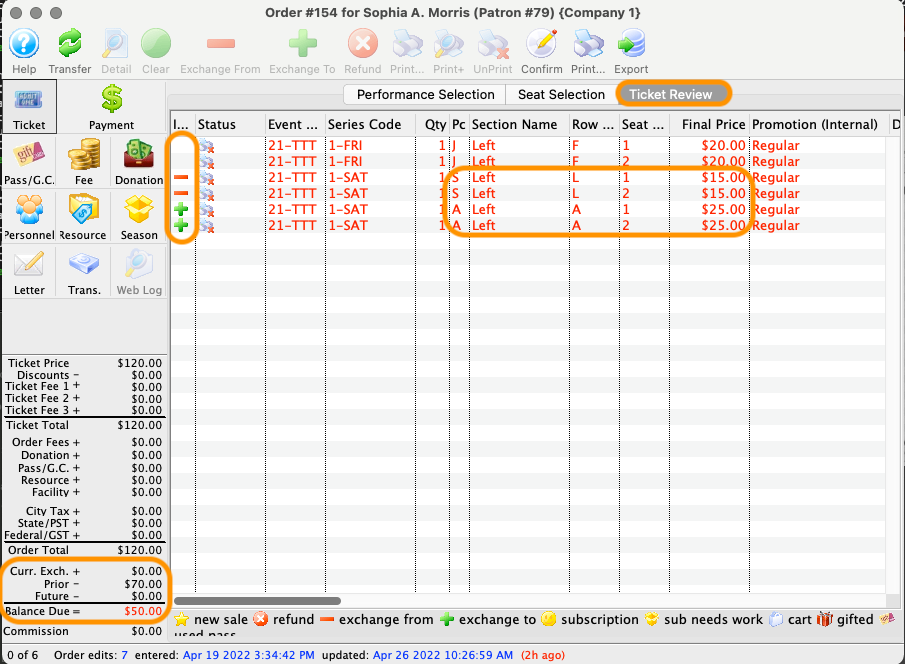
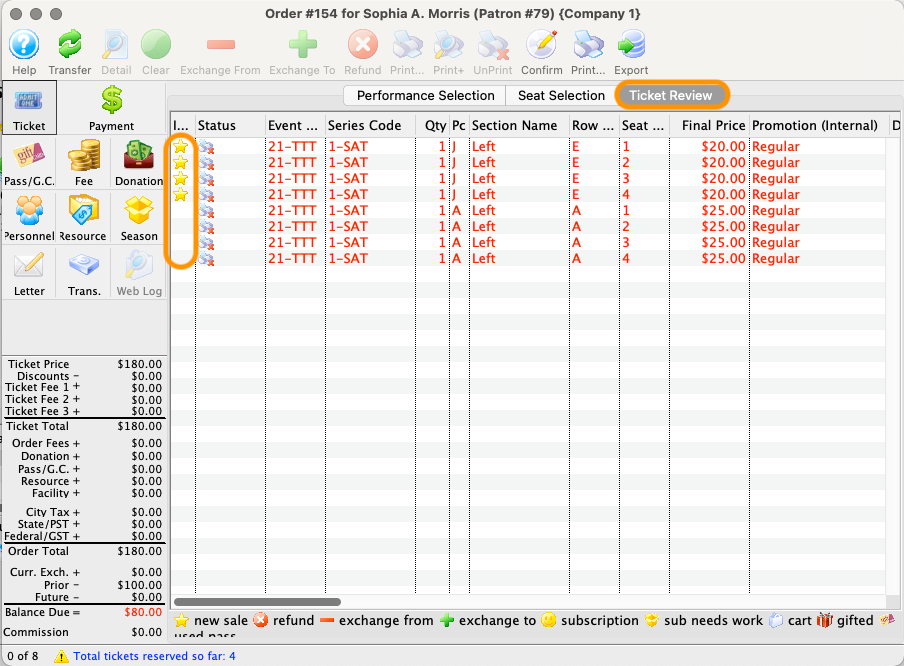
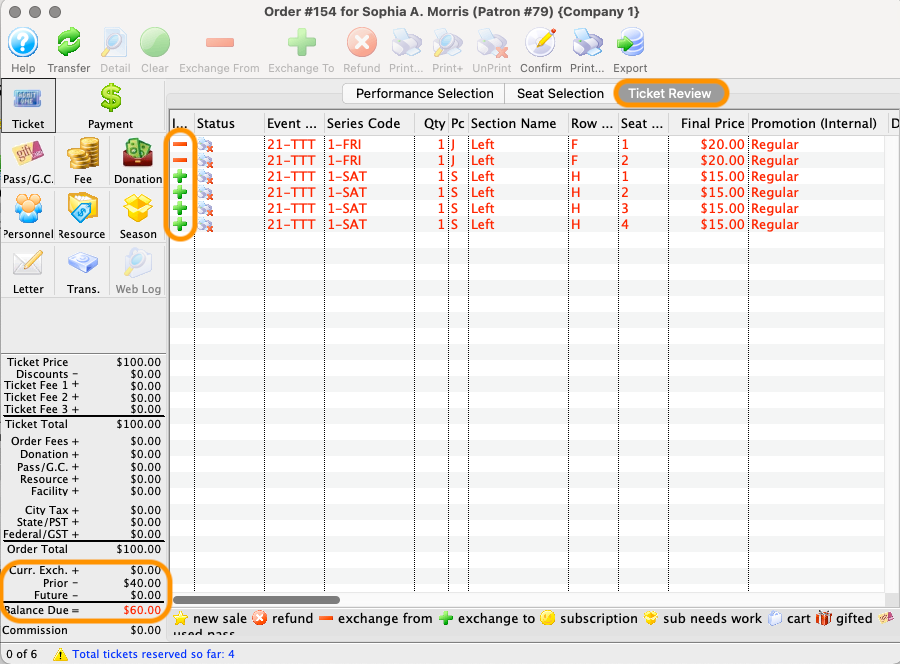
Make Sure BOTH Original AND New Tickets are Added to the Order.
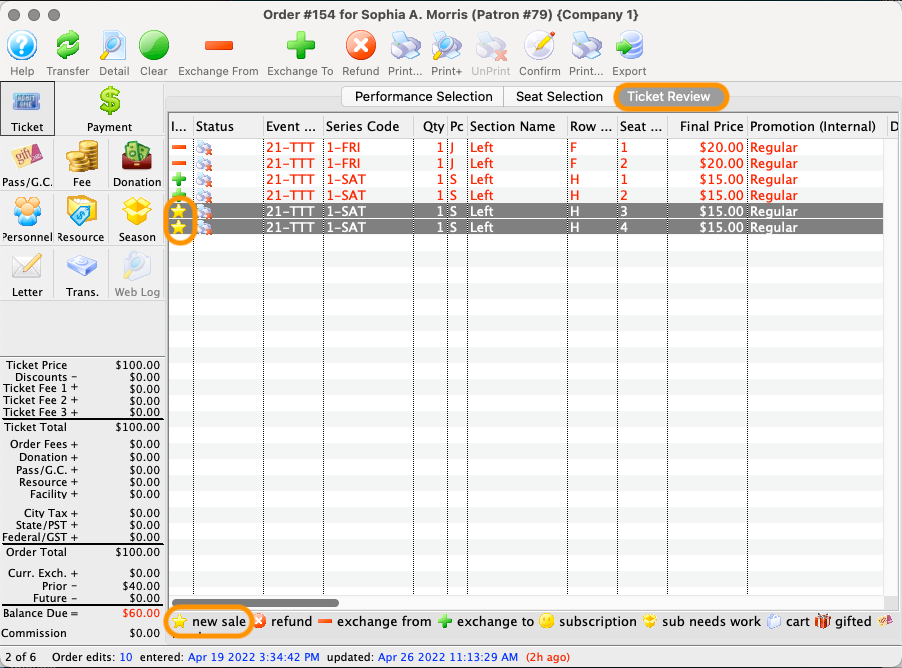
- Use the Performance Selection and Seat Selection tabs to add any new tickets to the order. In this example, we have four existing tickets and have added four new tickets, as indicated by the yellow star icons.
- Click the Ticket Review tab
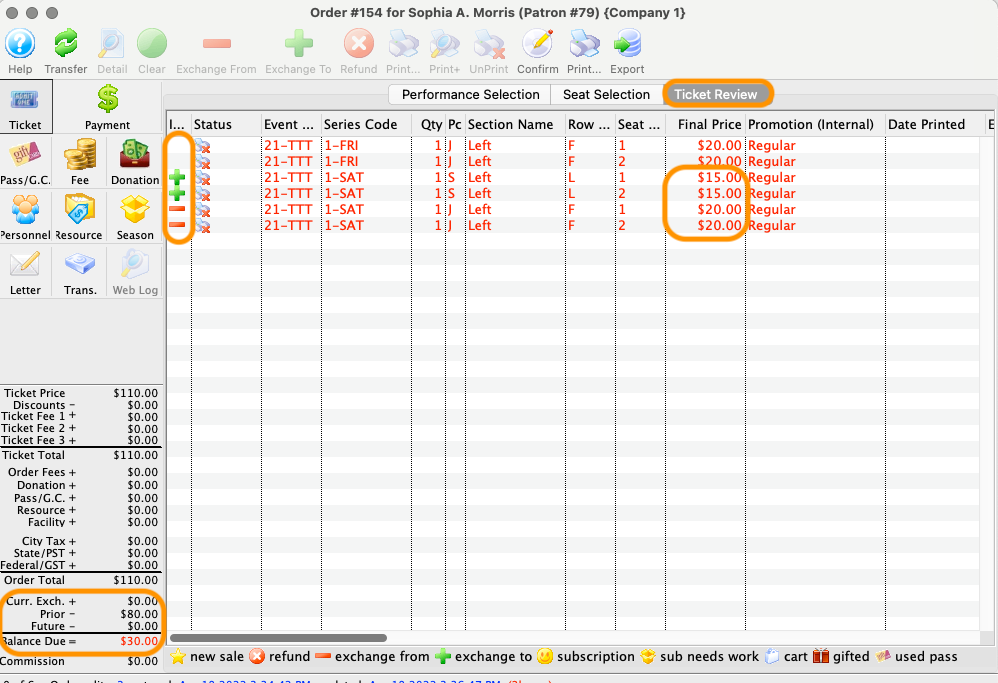
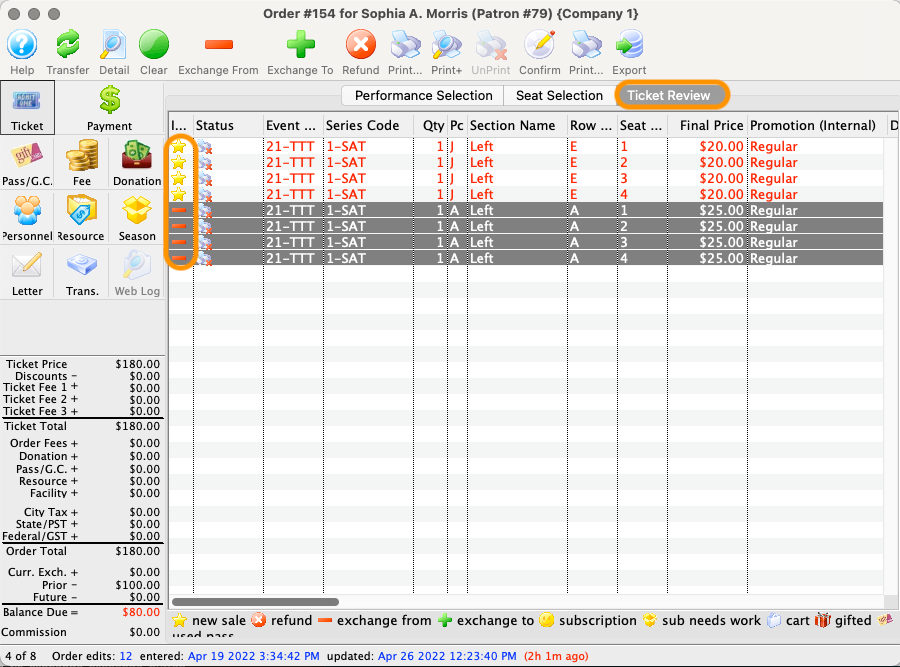
Correct the Transaction Icon for the Original Tickets.
- Highlight the original tickets
- Click the Exchange From (red minus sign) button to tag the highlighted tickets
Correct the Transaction Icon for the New Tickets.
- Highlight the new tickets
- Click the Exchange to (green plus sign) button to tag the highlighted tickets
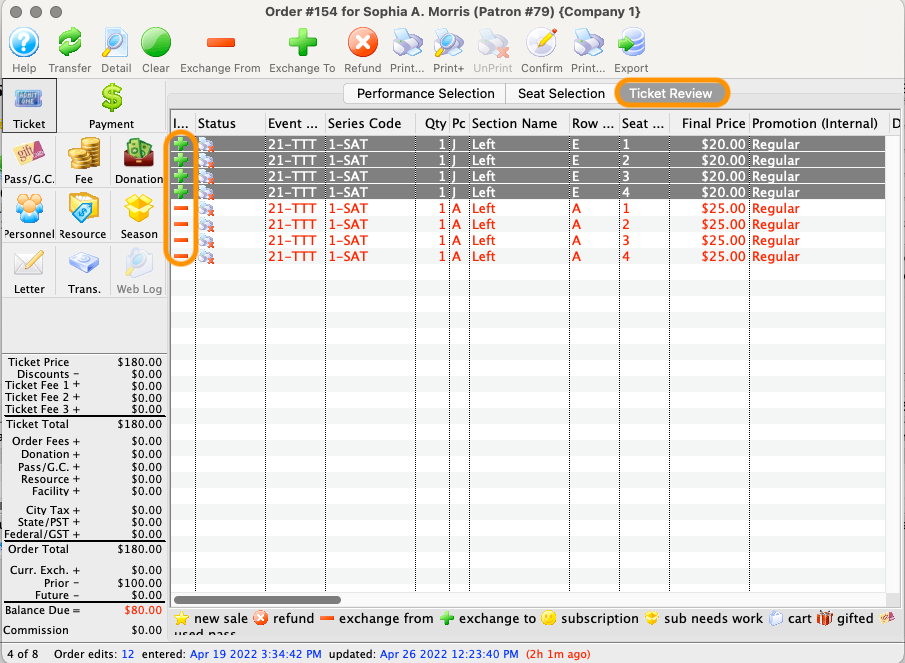
Proceed to step 4 (performance selection) of an exchange.
From Event Attendance Tab Top
Most exchanges start from a patron's Ticket tab, but you can start the full exchange process from the Attendance tab of an Event as well.
Find the Tickets to be Exchanged.
- Highlight the correct performance of the original tickets
- Sort the Attendance table as needed (usually last name and first name) to put all of the original tickets together
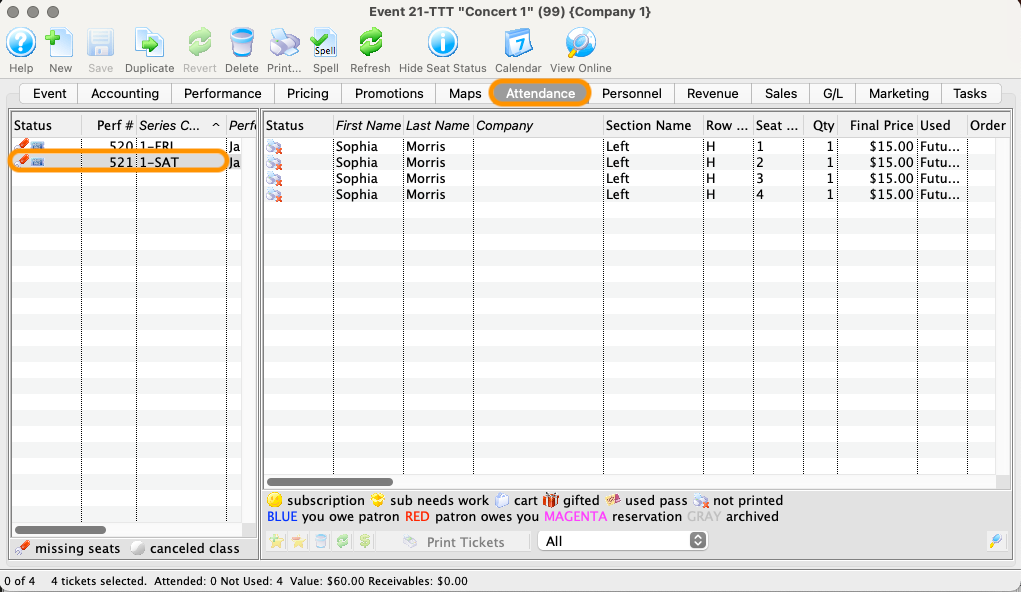
Select Exchange the selected tickets from the Context Menu.
- Highlight the original tickets to be exchanged
- Right-click (Windows) or control-click (MacOS) the highlighted tickets and select
Exchange the selected ticketsfrom the context menu
Proceed to step 6 (confirm the exchange) for a same price exchange, lower price exchange, or higher price exchange.
Adding Tickets During an Exchange Top
Follow the first five steps shared for all ticket exchanges, then:
Review the Transaction Icons.
In the image to the left, the red minus signs indicate the original tickets, now marked as exchange from, while the green plus signs indicate the new tickets, now marked as exchange to.
Because we selected four new tickets during the first part of the exchange process, the exchange to quantity is higher than the exchange from quantity. To keep the audit records accurate and avoid errors, it's important to make sure every tickimages/exchanges/et transaction is accurately tagged.
- Choose which of the new tickets should be coded as additional tickets rather than exchange to tickets
Correct the Transaction Icon for the Additional Tickets.
- Highlight the additional tickets that need to be recoded
- Click Clear
Review and Confirm the Exchange.
- Make sure the exchange from and exchange to quantity match
- Make sure the additional tickets have a correct yellow star icon
- Click the Confirm button
Select How TM Should Handle the Uneven Exchange.
In this case, even though we exchanged into a lower price section, the order total has increased with the addition of two tickets:
-
Exchange tickets and COLLECT price differenceis the most common option -
Exchange tickets and WAIVE the HIGHER price differenceis a less common choice that waives the price difference -
Click Exchange to complete your choice.
Review the Exchange.
NOTE: The left-side running order summary shows any balance due or owing if the total from the exchange and addition tickets is different than the original paid total.
- Review the ticket details to confirm all needed edits have been made
Pay for or Refund Any Price Difference.
- Click the Payment button to open the payment screen
- Select a payment method to collect from or refund back to the patron
- Click Accept Payment or Provide Refund and close the order

New Sale Icon
The Ticket Review tab legend indicates that the correct icon for a new ticket is a yellow star. This is a visual indicator on the ticket review tab to help sort out what tickets in the order are actually new.
Exchanging Hints Top
Techniques to Reduce Errors during Exchanges
Errors can occur during a ticket exchange when:
- The differences in the price of the original ticket and the replacement ticket is not collected or refunded correctly.
- The amount not refunded or collected is waived by Theatre Manager. Click here for more information on Waived Amounts.
- The ticket base price and sales promotion for the replacement ticket does not match the ticket base price and sales promotion of the original ticket.
It is recommended to:
- Use the Quick Exchange process for festival ticket exchanges when there is no difference in the price of the original tickets and the replacement tickets.
- Turn off automatic waiving to prevent accidental waiving of the difference between the price of the original tickets and the replacement tickets when an incorrect replacement ticket was purchased.
Use Quick Exchange
Quick exchange is a fast exchange procedure that automatically applies the same price and sales promotion on a replacement ticket as was on the original ticket.
- When the original ticket and the replacement ticket are not of the same value a warning appears indicating there is a difference in ticket values.
- The operator is not required to select the price code or the promotion code during the exchange.
- The price and promotion code on the original ticket is automatically applied to the replacement ticket.
- The operator can cancel the Quick Exchange and complete a regular exchange, if required.
- If quick exchange is used and an amount is accidentally waived, a regular exchange can be used to reverse the waived amount.
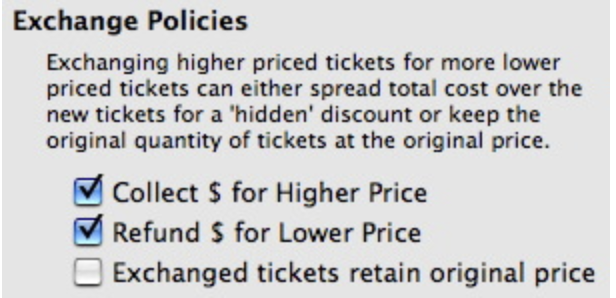
Turn Off Automatic Waiving
Turning off automatic waiving requires the employee to decide if any difference between the original tickets and the replacement tickets is to be refunded or collected. Select both checkboxes to collect money for higher priced tickets and to refund money for lower priced tickets.
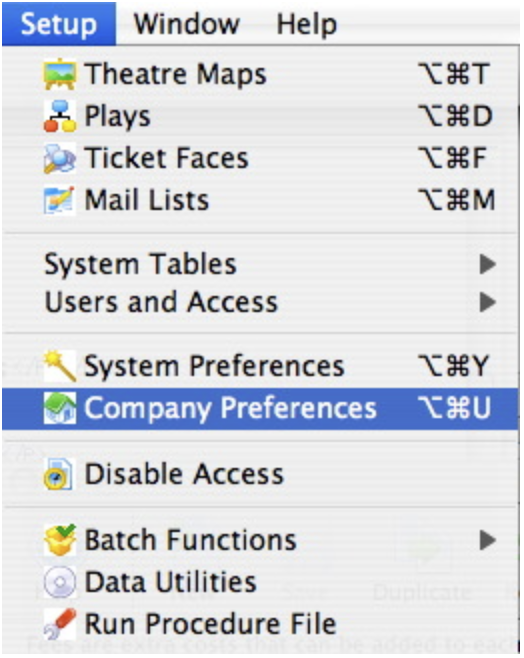
To examine the current settings:
Access to the Company Preferences is through the Setup menu.
- Then click on Company Preferences
Select the Box Office tab.
- Select the check Box
Exchanged tickets retain original price.
Past Event Ticket Exchange Top
To create a past event ticket exchange for a patron, you perform the following steps:
Select the Box Office tab.
- Click the Ticket Button.

Select Exchange the selected tickets.
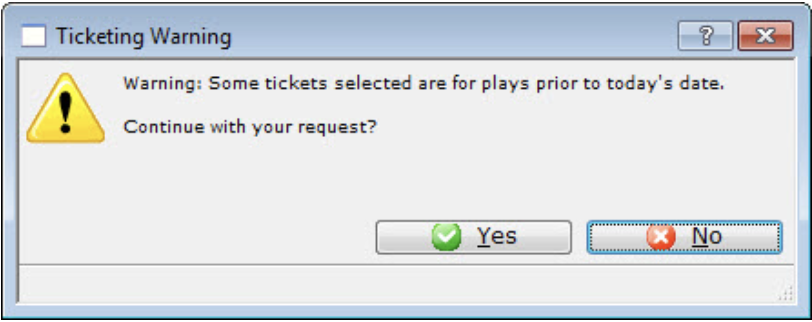
- You get a warning
A warning dialog opens.
- Click the YES button.
The Select Plays Window opens.
- Locate the Play you are exchanging to.

Select the list of performances the patron is going to exchange the tickets for.
Click here to learn how to create a Buy List.
Click the Seat Selection Tab.
-
The Ticket Sale Window opens with the information for the selected performance.
-
Select the tickets that the patron wants to exchange the original tickets for.
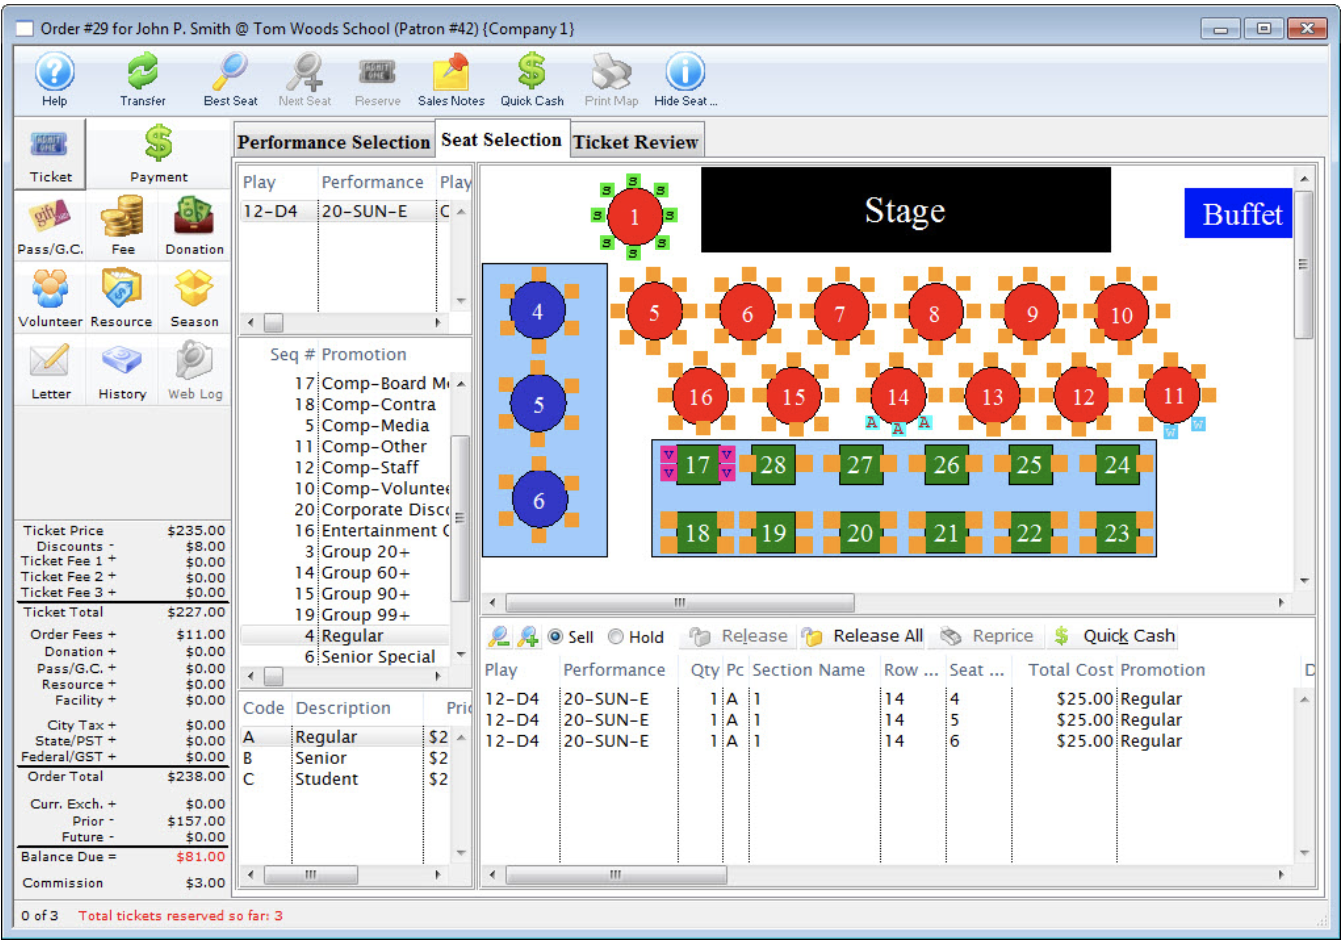
Did You Know?
Red seats indicate the location of the previous seats.
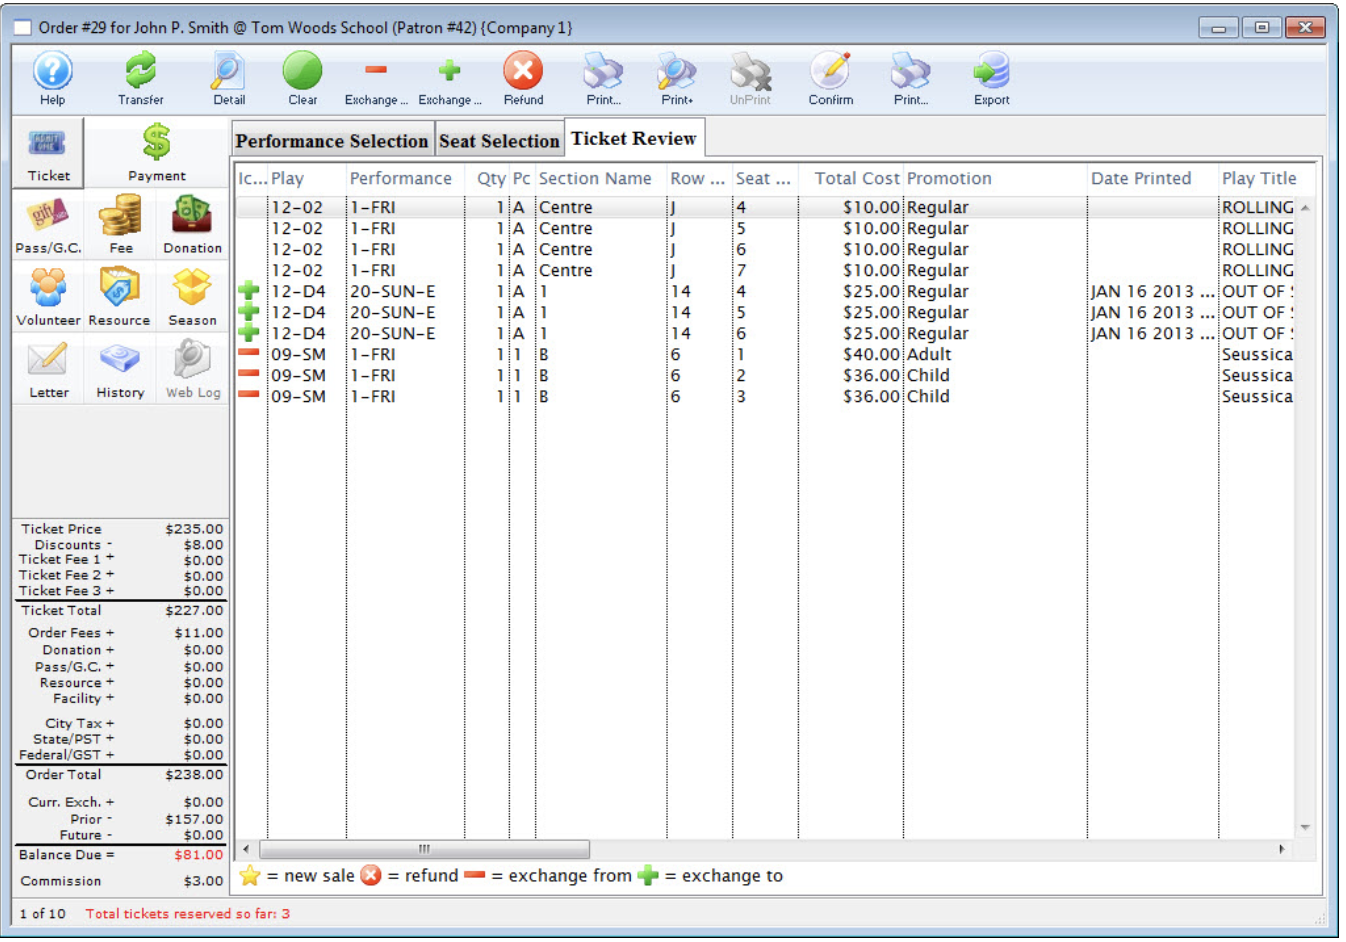
Click the Ticket Review Button.
-
Click the Confirm button to complete the ticket exchange.
-
The tickets the patron is exchanging will appear with a red minus symbol and the new tickets will appear with a green plus symbol.
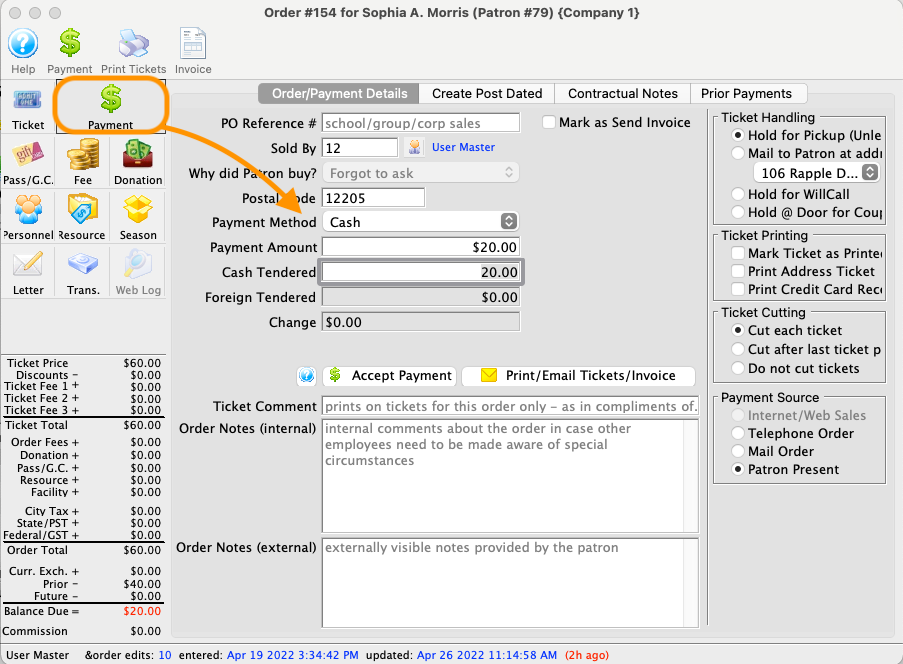
Click the Payments Button.
- In the example the Patron owes $32.10 to cover the upgrade of the exchanged tickets.
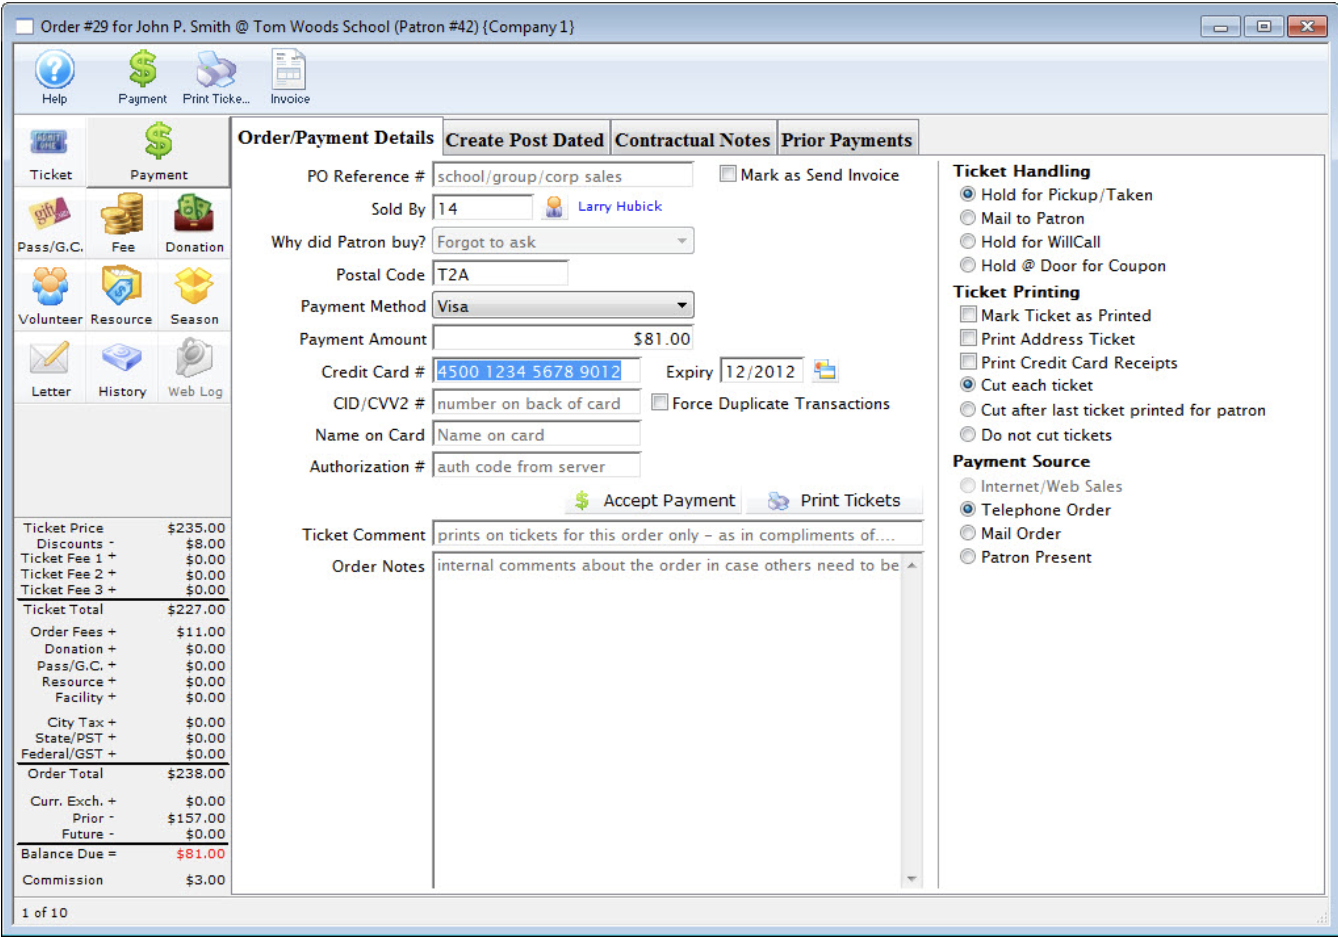
Click the Accept Payment or Print Tickets button.
- Clicking Accept Payment will finalize the exchange while clicking Print Tickets will finalize the exchange and print the new tickets. The original tickets will be returned to inventory allowing them to be purchased again.
Full Ticket Exchange Top
Select the Box Office tab.
- Click the Ticket Button.
Select Exchange the selected tickets.
- The Select Plays Window will open allowing the creation of a Buy List..
Select the list of performances the patron is going to exchange the tickets for.
- Click here to learn how to create a Buy List.
Click the Seat Selection Tab.
-
The Ticket Sale Window opens with the information for the selected performance.
-
Select the tickets that the patron wants to exchange the original tickets for.
Did You Know?
Red seats indicate the location of the previous seats.
Click the Ticket Review.
-
The tickets that the patron is exchanging will appear with a red minus symbol and the new tickets will appear with a green plus symbol.
-
Click the Confirm button to complete the ticket exchange.
Exchange Confirmation Dialog Pop Up.
- Click the Exchange Button.

Click the Payments Button.
-
In the example the Patron owes $32.10 to cover the upgrade of the exchanged tickets.
-
Click the Accept Payment button.
-
Clicking Accept Payment will finalize the exchange while clicking Print Tickets will finalize the exchange and print the new tickets. The original tickets will be returned to inventory allowing them to be purchased again.