Every report has a Search Tab to enter a database query and limit the records displayed when running a report. The remaining tabs in the Report Builder Window are different for each report as each report is uniquely customizable. This section outlines the part of commonly found customizing tabs. As the Invoice report is so frequently used and has it's own set of customizable options, please see the tab options on the Invoice report section.
Most Build Options Tabs share the following navigation and toolbar buttons.
Standard Report Navigation Buttons Top

Moves to the prior Build Options Tab. This button does not appear on the first tab of a Report Builder Window.

Moves to the next Build Options Tab. This button does not appear on the last tab of a Report Builder Window.

Cancels the adding of criteria and setting of build options. Hitting this button closes the Report Build Window and returns the user to the Report Selection Window.

If selected, the report will be sent to the background report generator so that you can continue working while the servers generate your reports. Queued reports can be viewed in the Queued Reports Window. There are two requirements to enable this option:
- Enabling a TM server for this purpose
- Enabling employee permissions for the appropriate employees to use queued reports

Completes the addition of criteria and setting of build options and begins the report generation process. A progress report will appear at the bottom of the Report Builder Window. When the process is complete, the build window will close and the Finished Report Window will appear.
Standard Report Toolbar Buttons Top

If available, this uses the default search criteria for this report.

If this report has previously been run, this button will add the previous criteria.

If available, opens the list of saved criteria for this report. Learn more about using saved criteria.

If available, saves the current criteria to be used later from the Saved Criteria Window. Learn more about using saved criteria.

If available, saves the current criteria to be used later from the Saved Criteria Window. Clicking this button opens a dialog to name this new criteria. Learn more about using saved criteria.
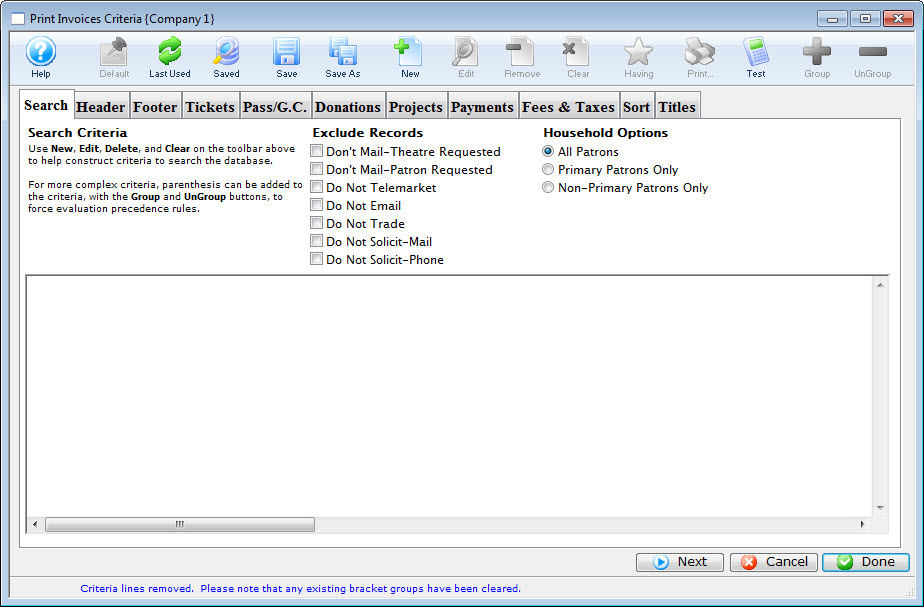
Report Search (Criteria) Tab Top
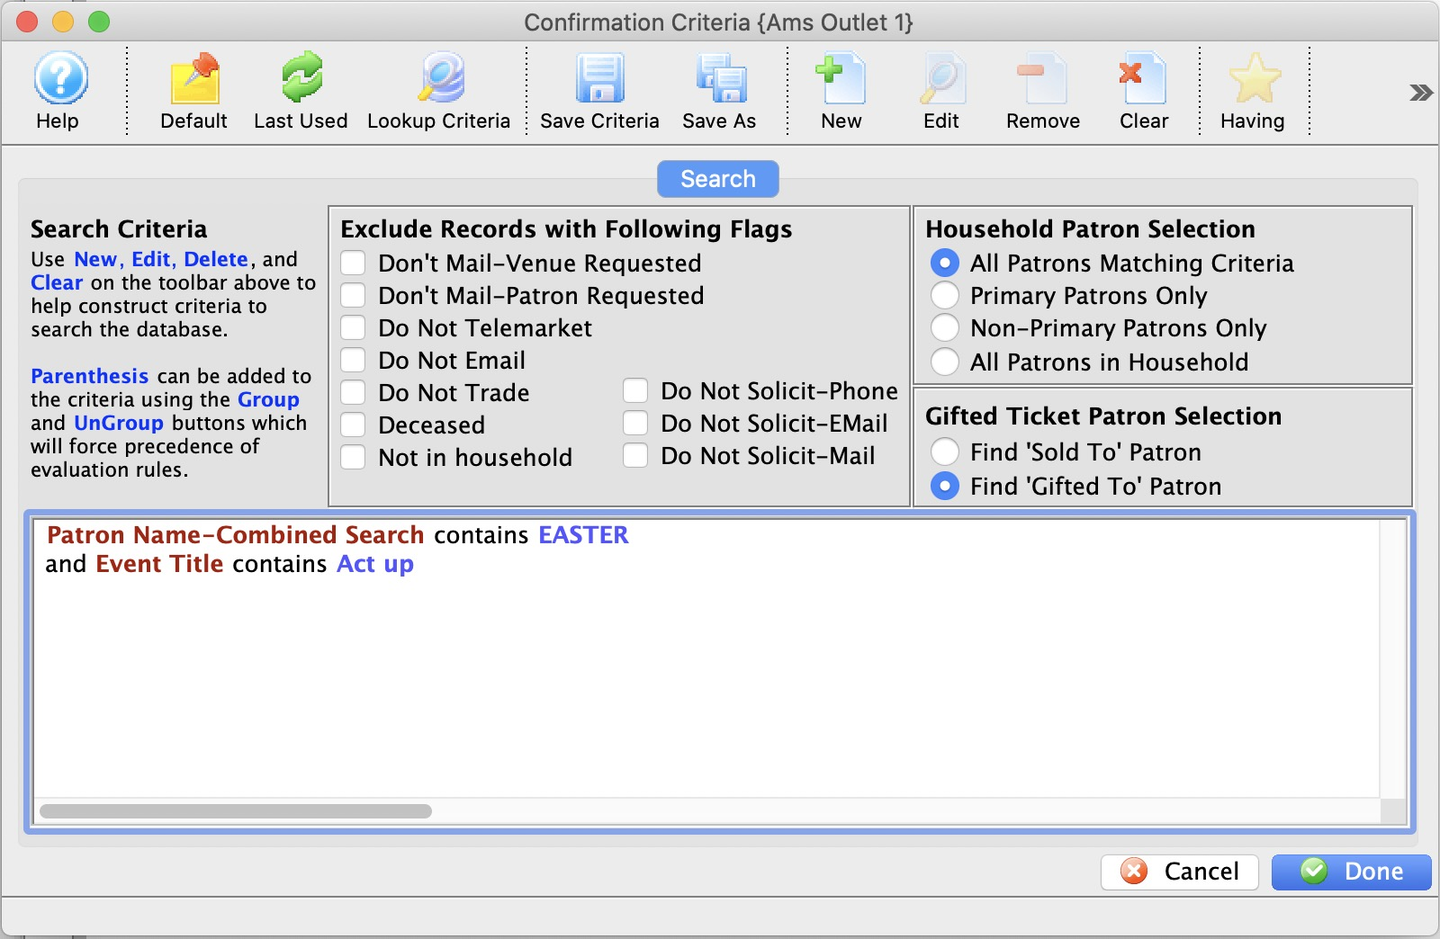
This tab shows the criteria window for database queries, shared across reports, mail lists, data exports, and Letter merges. The available search options may differ slightly based on the specific report selected.
Report Donation Receipt Tab Top
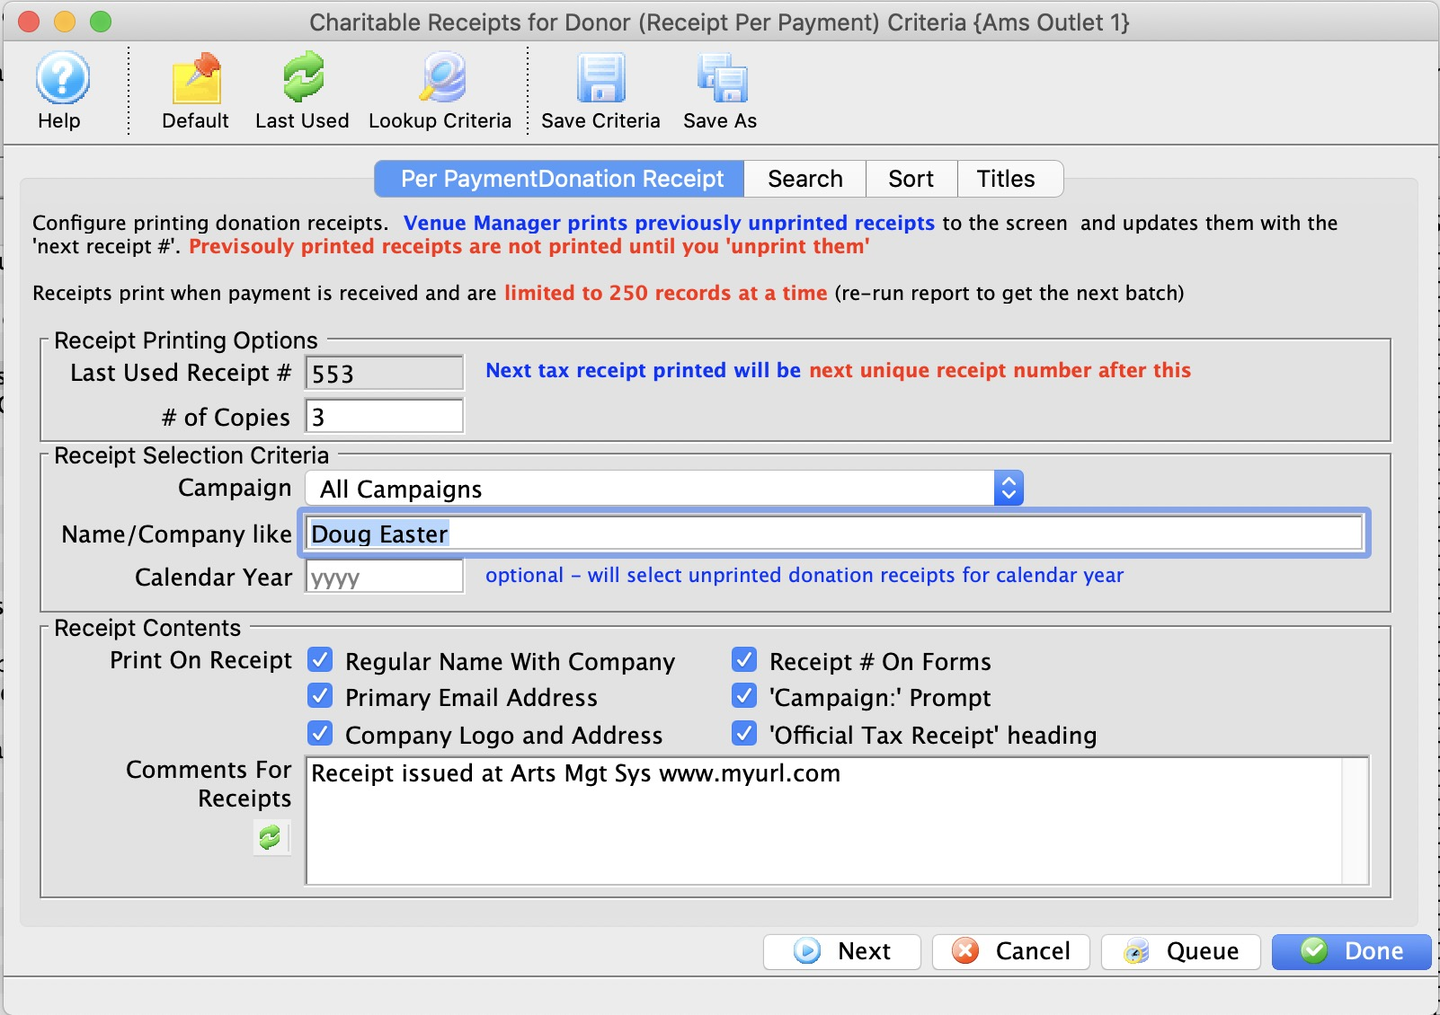

This tab appears for tax receipt reports in the Donation tax receipts & Reports Category. It shares the standard navigation buttons and toolbar buttons shared across most Build Options Tabs.
Last Used Receipt Number
Indicates the next number that will be used when printing a receipt. The last receipt number is tracked in the Donations Tab of Company Preferences and this is rarely altered manually prior to printing the next batch of receipts.
Number Copies
The number of copies of each receipt to be printed. If you are printing:
- One Receipt Per Payment (the default). You usually print three copies in Canada per Revenue Canada Donation Receipt guidelines (2 for the patron and 1 for your 2-year archive requirement). This happens to work out to be 3 per page using standard receipt size.
- Annual Statement Style receipts. In Canada you normally print 2 copies (1 for the patron and 1 for your archives). In the USA, usually one receipt will suffice. The Default is also found in the Company Preferences Donations Tab.
Donation Campaign
You can select to print donation receipts:
- for all campaigns (the default)
- for a specific campaign, if you wish
Name/Company Like
Allows for the selection of patrons based on name/company. This selection criteria behaves exactly the same as finding patron in the patron list window if you want to see how many people may be selected. The more of the first, last and company you enter, the fewer patrons that will be selected.
Calendar Year
Allows selection of tax receipts only within a calendar year. The criteria differs depending on receipt type:
- One Receipt Per Payment - This can be left blank. If so, all unprinted tax receipts dated prior to the current date will be selected that have not yet been printed.
- Annual Statement Style tax receipts - this must be entered. All tax receipts for the patron for the current calendar year will be selected and printed on the statement, as long as both of the following are true:
- There is at least ONE receipt for the calendar year that is unprinted.
- The tax receipts are all for donations marked with receipt option of annual receipt.
Regular Name with Company
All tax receipts include the name of the patron. When checked, the tax receipts will also include the company in the patron record, if one exists.
Primary Email Address
Places the patron's primary email address (if they have one) onto the tax receipt. You can use this to print the receipt to PDF and then email that receipt to a patron. This field is NOT printed when the tax receipt for the campaign is configured to auto-email when the donation is given online.
Company Logo and Address
Will place the company logo (see Company Preferences) and the company address onto the tax receipt.
Receipt # on Forms
When checked, Theatre Manager will print the tax receipts with the receipt number on them. Turn this off if tax receipts with numbers pre-printed on them are being used (not an advised approach since maintaining receipt numbers on paper with those in TM is harder to do).
Campaign: Prompt
Determines if the phrase Campaign: appears in front of the campaign name on the receipt.
Official Tax Receipt Heading
You can add a title to printed/emailed tax tax receipts that indicates that the tax receipt is official. When printing multiple copies of a tax receipt in the same print/email request:
- The first receipt will say
Official Tax Receipt. In Canada, it will sayOfficial Tax Receipt/Reçu Fiscal Officiel. - Second and subsequent tax receipts will indicate
Copy for your records. In Canada, it will be bilingualCopy for your records/Copie pour vos archives.
This text cannot be modified. It always prints on e-receipts and can be optionally printed on batch printed tax receipts.
Comments for Receipts
Lets you change the comments printed at the bottom of a receipt. This comment will print on all receipts.
Report Donor Summary Tab Top

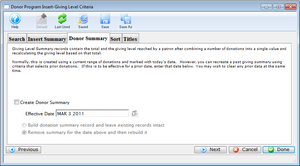
It shares the standard navigation buttons and toolbar buttons shared across most Build Options Tabs.
Create Donor Summary
When checked, all donations by a patron in the report will be combined and then the patron's giving level will be adjusted based on the total amount of donations.
Effective Date
All donations prior to this date will be summarized in the totals.
Build Summary Only
This will create a summary based on the donations in the report.
Remove Summary Then Rebuild It
This will remove any existing summaries, and then rebuild the summary for each patron.
Report Export Tab Top
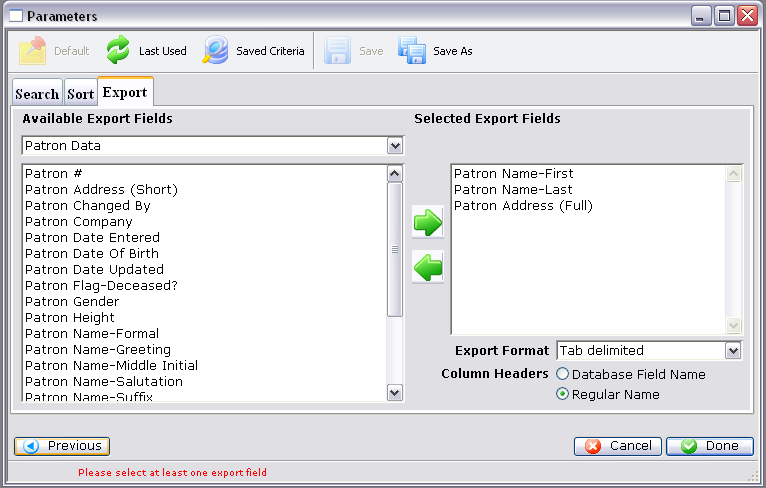
It shares the standard navigation buttons and toolbar buttons shared across most Build Options Tabs.
Available Export Fields
A list of fields available to export by. Note that this area has two parts:
- Above all the fields is a pop-up. in the example, it shows Patron Data. If you click this, you can select fields from other connected data. For example, if you intend to export ticket data, you can select fields from: tickets, plays, performances, patrons, sales promotions, etc. The files that are available in this list depend on the initial choice of data you are exporting.
- Below the file selection is a list of fields. This changes as you change the file pop-up (above).

Adds the currently selected field to the export field list.

Removes the currently selected field from the export field list.
Export Format
A drop down menu allowing for adjustments to the format in which the data is exported.
Database Field Name
When selected, the data column headers will be the name of the database field.
Regular Name
When selected, the data column headers will be in the standard name of the field.
Report Hold Code Options Tab Top
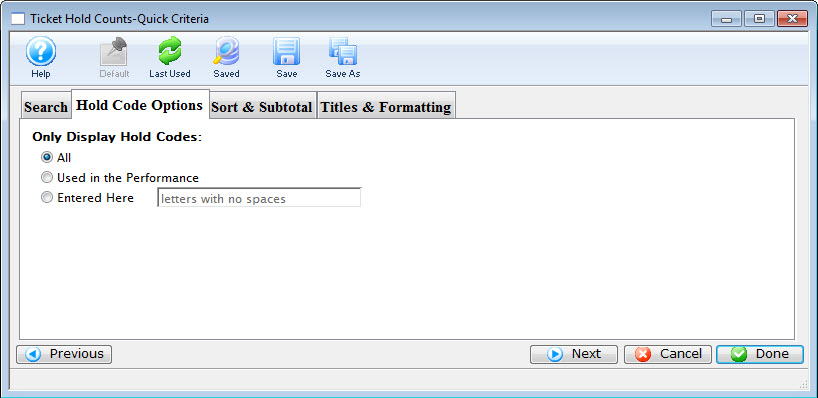
It shares the standard navigation buttons and toolbar buttons shared across most Build Options Tabs.
All
When selected all possible hold codes will be displayed in the report.
Used in the Performance
When selected only hold codes that have been used in the performance will be displayed in the report.
Entered Here
When selected the text field becomes active allowing the user to specify specific hold codes to be looked for.
Report Columns Tab Top
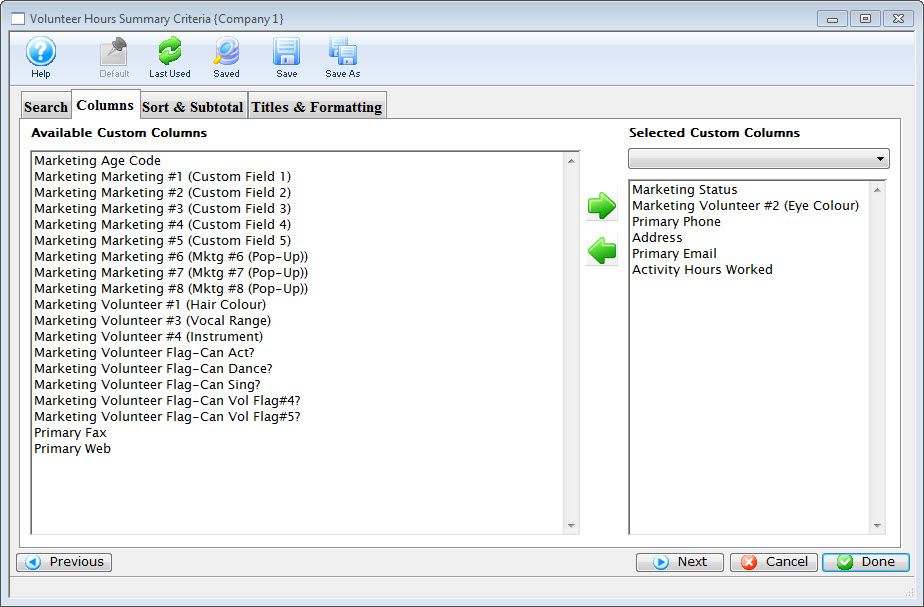

It shares the standard navigation buttons and toolbar buttons shared across most Build Options Tabs.
Available Custom Columns
A list of available columns you can include in your report.

Making a selection from the drop down list, changes the fields available.
Moves the selected Field from available to selected.
Moves the selected Field from selected to available.
Report Format & Fields Tab Top
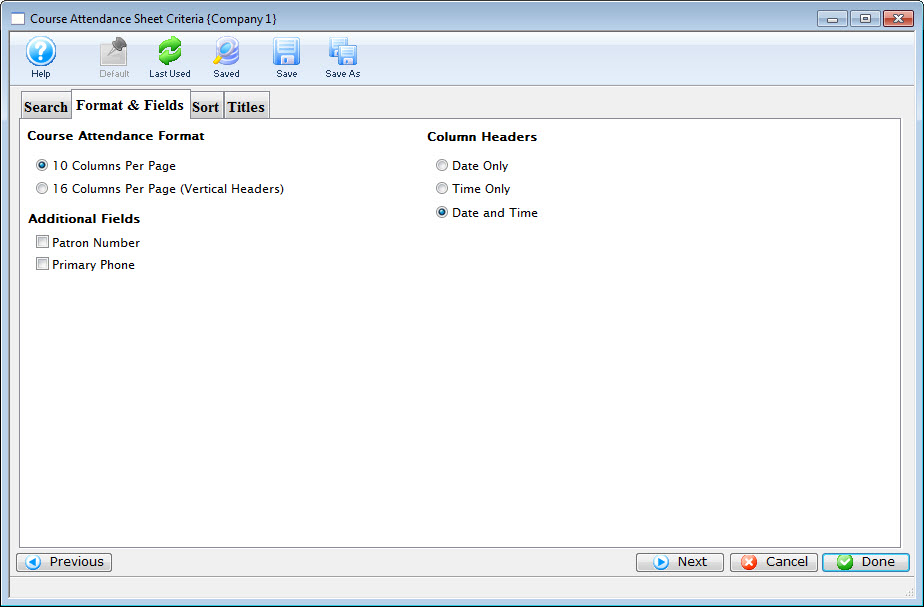
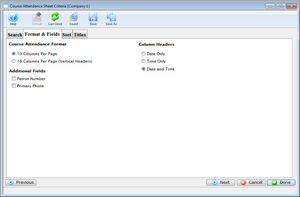
It shares the standard navigation buttons and toolbar buttons shared across most Build Options Tabs.
Course Attendance Format: 10 Columns Per Page
If this button is checked, the Course Attendance is printed in 10 columns across the page.
Course Attendance Format: 16 Columns Per Page (Vertical Headers)
If this button is checked, the Course Attendance is printed in 16 columns across the page.
Additional Fields: Patron Number
If this box is checked, the patron number is included on the report.
Primary Phone
If this box is checked, the patron phone number is included on the report.
Column Headers
Currently there are three selections:
- Date Only
- Time Only
- Date and Time
Report Insert Summary Tab Top
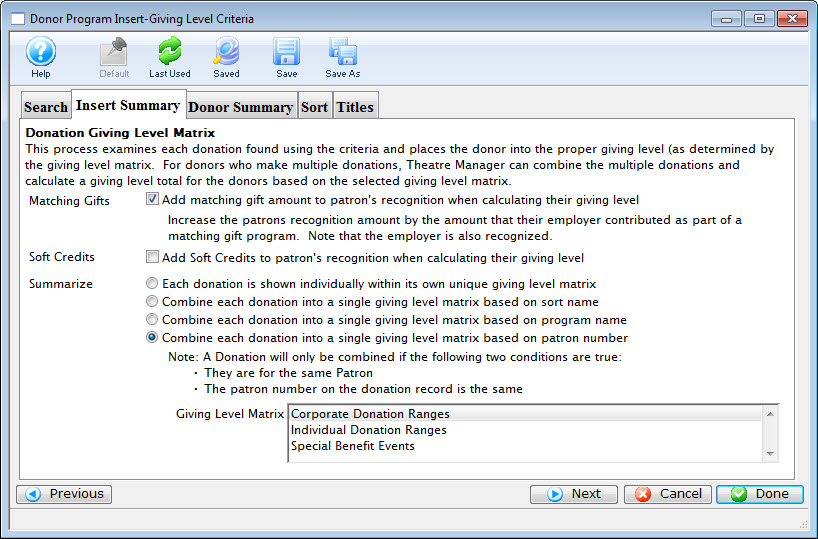
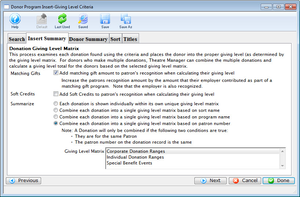
It shares the standard navigation buttons and toolbar buttons shared across most Build Options Tabs.
Matching Gifts: Add matching gift amount to patron's recognition when calculating their giving level
If the patron is part of a matching gift program, then the matching gift will be included in the totals when this box is checked.
Soft Credits: Add soft credits to patron's recognition when calculating their giving level
If the patrons has soft credits in the donor history, these will be added to the totals then this box is checked.
Summarize: Each donation is shown individually within its own unique giving level matrix
Sets all donations that are in separate giving level matrices to be listed individually when selected.
Summarize: Combine each donation into a single giving level matrix based on sort name
If a patron has donations in multiple giving level matrices, then all donations that have the same sort name attached will be combined into a single matrix of the user's choice. This will remove double-entered patrons if the donations contain the same sort name.
Summarize: Combine each donation into a single giving level matrix based on program name
If a patron has donations in multiple giving level matrices, then all donations that have the same program name attached will be combined into a single matrix of the user's choice. This will remove double-entered patrons if the donations contain the same program name.
Summarize: Combine each donation into a single giving level matrix based on patron name
If a patron has donations in multiple giving level matrices, then all donations that have the same patron name attached will be combined into a single matrix of the user's choice. This will remove double-entered patrons if the donations contain the same patron name.
Summarize: Combine each donation into a single giving level matrix based on patron number
If a patron has donations in multiple giving level matrices, then all donations that have the same patron number attached will be combined into a single matrix of the user's choice. This will remove double-entered patrons if the donations contain the same patron number.
Summarize: Combine each donation into a single giving level matrix based on household number
If many people in a household have given donations, then all donations that have the same household number will be combined into a single matrix of the user's choice. This will aggregate donations for the same household.The name that is chosen when combining by household will follow these rules:
- The primary household patron, if any one donation is listed under their name
- The highest value combined donor patron (if the primary didn't give, but many in the family did)
- The name of the patron that gave if there is only one
Giving Level Matrix
You will see your own giving level matrices so you can combine the selected donations to reclassify them as you wish. There are three selections in the example image above which are representative of what venues may have typically set up: Corporate Donation Ranges, Individual Donation Ranges, and Special Benefit Events.
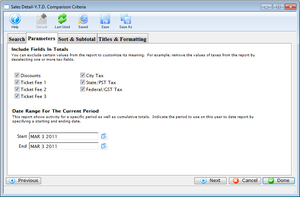
Report Parameters Tab Top
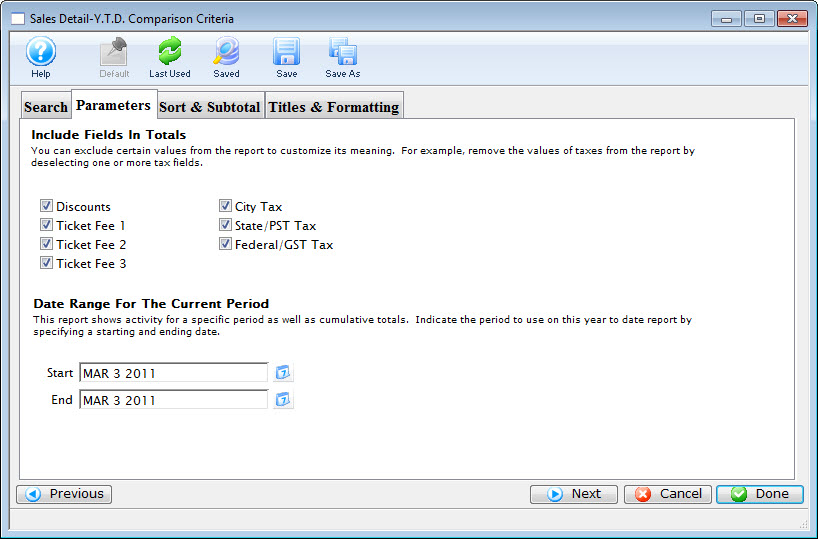
It shares the standard navigation buttons and toolbar buttons shared across most Build Options Tabs.
Discounts
When checked, this includes any discounts that were received with the sale.
Ticket Fee 1
When checked, all monies that were associated with Ticket Fee 1 are included.
Ticket Fee 2
When checked, all monies that were associated with Ticket Fee 2 are included.
Ticket Fee 3
When checked, all monies that were associated with Ticket Fee 3 are included.
City Tax
When checked, all monies that were credited to City Tax are included.
State/PST Tax
When checked, all monies that were credited to State/Prov Tax are included.
Federal/GST Tax
When checked, all monies that were credited to Federal Tax are included.
Start Date
Set the date that the report should start on.
End Date
Set the date that the report should end on.
If the bottom half of the screen should display price code options (only available for some reports) instead of date range options, refer to the help page on Price Code Options Tab for a description of their meaning.
Report Performance Type Tab Top


It shares the standard navigation buttons and toolbar buttons shared across most Build Options Tabs.
Available Perf Type Fields
Theatre Manager has a field called Performance Type that can be customized by each organization. you can use to flag specific performances. It can also be used for reports to narrow down searching for specific performances.
Moves the selected Field from available to selected.
Moves the selected Field from selected to available.
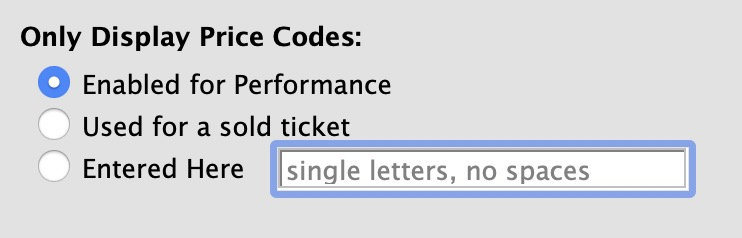
Report Price Code Options Tab Top
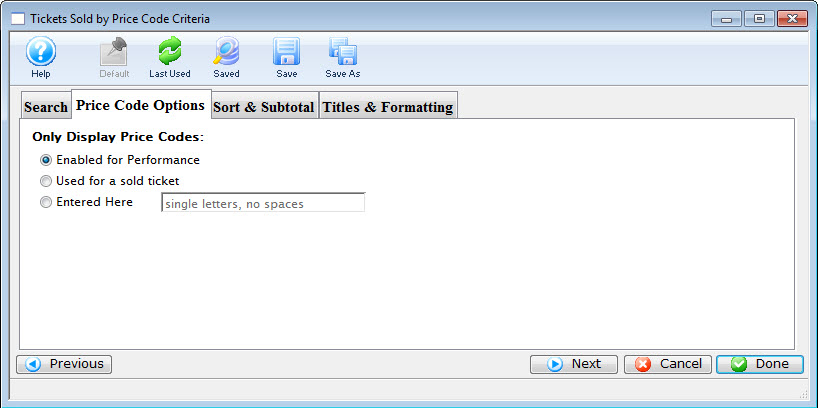
It shares the standard navigation buttons and toolbar buttons shared across most Build Options Tabs.
Enabled for Performance
When selected, only the price codes that are currently enabled for the performance will appear in the report. For example if the pricing map has 4 pricing zones (1, 2, A and B) and only price zones 1 and A are currently enabled for sale in the performance, then only price zones 1 and A will appear on the report. To note, if you have sold tickets in price zone B and then disabled it, those tickets will not be shown on the report, but will appear in totals. You might want to use specific price zones to show only subscription tickets.
Actually Used to Sell Tickets
When selected, only the price codes with tickets sold to them for the performance are in the report. For example, if the pricing map has 4 pricing zones (1, 2, A and B) and tickets have been sold using only Price Code B, then only price zone B will appear on the report. To note, this leaves unused price codes off the report to condense it to show only those currently used on tickets.
Entered Here
When selected, a text field becomes active, allowing the user to specify price codes to be included on the report. For example, if the pricing map has 4 pricing zones (1, 2, A and B) and you type B, C and D (C an D do not exist, only B does), then price codes B (which may have tickets) and C and D (which won't have tickets) will appear on the report. Price codes C & D will have zeros for totals. To note, this option might be useful if you want specific price codes across venues and you did not use consistent price zones in each of the venues. Maybe in venue 1, price zones A and B are used for single tickets and in venue 2, price codes C and D were used by a predecessor for single tickets. This way, a report for two events, in different venues, would only show relevant price codes.
Report Promotion Worksheet Tab Top
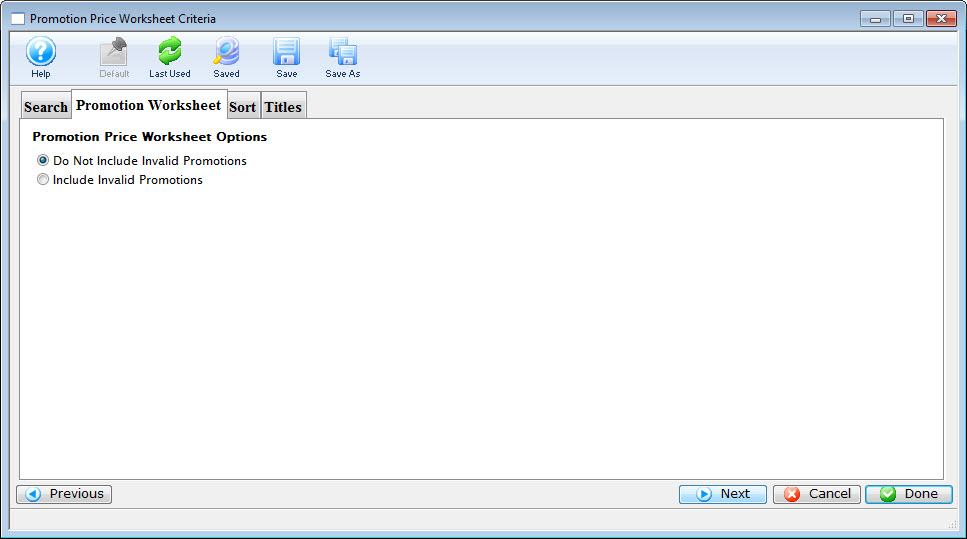
It shares the standard navigation buttons and toolbar buttons shared across most Build Options Tabs.
Do Not Include Invalid Promotions
When selected, Theatre Manager will only calculate the promotions relative to the performance.
Include Invalid Promotions
When selected, Theatre Manager will calculate all promotions in the system.
Report Set Day As Today Tab Top
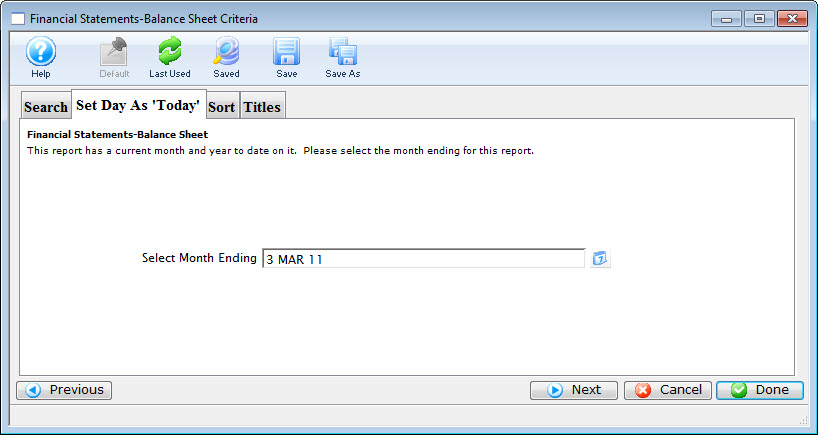
It shares the standard navigation buttons and toolbar buttons shared across most Build Options Tabs.
Select Month Ending
Set the date that Theatre Manager should use to run the report. Any data past this date will not be included.
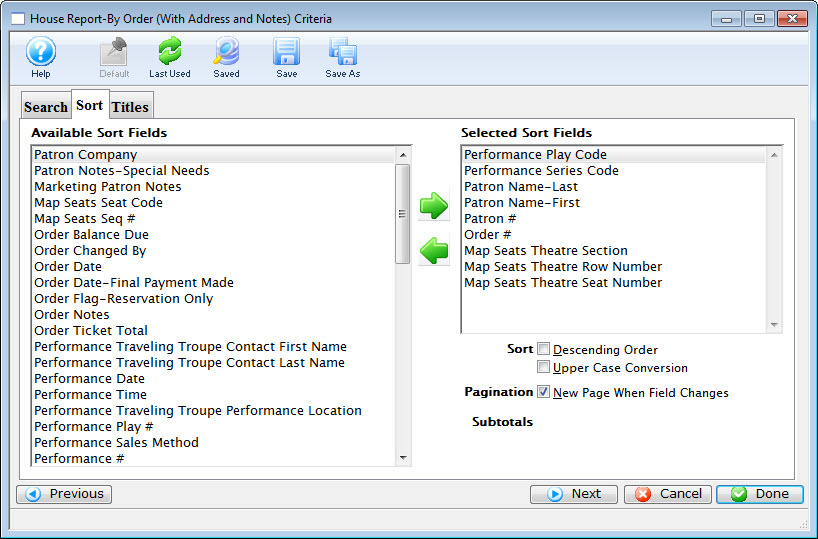
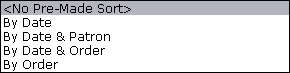
Report Sort Tab Top
It shares the standard navigation buttons and toolbar buttons shared across most Build Options Tabs.
Available Sort Fields
A list of fields available to sort by.
Moves the selected Field from available to selected.
Moves the selected Field from selected to available.
Selected Sort Fields
The fields currently used for sorting. Default sort fields may appear here. There is a limit of nine sort fields.
Sort in Descending Order
When checked, the currently selected sort field will sort in descending order.
Upper Case Conversion
When checked, the currently selected sort field will be converted to upper case letters.
New Page When Field Changes
When checked, the currently selected sort field will start on a new page when the field change
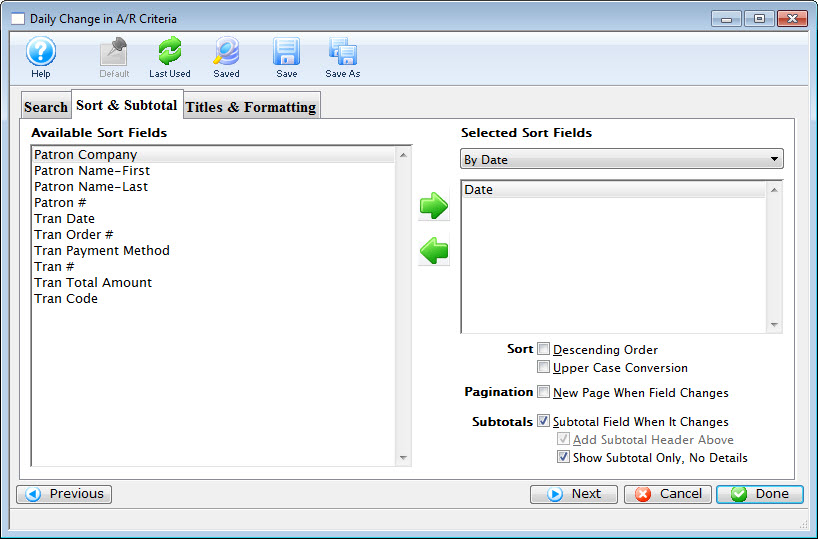
Report Sort & Subtotal Tab Top
It shares the standard navigation buttons and toolbar buttons shared across most Build Options Tabs.
Available Sort Fields
A list of fields available to sort by.
Moves the selected Field from available to selected.
Moves the selected Field from selected to available.
Selected Sort Fields
The fields currently used for sorting. Default sort fields may appear here. There is a limit of nine sort fields.
This drop down menu shows the various subtotal options that are available for this report.
Sort in Descending Order
When checked, the currently selected sort field will sort in descending order.
Upper Case Conversion
When checked, the currently selected sort field will be converted to upper case letters.
New Page When Field Changes
When checked, the currently selected sort field will start on a new page when the field changes.
Subtotals When Field Changes
When checked, subtotals will be listed whenever the field changes.
Add Subtotal Header Above
When checked, the subtotals will be listed in the header.
Show Subtotal Only, No Details
When checked, only the subtotals are displayed.
Report Subtotal Options Tab Top
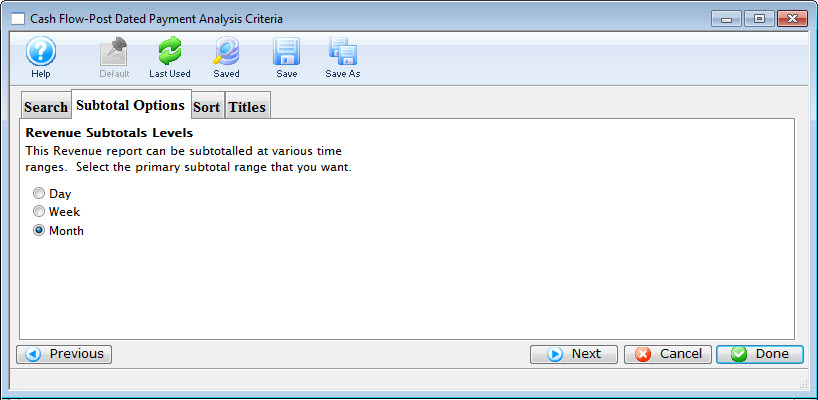
It shares the standard navigation buttons and toolbar buttons shared across most Build Options Tabs.
Day
Subtotals the report by day.
Week
Subtotals the report by week.
Month
Subtotals the report by month. This is the default setting.
Report Time Parameters Tab Top
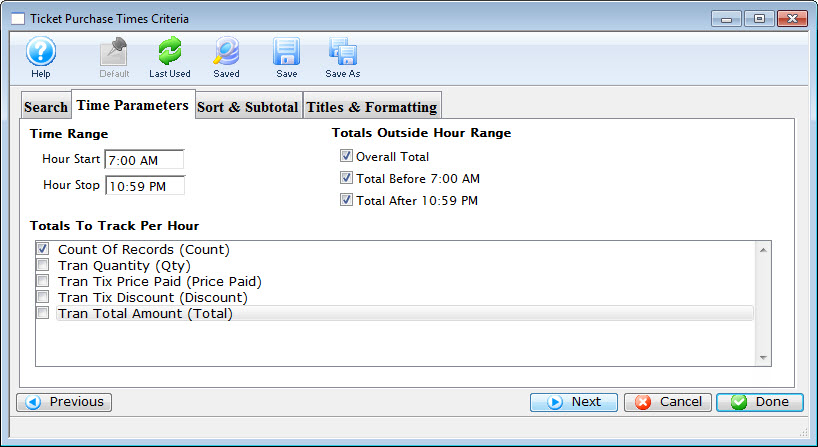

It shares the standard navigation buttons and toolbar buttons shared across most Build Options Tabs.
Time Range: Hour Start
Enter the hour to start the report.
Time Range: Hour Stop
Enter the hour to stop the report.
Totals Outside Hour Range: Overall Total
If enabled, the report will total all the tickets purchased outside of the time range specified.
Totals Outside Hour Range: Total Before 7:00 AM
If enabled, the report will total all the tickets purchased prior to the start of the time range.
Totals Outside Hour Range: Total After 10:59 PM
If enabled, the report will total all the tickets purchased after the end of the time range.
Totals to Track Per Hour: Count of Records
If enabled, the report displays a count of the records processed.
Totals to Track Per Hour: Tran Quantity (Qty)
If enabled, the report displays the quantity of the records processed.
Totals to Track Per Hour: Tran Tix Price Paid (Price Paid)
If enabled, the report displays the transaction ticket prices paid.
Totals to Track Per Hour: Tran Tix Discount (Discount)
If enabled, the report displays the discounted transaction ticket prices paid.
Totals to Track Per Hour: Tran Total Amount (Total)
If enabled, the report displays the the total of all the transactions.
Report Time Period Tab Top
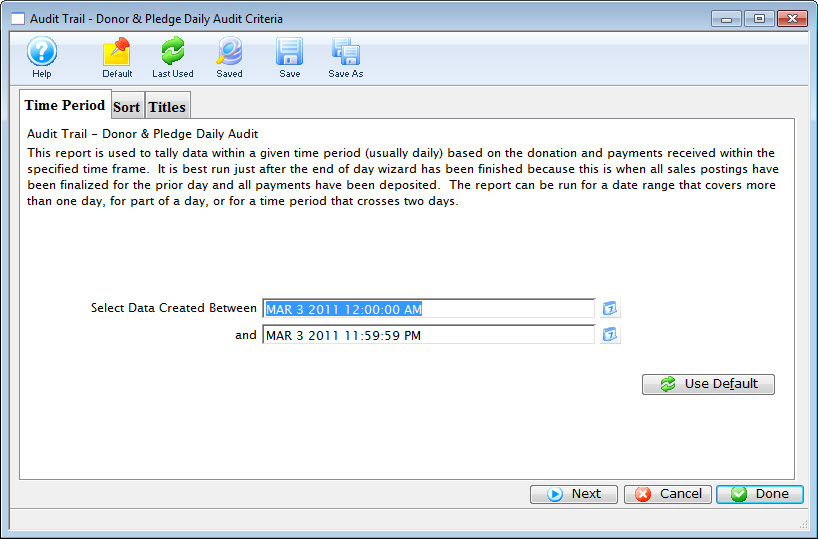

It shares the standard navigation buttons and toolbar buttons shared across most Build Options Tabs.
Select Data Created Between
Set the date and time range of the data to be used.

Opens a mini-calendar for easier date selection.
Report Titles Tab Top


It shares the standard navigation buttons and toolbar buttons shared across most Build Options Tabs.
Title: Use default report title
If checked, the default title of the report will print at the top of every page. If unchecked, you can specify a custom title for the report in the field that follows (e.g. Monthly marketing mtg totals).
Description: Display employee full name
If checked, display the employee's full name under the report title. This is useful if printing to a common printer. If unchecked, you can add in a bit of a description of what the report means instead (e.g. Sales stats exclude comps).
File Name: Use default file name
If checked, and you chose to export or mail the report as part of the process, the system will automatically pick a file name (based on the name of the report) and append a timestamp to the file name. If unchecked, you can enter your own file name to be used when this report is exported (e.g. monthly sales statistics). You can also specify if you want a timestamp to be appended to the file name.
Report Titles & Formatting Tab Top
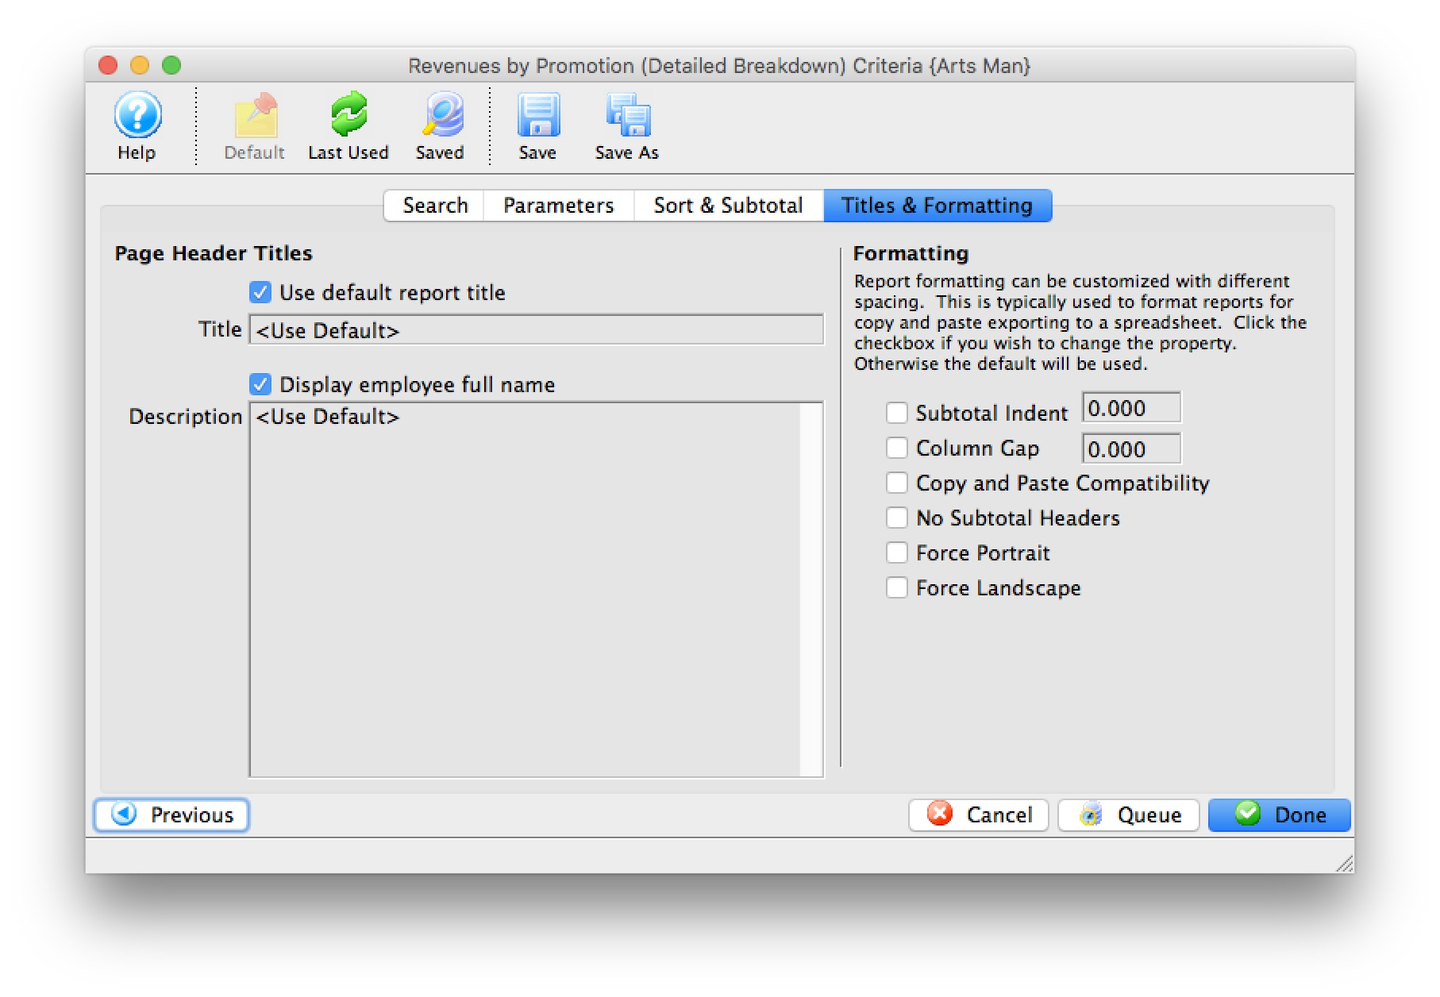

It shares the standard navigation buttons and toolbar buttons shared across most Build Options Tabs.
Page Header Titles: Use default report title
If enabled, the default report tile will print. If disabled, you can specify a specific title for the report.
Page Header Titles: Title
Enter the title you want the report to have.
Page Header Titles: Display employee full name
The name of the employee logged into Theatre Manager will print on the report.
Page Header Titles: Description
You can enter a description of the report and/or the criteria you have selected.
Formatting: Subtotal Indent
When checked, the indent of the subtotal will be adjusted. Adjust the indent by changing the number in the text field.
Formatting: Column Gap
When checked, the gap between columns will be adjusted. Adjust the actual gap by changing the number in the text field.
Formatting: Copy and Paste Compatibility
When checked, additional adjustments to the spacing will be done to allow for easier copying and pasting of the report into another document.
Formatting: No Subtotal Headers
When checked, the page headers will be adjusted to only fit on one line.
Formatting: Force Portrait
When checked, the report will print in portrait format.
Formatting: Force Landscape
When checked, the report will print in landscape format.