Before trying your first query, please review the introduction to the REST API and read through the sample queries
All REST API queries begin with the address https://tickets.yourvenue.org/api/v1/ with your domain instead of yourvenue.org. You append specific parameters to the URL address to specify:
- what endpoint you want to pull information from
- what database fields and values you want to search
- which columns you want to view in the results
- what order and aggregation you want to view the results
- specific output formats
Specify Data Tables Top
Set a Single Endpoint Top
All REST API queries begin with an endpoint. This is done simply by entering / followed by the name of the endpoint in the format https://tickets.yourvenue.org/api/v1/endpoint (e.g. https://tickets.yourvenue.org/api/v1/patrons or https://tickets.yourvenue.org/api/v1/carts).
Show Relationships to Other Tables Top
The endpoints of the REST API specify a particular table from the database that you want to access. Some of those tables are related to other information (e.g. tickets are connected to the patrons that bought them, the event that it is for, and the performance time that the patron purchased). You can add these additional table connections by appending /related after your endpoint specification. For example:
https://tickets.yourvenue.org/api/v1/patrons/relatedshows relationships to any patron record.https://tickets.yourvenue.org/api/v1/patrons/51/relatedshows relationships for a specific patron record (#51) which can be followed to see data for that patronhttps://tickets.yourvenue.org/api/v1/marketing/relatedadds relationships for a particular marketing record for the patron so that you can retrieve things like the primary email address, phone, or physical address.
Add Relationships to Other Tables in a Query Top
Once you know which endpoints are related to each other, you can start to include that data onto the URL query simply by adding multiple search parameters. In a one-to-many relationship, you need to select the child or collection record as your initial endpoint. Here are some examples:
https://tickets.yourvenue.org/api/v1/performances?q=perform_datetime:2016-01-01..2016-12-31&include=event- In addition to data from the performance endpoint, there is now data from the event endpoint on the end of each row of data.
https://tickets.yourvenue.org/api/v1/performances?q=perform_datetime:>2016-01-01&only=event.title+event.show_code+series_code+perform_datetime+venue.name+venue.address_line_one+venue.city- Shows event title, show code, series code and performance date time for performances after 2016-01-01 and adds the name, address and city of the venue from that relationship.
https://tickets.yourvenue.org/api/v1/marketing?only=patron.first_name+patron.last_name+patron.company+primary_email.contents+primary_address.address_line_one+primary_address.city- Shows patron names and the primary address and email.
Search for a Specific Value Top

To retrieve a specific value using the output format you've selected (the default is html), follow these steps:
- Specify the endpoint you need to pull from (e.g.
https://tickets.yourvenue.org/api/v1/patrons/orhttps://tickets.yourvenue.org/api/v1/events/). - Add the record's unique ID after the data table specification (e.g.
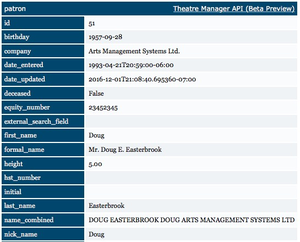
https://tickets.yourvenue.org/api/v1/patrons/51to show data for patron 51 orhttps://tickets.yourvenue.org/api/v1/events/85to show data for event 85)
Search with Multiple Parameters Top
There are a lot of query search options. to get a full list, please check the reference file for query parameters by variable type.
Using multiple parameters (in the form field:value) can provide restrictions to limit the rows of data that are returned. Follow these basic steps:
- Specify your endpoint, followed with a
?(e.g.https://tickets.yourvenue.org/api/v1/patrons?orhttps://tickets.yourvenue.org/api/v1/carts?). - Add
q=to begin your query (e.g.https://tickets.yourvenue.org/api/v1/patrons?q=orhttps://tickets.yourvenue.org/api/v1/carts?q=) - Enter the first search field name followed by a
:(e.g.https://tickets.yourvenue.org/api/v1/patrons?q=first_name:orhttps://tickets.yourvenue.org/api/v1/carts?q=status_id:)- This constitutes the first part of a condition.
- To negate the search (e.g. all patrons whose last name ISN'T
smithversus all patrons whose last name ISsmith), enter a-in front of the field name (e.g.https://tickets.yourvenue.org/api/v1/patrons?q=-first_name:orhttps://tickets.yourvenue.org/api/v1/carts?q=-status_id:)
- Enter the value(s) to limit the first field search to (e.g.
https://tickets.yourvenue.org/api/v1/patrons?q=first_name:johnorhttps://tickets.yourvenue.org/api/v1/carts?q=status_id:4)- This constitutes the second part of a condition.
- Enter a
+to begin a second parameter (e.g.https://tickets.yourvenue.org/api/v1/patrons?q=first_name:john+orhttps://tickets.yourvenue.org/api/v1/carts?q=status_id:4+) - Enter the next search field name followed by a
:(e.g.https://tickets.yourvenue.org/api/v1/patrons?q=first_name:john+last_name:orhttps://tickets.yourvenue.org/api/v1/carts?q=status_id:4+patron_id:) - Enter the value(s) to limit this next search field by (e.g.
https://tickets.yourvenue.org/api/v1/patrons?q=first_name:john+last_name:smithorhttps://tickets.yourvenue.org/api/v1/carts?q=status_id:4+patron_id:51) - Repeat steps 6 and 7 until your entire search set has been entered.
- (optional) specify which columns to return using a
&to separate the query parameters from the column limitations. - (optional) specify sort and aggregation using a
&to separate the query parameters and/or column limitations from the sort/aggregation choices. - (optional) specify any custom output formats.
Select Columns Top
You can limit the results of a query to specific columns by adding only= to the parameter line. Each column you want to see in your output is separated with a +. For example:
https://tickets.yourvenue.org/api/v1/patrons?only=first_name+last_name+company- shows only first name, last name and company from the patron table/endpoint
https://tickets.yourvenue.org/api/v1/events?only=id+year+title+total_sold+sales_notes- shows only id, year, title, total_sold (to all performances) and sales notes from the event table/endpoint.
To combine column limitations with query parameters and/or sort/aggregation choices, use a & value.
Specify Sort & Aggregation Top
Sort Top
The output from the REST API can be sorted by any field in ascending or descending order, whether you display it or not, by adding a sort= parameter to the query. Add multiple sort fields with an '+' as separator. To sort in descending order, preface the field name with a -. Here are some examples:
https://tickets.yourvenue.org/api/v1/patrons?sort=company- sorts patron data by company (ascending)
https://tickets.yourvenue.org/api/v1/patrons?sort=-company- sorts patron data by company (descending)
https://tickets.yourvenue.org/api/v1/patrons?sort=last_name+first_name- sorts patron data by last name (ascending), then by first name (ascending)
https://tickets.yourvenue.org/api/v1/patrons?sort=last_name+-first_name- sorts patron data by last name (ascending), then first name (descending)
https://tickets.yourvenue.org/api/v1/events?sort=year+title+-first_performance_date- sorts event data by year (ascending), title (ascending) and then first performance date (descending)
To combine sort choices with column limitations and/or query parameters and/or aggregation choices, use a & value.
Paginate Top
Please review all of the pagination parameter options available.
If you would like to see some only some data from an endpoint, you can use the page=XX parameter to specify which page of data to pull (e.g. page=1 is a good way to see a sample of data). The contents of each page are affected by the sort, aggregation, and other query parameters that you provide. When you display a page, you will have next and previous on the html page so that you can navigate easily. Here are some examples:
https://tickets.yourvenue.org/api/v1/patrons?page=1- returns page 1 of the patron table, rows 1 to 25
https://tickets.yourvenue.org/api/v1/events?page=2- returns page 2 of the event listing, which is rows 26 to 50 of the data
https://tickets.yourvenue.org/api/v1/events?page=2&page_size=10- returns page 3 of the event data, paginated at 10 rows per page (effectively this is records 21 to 30)
https://tickets.yourvenue.org/api/v1/patrons/pages?include_first&include_last&sort=last_name+first_name&only=page+page_rows+row+page_url+first_name+last_name- sorts the patron table by last name/first name and then, in a summary table, show the first and last person in each page group.
To combine pagination choices with column limitations and/or query parameters and/or sort/aggregation choices, use a & value.
Group Top
You can summarize the results of a REST API query using the group= parameter (usually also in conjunction with an aggregation parameter). This allows you to summarize by text, number, boolean and date fields. Separate multiple groupings with +. You can also provide a function to summarize by parts of a date field. Here are some examples:
group=last_name- groups patrons for summary by last name
group=company+last_name- groups patrons for summarization by company and last name
group=date_bought- groups the tickets by the date they were bought
group=round(date_bought,1,month):purchase_date- groups the tickets by date bought, but rounded to monthly increments (any intervals are available, such as 10 minutes)
To combine grouping choices with column limitations and/or query parameters and/or aggregation choices, use a & value.
Aggregate Top
You can summarize the results of a REST API query using the agg= parameter (usually also in conjunction with an grouping parameter). Separate multiple aggregations with +. Here are some examples:
agg=count+sum(total_cost)+avg(total_cost)- For each group, aggregates the count of tickets, the total cost of tickets, and the average cost of each ticket
https://tickets.yourvenue.org/api/v1/tickets?q=-date_bought:null&group=round(date_bought,1,month):purchase_date&agg=count+sum(total_cost)+avg(total_cost)- retrieves all sold tickets (date bought is not empty) and aggregates the count, total cost, and average cost into groupings of date_bought, rounded by month
To combine grouping choices with column limitations and/or query parameters and/or sort/aggregation choices, use a & value.
Custom Output Top
Column Alias Top
If you wish, you can rename the columns from the Theatre Manager standard names by adding an alias. This is done by adding a : and your alias name after specifying the column in the URL query (e.g. patron.id:patnum renames patron.id to patnum). You can use this feature if you want a different name when transporting the data to another service. Here are some examples:
https://tickets.yourvenue.org/api/v1/contact_links?only=patron.id:patnum+patron.first_name:fname+patron.last_name:lname+patron.date_updated:updated+contact.contents:email- Renames:
patron.idto patnumpatron.first_nameto fnamepatron.last_nameto lnamepatron.date_updatedto updatedcontact.contentsto email
- Renames:
https://tickets.yourvenue.org/api/v1/contact_links?only=patron.id:patnum+patron.first_name:fname+patron.last_name:lname+patron.date_updated:updated+contact.contents:email+contact.type_id:type&q=contact.type_id:2- Sets the alias for the
contact.type_idto type (and searches for only email addresses usingq=contact.type_id:2, where type_id = 2 means emails)
- Sets the alias for the
Output Format Top
The default result format is html, however it is very easy to use one of the other output formats. At the end of a URL query, enter . followed by the format extension name (e.g. .json or .xml). Here are some examples:
https://tickets.yourvenue.org/api/v1/carts/pages.json?page=3https://tickets.yourvenue.org/api/v1/tickets.xls- This will download a spreadsheet to your computer
https://tickets.yourvenue.org/api/v1/carts/pages.xml
Access Images Top
There is no specific API call to access images at this time where you can pull them down to a program. However, you can access the images on the web site for events or venues. They are done in a hierarchy, so that if you ask for the event image and it is not available, you'll get the venue image. If that is not available, you'll get the outlet image.
- Images for an event have
?event=xxas a parameter ALA https://tickets.artsman.com/TheatreManager/1/image?event=60 - Images for a venue have
?venue=xxas a parameter ALA https://tickets.artsman.com/TheatreManager/1/image?venue=48
With this method you can show images that are in Theatre Manager on other web pages just by referring to them with the Theatre Manager URL. If you are going to use those images in a front-end marketing web site, then we also suggest creating an image cache that is refreshed periodically to help lower the actual traffic to the commerce part of the web site.