Set Up Online Subscription to a Mail List Top
In order to subscribe to a Mail List online, a patron must be logged in to their online account OR you must have enabled the limited profile patron feature for web sales and Mail List addition.
Patrons can subscribe to or unsubscribe themselves from mail lists that you choose to make visible online as part of the web sales module. To allow patrons to subscribe or unsubscribe from a Mail List via the internet, you perform the following steps:

Find the Mail List you want to allow patrons to subscribe to or unsubscribe from. The example shows wording you might use for setting up ticket sales by lottery. This can be used for many purposes requiring patron consent like:
- Tell me about auditions
- Keep me informed about musicals
- Special events interest me
- Tell me about last minute deals
- Etc.
Step 2
Click the Allow patron to subscribe/unsubscribe via internet flag. A check mark will appear in the box. Patrons logged into the database through the web sales module can now subscribe/unsubscribe to this mail list.
Step 3
Optionally, click the flag for double opt in email. If double opt in is set, the patron will get an email asking them to confirm they opted in. This feature:
- Tracks explicit consent per CASL anti spam laws
- Can be used to verify accuracy of email addresses submitted online since the patron must confirm them. It might be wise to do this for some mail lists to confirm that the patrons are real.
Read more about setting up a double opt-in mail list.
Step 4
Repeat for each Mail List needing access via the internet.
Set Up Double Opt-In in a Mail List Top
A double opt in Mail List has two key settings on the Mail List setup window:
- The Mail List must be marked that the patron can subscribe to it via the internet (e.g. they can add or remove themselves from the list membership)
- It has the double opt in flag checked.
If both these settings are made, then any patron gets added to the Mail List will be sent an email requesting confirmation that they consented to be on the list. If the patron:
- Confirms the addition by clicking on a link, then they will be confirmed on the Mail List with a double opt in status. This also confirms the email address and records when the patron gave consent.
- Does not confirm the addition to the mail list, then they will be removed from the list in approximately 24 hours.
To set up a double opt-in list:
{% reference(text=Step 1") %} Open the Mail List you want to use for the subscribe online with double opt-in. For more information on accessing the Mail List window [click here]/reference/data/mail-lists/ml-search-window). {% end %}
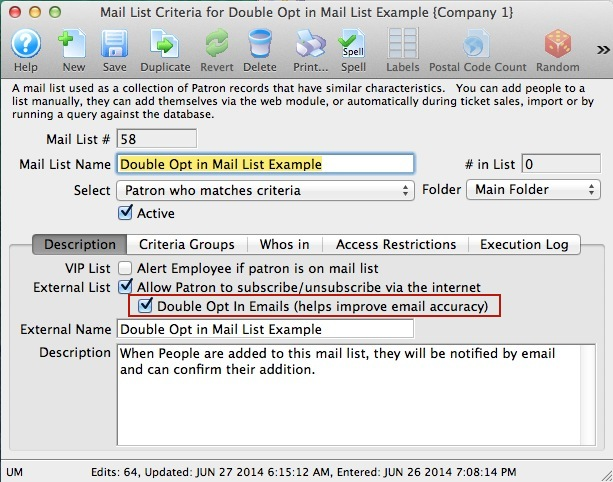
Click on the Description Tab. A best practice is to make sure that the Double Opt-In option IS NOT CHECKED when building the list for the first time. If it is, then any patron added to the Mail List in any manner will receive an email instantly.
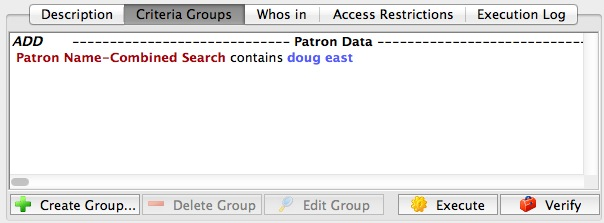
Add patrons to the Mail List in any manner you wish. You can use any of the standard ways to get people added to the Mail List such as:
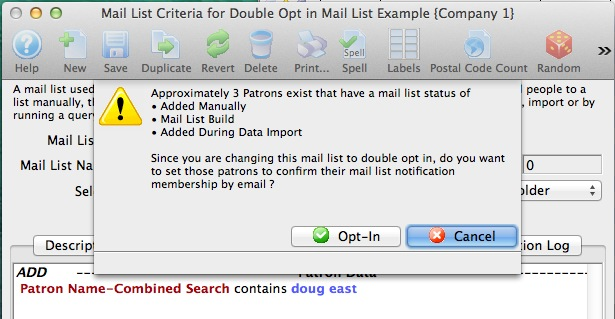
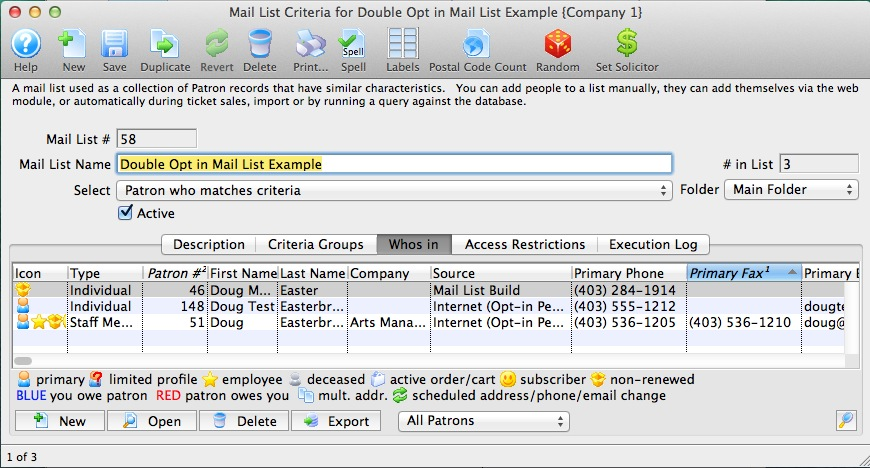
On the Description Tab, click the double-opt in option. Theatre Manager will tell you that there are people in the Mail List that have not received a notification per this image. It will only consider those that have the Mail List source status codes of:
- Added Manually (meaning you dragged and dropped them into the list)
- Added via a Mail List build (meaning criteria was executed to find people)
- Added during some sort of data import exercise
The other status codes are ignored. That is because they are considered implied consent to email (e.g. added because they bought a show online).
Click the opt-in button if you want to start generating an email for the patrons in the list with the 3 status codes above. If you click cancel, then you can still do it again by un-clicking the double opt in' button and saving, then clicking the double opt in button again to repeat the process.
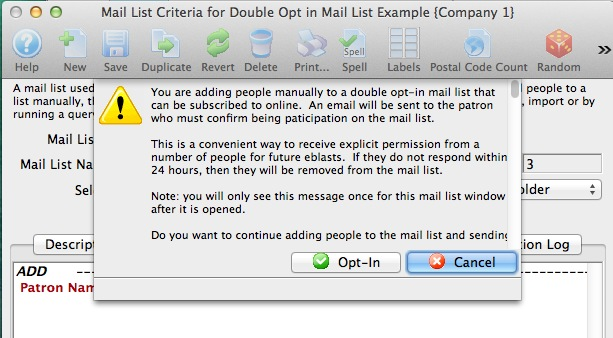
Confirm you want to email people using the double-opt in option. You are given a second chance to confirm you want emails to go to patrons having the Mail List status codes above. This question is asked ONCE after opening the Mail List detail window as a WARNING. After that, the message no longer displayed to you. After getting this once, you can continue to drag and drop other people only the list quickly and emails will be sent without a message.
On the Whos's In Tab, view the status of patrons. If the patron has an email address, the status of the patron will be Internet (opt -in). That means an email has been sent to the patron and they have not responded to the email to confirm them being part of the mail list.
Patrons who do not have an email address will retain their original Mail List source. If you find an email for them, you can add it to the patron address, and then change the opt in status again to send out the remainder of the emails. People with pending opt-in status will NOT receive a second email.
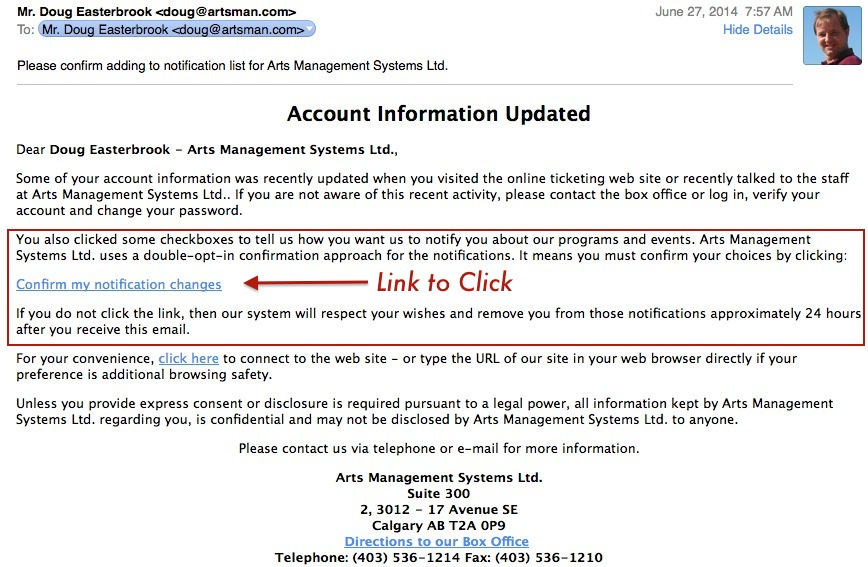
An email will be sent to the patron that looks like this and is from the tmPatronUpdateEmailBoxOfficeOptIn.html web page. It will have your background and CSS stylings. The difference is that if there are double-opt-in mail lists as part of the update, then the patron will see the new text highlighted in red. That is the link they will need to click to confirm the opt-in. When they click the link, they will be taken to your web site and see a confirmation page (tmMaillistVerifyOptin.html).
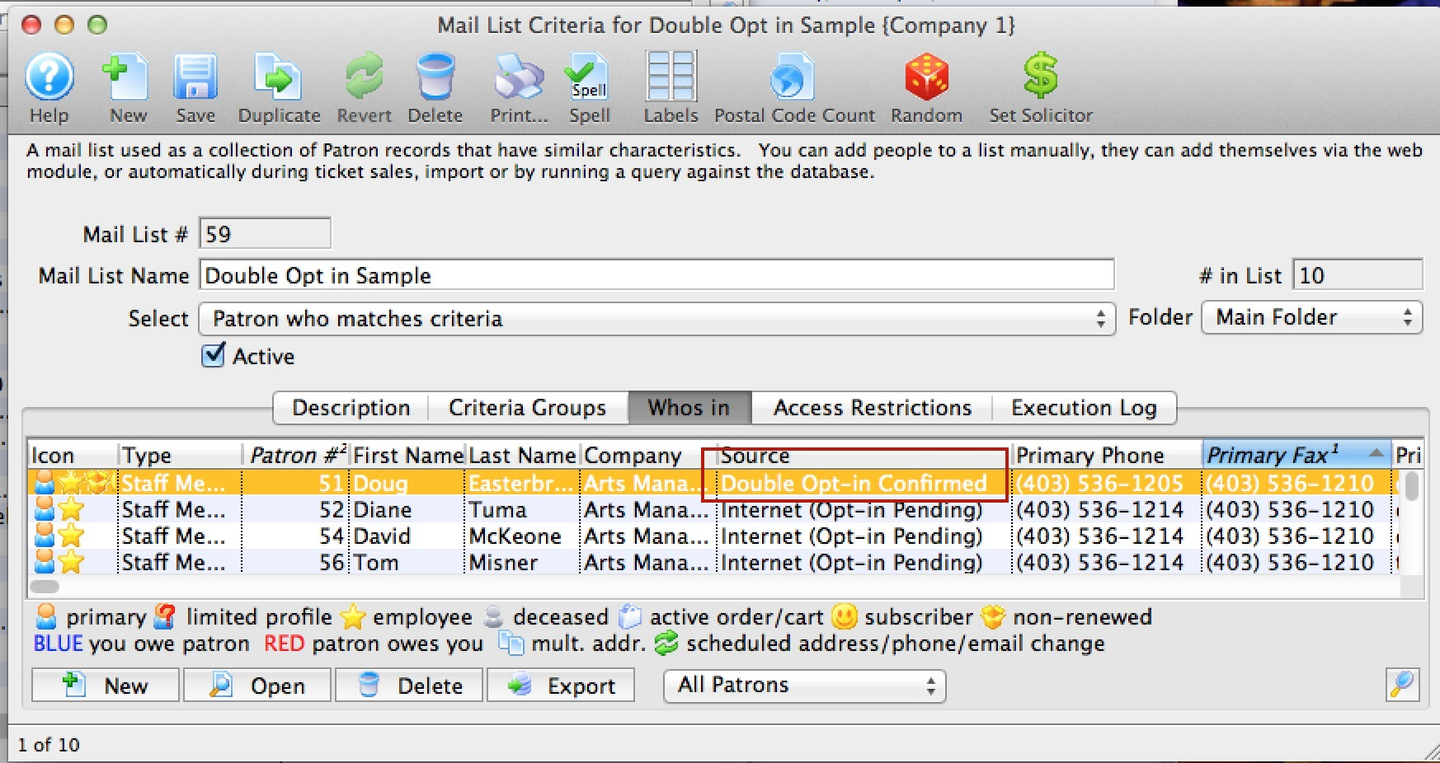
After the patron confirms participation in the Mail List through double opt-in, the status of that person's Mail List entry will change to Double Opt-in. It also records the date of the opt-in.
Use the Unsubscribe Feature in a Mail List Top
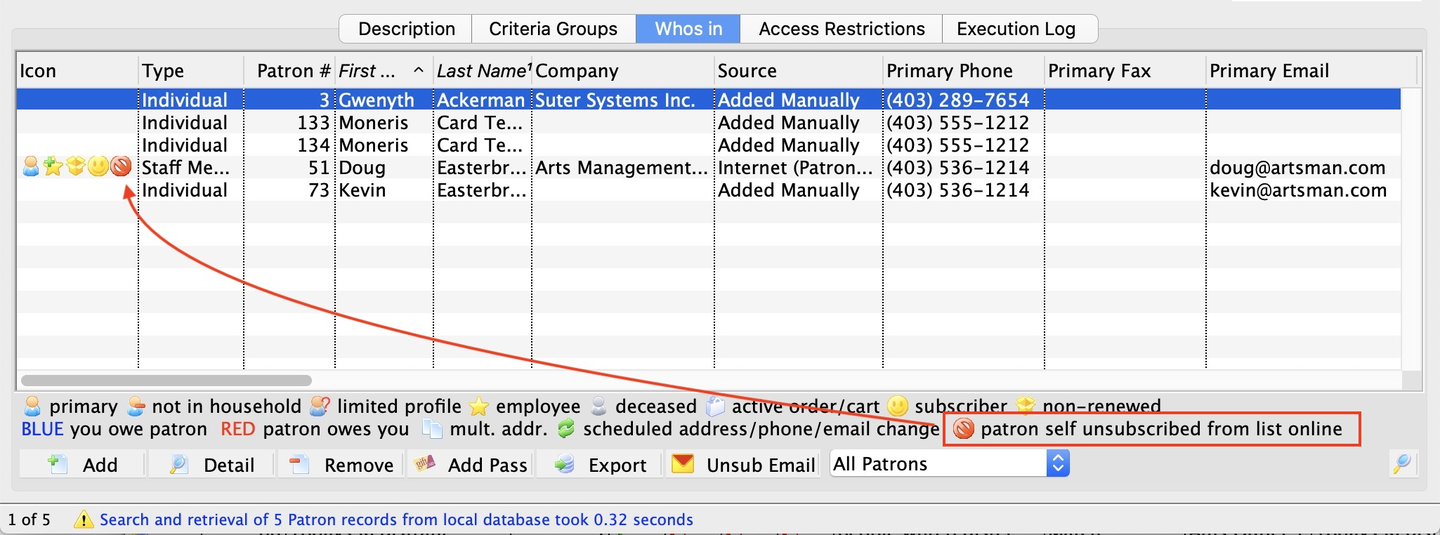
In the sample list above, one patron is marked as unsubscribed online. One of the columns in the list contains the unsubscribe date, so you know when people no longer wanted to be part of the mail list.
When building other mail lists or running reports, there are two key selection criteria that lets you select these people:
- Marketing Patron Belongs to Mail List - Subscribed To
- When used, this will find all the people in the Mail List except those patrons who unsubscribe themselves online. This makes selecting people on a public Mail List easy. You don't need to worry about who doesn't want email since they are automatically ignored.
- Marketing Patron Belongs to Mail List - Unsubscribed From
- This search criteria only picks people who have unsubscribed. Its best use might be for an eblast Mail List where people say they no longer want a specific type of eblasts.
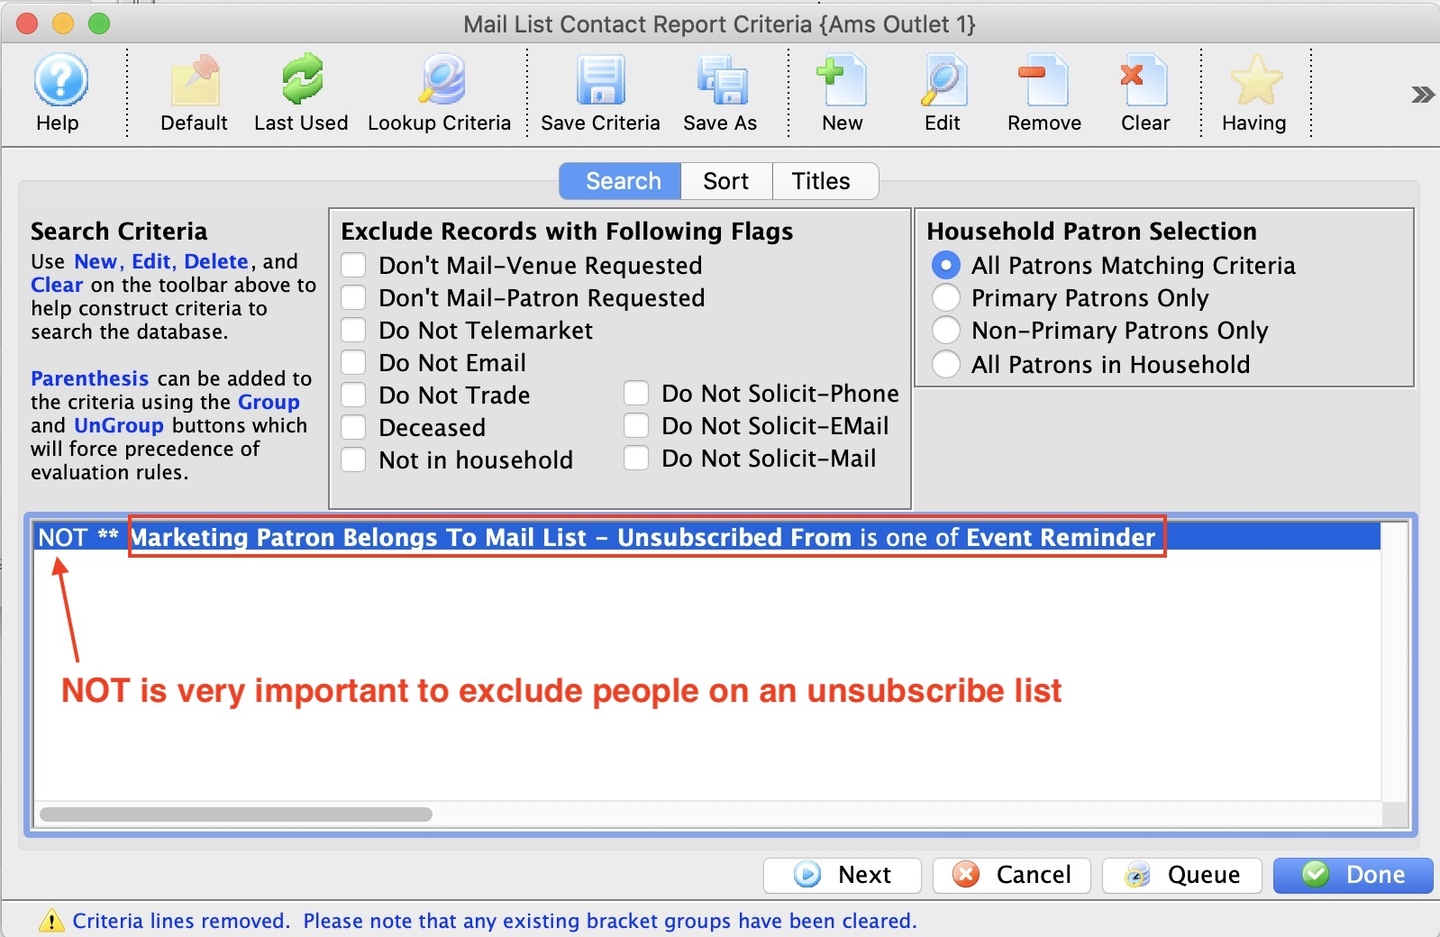
You can include patrons in your normal way and then use this list to eliminate people in the unsubscribed list using something like this.